バージョニング規約Versioning Scheme
Laravelのバージョニングは、「パラダイム.マイナー.パッチ」の規約として維持しています。マイナーフレームワークリリースは、1月と6月の半年ごとにリリースします。一方、パッチリリースは毎週のように、頻繁にリリースされます。パッチリリースは、ブレーキングチェンジを決して含めてはいけません。Laravel's versioning scheme maintains the following convention: paradigm.minor.patch. Minor framework releases are released every six months (January and July), while patch releases may be released as often as every week. Patch releases should never contain breaking changes.
アプリケーションやパッケージで、Laravelフレームワークやコンポーネントを利用する場合、常に5.4.*のようにバージョンを指定してください。なぜなら、Laravelのマイナーリリースは、ブレーキングチェンジを含んでいるからです。新しいマイナーリリースへの更新は、一日かからないように努力しています。When referencing the Laravel framework or its components from your application or package, you should always use a version constraint such as 5.4.*, since minor releases of Laravel do include breaking changes. However, we strive to always ensure you may update to a new minor release in one day or less.
パラダイムシフトリリースは数年あけられます。これはフレームワークの構造と規約に重要な変更が起きたことを表します。現在、パラダイムシストリリースは開発されていません。Paradigm shifting releases are separated by many years and represent fundamental shifts in the framework's architecture and conventions. Currently, there is no paradigm shifting release under development.
Laravelはなぜセマンティックバージョニングを使わないのかWhy Doesn't Laravel Use Semantic Versioning?
Laravelのコンポーネント(Cashier、Dusk、Valet、Socialiteなど)では、セマンティックバージョニングが使われています。しかし、Laravelフレームワーク自体には、使用していません。なぜなら、セマンティックバージョニングは、2つのコード部分がコンパチブルであるかを「還元論」的に決める方法だからです。たとえ、セマンティックバージョニングを採用していても、皆さんはアップグレードパッケージをインストールし、自動化したテストスーツを実行することにより、自分のコードベースでもコンパチブルであるかを実際に確認する必要があります。On one hand, all optional components of Laravel (Cashier, Dusk, Valet, Socialite, etc.) do use semantic versioning. However, the Laravel framework itself does not. The reason for this is because semantic versioning is a "reductionist" way of determining if two pieces of code are compatible. Even when using semantic versioning, you still must install the upgraded package and run your automated test suite to know if anything is actually incompatible with your code base.
そのため、Laravelフレームワークでは、実際のリリース期間をより良く表すバージョニング方法を採用しています。さらに、パッチリリースは決して内部のブレーキングチェンジを含まないわけですから、「パラダイム.マイナー.*」記法でバージョンを指定している限り、ブレーキングチェンジを受けることはありません。So, instead, the Laravel framework uses a versioning scheme that is more communicative of the actual scope of the release. Furthermore, since patch releases never contain intentional breaking changes, you should never receive a breaking change as long as your version constraints follow the paradigm.minor.* convention.
サポートポリシーSupport Policy
Laravel5.1のようなLTSリリースでは、バグフィックスは2年間、セキュリティフィックスは3年間提供します。これらのリリースは長期間に渡るサポートとメンテナンスを提供します。 一般的なリリースでは、バグフィックスは6ヶ月、セキュリティフィックスは1年です。For LTS releases, such as Laravel 5.1, bug fixes are provided for 2 years and security fixes are provided for 3 years. These releases provide the longest window of support and maintenance. For general releases, bug fixes are provided for 6 months and security fixes are provided for 1 year.
Laravel 5.4.22Laravel 5.4.22
Laravel 5.4.22は、一連のLaravel5.4リリースを使ったアプリケーションのユーザーに対し、フィッシングを可能にしているセキュリティ脆弱性に対応するパッチです。パスワードリセットシステムを使用し、悪意のあるユーザーがユーザーに対し、彼らのコントロールする別のアプリケーションへログイン情報を入力させる罠を仕掛けることを可能になっています。パスワードリセット通知は、受診したリクエストのホストを使い、パスワードリセットURLを組み立てており、パスワードリセットURLのホストは偽装可能です。もし、ユーザーが目的としているアプリケーションのドメインと異なることに気が付かなければ、悪意のあるアプリケーションへログイン情報を入力してしまうでしょう。Laravel 5.4.22 patches a security vulnerability in the Laravel 5.4 release series that allows phishing attempts on users of the application. Using the password reset system, malicious users can attempt to trick your users into entering their login credentials into a separate application that they control. Since the password reset notification uses the host of the incoming request to build the password reset URL, the host of the password reset URL may be spoofed. If users do not notice that they are not on their intended application's domain, they may accidentally enter their login credentials into a malicious application.
Laravel5.1アプリケーションのパスワードリセット通知は開発者によりメンテナンスされているため、この脆弱性があるかもしれませんし、ないかもしれません。アプリケーションが生成するパスワードリセットリンクの絶対URLを確認してください。In Laravel 5.1 applications, the password reset notification is maintained by the developer, so this vulnerability may or may not be present. You should verify that your application generates an absolute URL for password reset links:
{{ url('http://example.com/password/reset/'.$token) }}
Laravel 5.4Laravel 5.4
Laravel5.4は5.3に引き続き、機能の向上させています。Markdownベースのメールと通知や、ブラウザ自動操作とテストフレームワークの Laravel Dusk、Laravel Mix、Blade「コンポーネント」と「スロット」、ブロードキャストチャンネルに対するルートモデル結合、コレクションのhigher order messages、オブジェクトベースのEloquentイベント、ジョブレベルの「再試行」と「タイムアウト」の指定、「リアルタイム」ファサード、Redisクラスターサポートの向上、カスタム中間テーブルモデル、リクエスト入力のトリミングとクリーニングのためのミドルウェアなどです。更に付け加え、フレームワークのコードベース全体は、全般的な美しさのためにレビューされ、リファクタされています。Laravel 5.4 continues the improvements made in Laravel 5.3 by adding support for Markdown based emails and notifications[/docs/5.4/mail#markdown-mailables], the Laravel Dusk[/docs/5.4/dusk] browser automation and testing framework, Laravel Mix, Blade "components" and "slots", route model binding on broadcast channels, higher order messages for Collections, object-based Eloquent events, job-level "retry" and "timeout" settings, "realtime" facades, improved support for Redis Cluster, custom pivot table models, middleware for request input trimming and cleaning, and more. In addition, the entire codebase of the framework was reviewed and refactored for general cleanliness.
">Tip!! このドキュメントはフレームワークの一番目立つ向上点をまとめたドキュメントです。より全体的な変更のログは、いつでもGitHub上で参照可能です。{tip} This documentation summarizes the most notable improvements to the framework; however, more thorough change logs are always available on GitHub[https://github.com/laravel/framework/blob/5.4/CHANGELOG-5.4.md].
Markdownメールと通知Markdown Mail & Notifications
Laracastsにこの機能についての、無料ビデオチュートリアルが用意されています。{video} There is a free video tutorial[https://laracasts.com/series/whats-new-in-laravel-5-4/episodes/7] for this feature available on Laracasts.
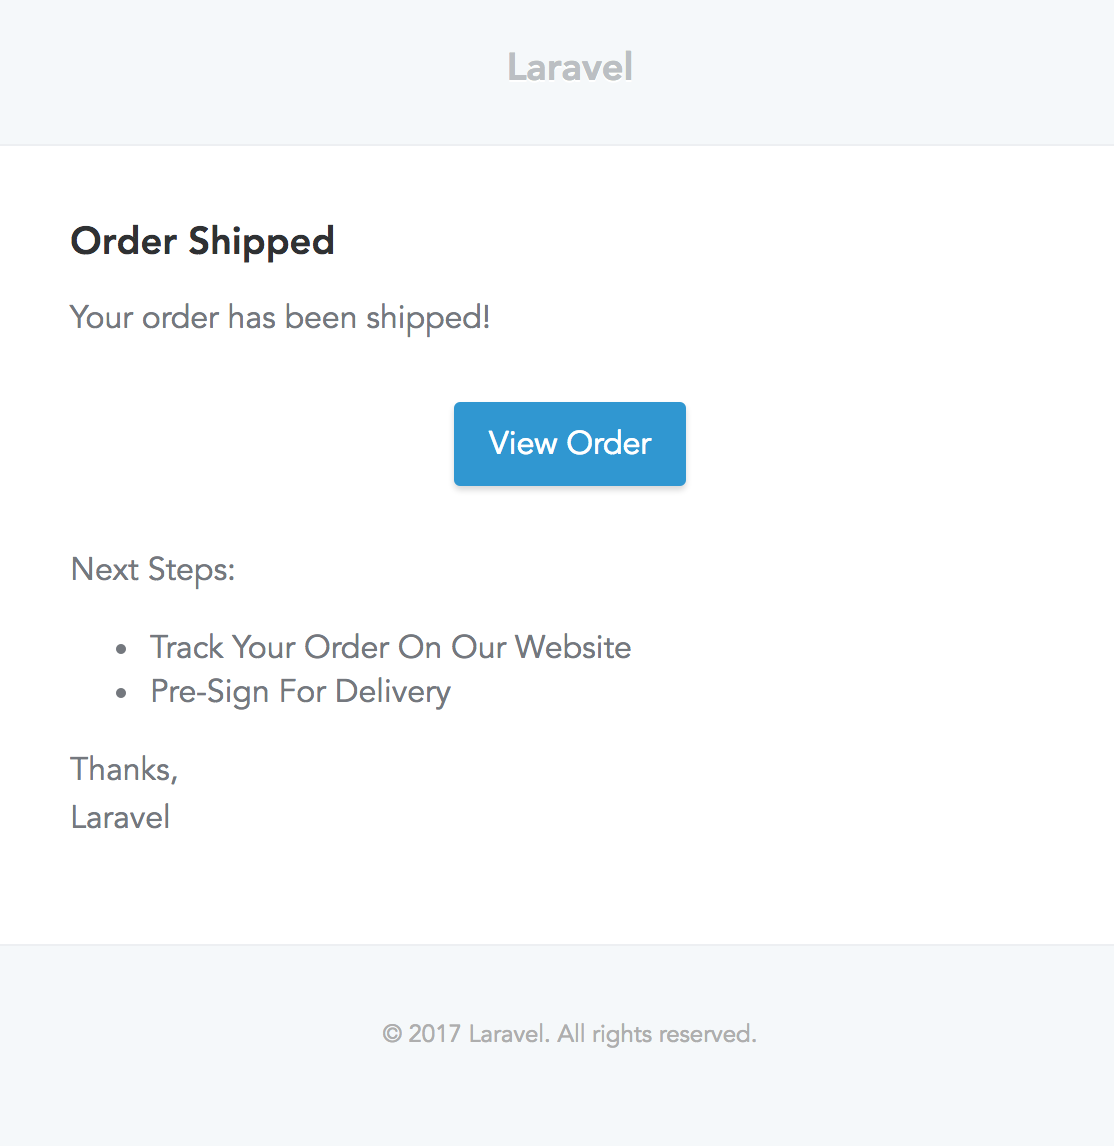
Markdown mailableメッセージにより、事前に構築したテンプレートとメール通知のコンポーネントの利点をMailable中で利用できます。メッセージをMarkdownで記述すると、Laravelは美しいレスポンシブHTMLテンプレートをレンダーすると同時に、自動的に平文テキスト版も生成します。以下は、Markdownメールがどのような見た目であるかの例です。Markdown mailable messages allow you to take advantage of the pre-built templates and components of mail notifications in your mailables. Since the messages are written in Markdown, Laravel is able to render beautiful, responsive HTML templates for the messages while also automatically generating a plain-text counterpart. For example, a Markdown email might look something like the following:
@component('mail::message')
# Order Shipped

Your order has been shipped!

@component('mail::button', ['url' => $url])
View Order
@endcomponent

Next Steps:

- Track Your Order On Our Website
- Pre-Sign For Delivery

Thanks,<br>
{{ config('app.name') }}
@endcomponent
このシンプルなMarkdownテンプレートを使えば、LaravelはレスポンシブHTMLメールと、プレーンテキスト版を生成します。Using this simple Markdown template, Laravel is able to generate a responsive HTML email and plain-text counterpart:
Markdownメールと通知については、完全なメールと通知のドキュメントをご覧ください。To read more about Markdown mail and notifications, check out the full mail[/docs/5.4/mail] and notification[/docs/5.4/notifications] documentation.
">Tip!! カスタマイズのためにアプリケーションへ全Markdownメールコンポーネントをエクスポートできます。エクスポートするには、
vendor:publishArtisanコマンドへlaravel-mailでアセットタグを指定し公開してください。{tip} You may export all of the Markdown mail components to your own application for customization. To export the components, use thevendor:publishArtisan command to publish thelaravel-mailasset tag.
Laravel DuskLaravel Dusk
Laracastsにこの機能についての、無料 video tutorialが用意されています。{video} There is a free video tutorial[https://laracasts.com/series/whats-new-in-laravel-5-4/episodes/9] for this feature available on Laracasts.
Laravel Duskは、利用が簡単なブラウザの自動操作/テストAPIを提供します。デフォルトのDuskは皆さんのマシンへ、JDKやSeleniumのインストールを求めません。代わりにDuskはスタンドアローンのChromeDriverを使用します。しかし、望みのSeleniumコンパチドライバを自由に使用することもできます。Laravel Dusk provides an expressive, easy-to-use browser automation and testing API. By default, Dusk does not require you to install JDK or Selenium on your machine. Instead, Dusk uses a standalone ChromeDriver[https://sites.google.com/a/chromium.org/chromedriver/home] installation. However, you are free to utilize any other Selenium compatible driver you wish.
Duskは本当のブラウザを使用しますので、JavaScriptをたくさん使うアプリケーションでも簡単に操作し、テストできます。Since Dusk operates using a real browser, you are able to easily test and interact with your applications that heavily use JavaScript:
/**
 * 基本的なブラウザテスト例
 *
 * @return void
 */
public function testBasicExample()
{
    $user = factory(User::class)->create([
        'email' => 'taylor@laravel.com',
    ]);

    $this->browse(function ($browser) use ($user) {
        $browser->loginAs($user)
                ->visit('/home')
                ->press('Create Playlist')
                ->whenAvailable('.playlist-modal', function ($modal) {
                    $modal->type('name', 'My Playlist')
                          ->press('Create');
                });

        $browser->waitForText('Playlist Created');
    });
}
Duskの詳細な情報は、完全なDuskドキュメントをご覧ください。For more information on Dusk, consult the full Dusk documentation[/docs/5.4/dusk].
Laravel MixLaravel Mix
Laracastsにこの機能についての、無料 video tutorialが用意されています。{video} There is a free video tutorial[https://laracasts.com/series/whats-new-in-laravel-5-4/episodes/3] for this feature available on Laracasts.
Laravel MixはLaravel Elixirの精神を受け継ぎ、Gulpの代わりに、全体をWebpackベースにしたものです。はLaravel Mixは多くの一般的なCSSとJavaScriptのプリプロセッサを使用し、Laravelアプリケーションために、構築過程をWebpackでスラスラと定義できるAPIを提供しています。シンプルなメソッドチェーンを使用しているため、アセットパイプラインを流暢に定義できます。例を見てください。Laravel Mix is the spiritual successor of Laravel Elixir, and its entirely based on Webpack instead of Gulp. Laravel Mix provides a fluent API for defining Webpack build steps for your Laravel application using several common CSS and JavaScript pre-processors. Through simple method chaining, you can fluently define your asset pipeline. For example:
mix.js('resources/assets/js/app.js', 'public/js')
   .sass('resources/assets/sass/app.scss', 'public/css');
BladeコンポーネントとスロットBlade Components & Slots
Laracastsにこの機能についての、無料 video tutorialが用意されています。{video} There is a free video tutorial[https://laracasts.com/series/whats-new-in-laravel-5-4/episodes/6] for this feature available on Laracasts.
Bladeコンポーネントとスロットは、セクションとレイアウトと似た利便を提供します。しかし、コンポーネントとスロットのメンタルモデルのほうが簡単に理解できることに気づくはずです。最初に、アプリケーション全体で再利用する、"alert"コンポーネントをイメージしてください。Blade components and slots provide similar benefits to sections and layouts; however, some may find the mental model of components and slots easier to understand. First, let's imagine a reusable "alert" component we would like to reuse throughout our application:
<!-- /resources/views/alert.blade.php -->

<div class="alert alert-danger">
    {{ $slot }}
</div>
{{ $slot }}変数は、このコンポーネントへ注入しようとする内容を含んでいます。では、このコンポーネントを構築するため、@component Bladeディレクティブを使いましょう。The {{ $slot }} variable will contain the content we wish to inject into the component. Now, to construct this component, we can use the @component Blade directive:
@component('alert')
    <strong>Whoops!</strong> Something went wrong!
@endcomponent
名前付きスロットにより、一つのコンポーネント中に複数のスロットを利用できます。Named slots allow you to provide multiple slots into a single component:
<!-- /resources/views/alert.blade.php -->

<div class="alert alert-danger">
    <div class="alert-title">{{ $title }}</div>

    {{ $slot }}
</div>
名前付きのスロットを挿入するには、@slotディレクティブを使用します。@slotディレクティブ外の全コンテンツは、$slot変数中のコンポーネントへ渡されます。Named slots may be injected using the @slot directive. Any content is not within a @slot directive will be passed to the component in the $slot variable:
@component('alert')
    @slot('title')
        Forbidden
    @endslot

    You are not allowed to access this resource!
@endcomponent
コンポーネントとスロットに関する情報は、Bladeドキュメントをご覧ください。To read more about components and slots, consult the full Blade documentation[/docs/5.4/blade].
Broadcastモデル結合Broadcast Model Binding
HTTPルートと同様にチャンネルルートでも、暗黙あるいは明白なルートモデル結合を利用できます。たとえば、文字列や数値の注文IDを受け取る代わりに、実際のOrderモデルインスタンスを要求できます。Just like HTTP routes, channel routes may now take advantage of implicit and explicit route model binding[/docs/5.4/routing#route-model-binding]. For example, instead of receiving the string or numeric order ID, you may request an actual Order model instance:
use App\Order;

Broadcast::channel('order.{order}', function ($user, Order $order) {
    return $user->id === $order->user_id;
});
ブロードキャストモデル結合の詳細は、イベントブロードキャストドキュメントをご覧ください。To read more about broadcast model binding, consult the full event broadcasting[/docs/5.4/broadcasting] documentation.
コレクションHigher Order MessagesCollection Higher Order Messages
Laracastsにこの機能についての、無料 video tutorialが用意されています。{video} There is a free video tutorial[https://laracasts.com/series/whats-new-in-laravel-5-4/episodes/2] for this feature available on Laracasts.
コレクションで繁用するアクションを手短に実行するために、"higher order messages"をサポートしました。contains、each、every、filter、first、map、partition、reject、sortBy、sortByDesc、sumコレクションメソッドでhigher order messageが使用できます。Collections now provide support for "higher order messages", which are short-cuts for performing common actions on collections. The collection methods that provide higher order messages are: contains, each, every, filter, first, map, partition, reject, sortBy, sortByDesc, and sum.
各higher order messageへは、コレクションインスタンスの動的プロパティとしてアクセスできます。例として、コレクション内の各オブジェクトのメソッドを呼び出す、each higher order messageを使ってみましょう。Each higher order message can be accessed as a dynamic property on a collection instance. For instance, let's use the each higher order message to call a method on each object within a collection:
$users = User::where('votes', '>', 500)->get();

$users->each->markAsVip();
同様に、ユーザーのコレクションに対し、「投票(votes)」の合計数を求めるために、sum higher order messageを使用できます。Likewise, we can use the sum higher order message to gather the total number of "votes" for a collection of users:
$users = User::where('group', 'Development')->get();

return $users->sum->votes;
オブジェクトベースEloquentイベントObject Based Eloquent Events
Laracastsにこの機能についての、無料 video tutorialが用意されています。{video} There is a free video tutorial[https://laracasts.com/series/whats-new-in-laravel-5-4/episodes/10] for this feature available on Laracasts.
Eloquentのイベントハンドラはイベントオブジェクトにマップされました。これにより、直感的な方法でEloquentイベントを処理でき、イベントのテストも簡単になりました。使用開始するには、Eloquentモデルの様々なライフサイクルポイントを皆さん自身のイベントクラスへマップするための$eventsプロパティを定義してください。Eloquent event handlers may now be mapped to event objects. This provides a more intuitive way of handling Eloquent events and makes it easier to test the events. To get started, define an $events property on your Eloquent model that maps various points of the Eloquent model's lifecycle to your own event classes[/docs/5.4/events]:
<?php

namespace App;

use App\Events\UserSaved;
use App\Events\UserDeleted;
use Illuminate\Notifications\Notifiable;
use Illuminate\Foundation\Auth\User as Authenticatable;

class User extends Authenticatable
{
    use Notifiable;

    /**
     * モデルのイベントマップ
     *
     * @var array
     */
    protected $events = [
        'saved' => UserSaved::class,
        'deleted' => UserDeleted::class,
    ];
}
ジョブレベル再試行/タイムアウトJob Level Retry & Timeout
以前のキュージョブでは、コマンドラインで全ジョブに対してグローバルに「再試行」と「タイムアウト」をせってしていました。しかし、Laravel5.4では、各ジョブごとにジョブクラス上で直接定義できるようになりました。Previously, queue job "retry" and "timeout" settings could only be configured globally for all jobs on the command line. However, in Laravel 5.4, these settings may be configured on a per-job basis by defining them directly on the job class:
<?php

namespace App\Jobs;

class ProcessPodcast implements ShouldQueue
{
    /**
     * ジョブの最大試行回数
     *
     * @var int
     */
    public $tries = 5;

    /**
     * ジョブタイムアウトまでの秒数
     *
     * @var int
     */
    public $timeout = 120;
}
これらの設定についての情報は、キュードキュメントをご覧ください。For more information about these settings, consult the full queue documentation[/docs/5.4/queues].
リクエストサニタライズミドルウェアRequest Sanitization Middleware
Laracastsにこの機能についての、無料 video tutorialが用意されています。{video} There is a free video tutorial[https://laracasts.com/series/whats-new-in-laravel-5-4/episodes/1] for this feature available on Laracasts.
Laravel5.4に新しいデフォルトミドルウェアとして、TrimStringsとConvertEmptyStringsToNullが追加されました。Laravel 5.4 includes two new middleware in the default middleware stack: TrimStrings and ConvertEmptyStringsToNull:
/**
 * アプリケーションのグローバルHTTPミドルウェアスタック
 *
 * これらのミドルウェアはアプリケーションへのリクエスト全てで実行される。
 *
 * @var array
 */
protected $middleware = [
    \Illuminate\Foundation\Http\Middleware\CheckForMaintenanceMode::class,
    \Illuminate\Foundation\Http\Middleware\ValidatePostSize::class,
    \App\Http\Middleware\TrimStrings::class,
    \Illuminate\Foundation\Http\Middleware\ConvertEmptyStringsToNull::class,
];
これらのミドルウェアは自動的にリクエスト入力値をトリムし、空文字列をnullへ変換します。これによりアプリケーションに入ってくる全リクエストの入力をノーマライズできるようになり、全ルートとコントローラでtrim関数を呼び出し続けることを心配せずに済みます。These middleware will automatically trim request input values and convert any empty strings to null. This helps you normalize the input for every request entering into your application and not have to worry about continually calling the trim function in every route and controller.
「リアルタイム」ファサード"Realtime" Facades
Laracastsにこの機能についての、無料 video tutorialが用意されています。{video} There is a free video tutorial[https://laracasts.com/series/whats-new-in-laravel-5-4/episodes/8] for this feature available on Laracasts.
以前のLaravelには、サービスコンテナにより自身の組み込みサービスのメソッドへ、素早く簡単にアクセスできるファサードが提供されていました。しかし、Laravel5.4ではimportのクラス名にFacadesをプレフィックスとして付けることにより、アプリケーションのどんなクラスでも簡単にファサードへリアルタイムに変換できるようになりました。例として、アプリケーションに以下のようなクラスが含まれていると考えてください。Previously, only Laravel's own built-in services exposed facades[/docs/5.4/facades], which provide quick, terse access to their methods via the service container. However, in Laravel 5.4, you may easily convert any of your application's classes into a facade in realtime simply by prefixing the imported class name with Facades. For example, imagine your application contains a class like the following:
<?php

namespace App\Services;

class PaymentGateway
{
    protected $tax;

    /**
     * 新しい支払いゲートウェイインスタンスの生成
     *
     * @param  TaxCalculator  $tax
     * @return void
     */
    public function __construct(TaxCalculator $tax)
    {
        $this->tax = $tax;
    }

    /**
     * 指定金額の支払い
     *
     * @param  int  $amount
     * @return void
     */
    public function pay($amount)
    {
        // 金額の支払い処理…
    }
}
このクラスをファサードして簡単に使用できます。You may easily use this class as a facade like so:
use Facades\ {
    App\Services\PaymentGateway
};

Route::get('/pay/{amount}', function ($amount) {
    PaymentGateway::pay($amount);
});
もちろん、このようにリアルタイムファサードの利点を活用しても、Laravelのファサードモック機能を利用し簡単にテストを書くことができます。Of course, if you leverage a realtime facade in this way, you may easily write a test for the interaction using Laravel's facade mocking capabilities[/docs/5.4/mocking]:
PaymentGateway::shouldReceive('pay')->with('100');
カスタム中間テーブルモデルCustom Pivot Table Models
Laravel5.3では、belongsToManyリレーションの「中間」テーブルモデルは、同じ組み込み済みのPivotモデルインスタンスでした。Laravel5.4では、中間テーブルにカスタムモデルを定義できるようになりました。リレーションの中間テーブルを表すカスタムモデルを定義したい場合は、リレーションの定義でusingメソッドを使用してください。In Laravel 5.3, all "pivot" table models for belongsToMany relationships used the same built-in Pivot model instance. In Laravel 5.4, you may define custom models for your pivot tables. If you would like to define a custom model to represent the intermediate table of your relationship, use the using method when defining the relationship:
<?php

namespace App;

use Illuminate\Database\Eloquent\Model;

class Role extends Model
{
    /**
     * 役割に所属するユーザー
     */
    public function users()
    {
        return $this->belongsToMany('App\User')->using('App\UserRole');
    }
}
Redisクラスタサポートの向上Improved Redis Cluster Support
以前は同じアプリケーションでシングルホストへのRedis接続と、クラスタへの接続を定義できませんでした。Lravel5.4では、同じアプリケーションで、複数のシングルホストと複数クラスタに対するRedis接続を定義できるようになりました。LaravelにおけるRedisについての情報は、Redisドキュメントをご覧ください。Previously, it was not possible to define Redis connections to single hosts and to clusters in the same application. In Laravel 5.4, you may now define Redis connections to multiple single hosts and multiple clusters within the same application. For more information on Redis in Laravel, please consult the full Redis documentation[/docs/5.4/redis].
マイグレーションデフォルト文字列長Migration Default String Length
Laravel5.4はデータベース中への「絵文字」保存をサポートするため、デフォルトでutf8mb4文字セットを使っています。アプリケーションをLaravel5.3からアップグレードする場合は、この文字列セットへ切り替える必要はありません。Laravel 5.4 uses the utf8mb4 character set by default, which includes support for storing "emojis" in the database. If you are upgrading your application from Laravel 5.3, you are not required to switch to this character set.
この文字セットへ手動で切り替えるとき、バージョン5.7.7より古いMySQLが動作している場合は、マイグレーションで生成されるデフォルト文字列長を手動で設定する必要があります。設定するには、AppServiceProviderの中で、Schema::defaultStringLengthメソッドを呼び出してください。If you choose to switch to this character set manually and are running a version of MySQL older than the 5.7.7 release, you may need to manually configure the default string length generated by migrations. You may configure this by calling the Schema::defaultStringLength method within your AppServiceProvider:
use Illuminate\Support\Facades\Schema;

/**
 * アプリケーションの全サービスの初期処理
 *
 * @return void
 */
public function boot()
{
    Schema::defaultStringLength(191);
}
Laravel 5.3Laravel 5.3
Laravel5.2で施された改善に引き続き、5.3では以降の新機能/改善が行われました。ドライバベースの通知システム、Laravel Echoによる堅牢なリアルタイムのサポート、Laravel Passportによる苦労知らずのOAuth2サーバ、Laravel Scoutによるフルテキストモデル検索、Laravel ElixirによるWebpackのサポート、"Mailable"オブジェクトの導入、webとapiルートの明確な分離、クロージャベースコンソールコマンド、アップロードファイル保存の便利なヘルパ、POPOでシングルアクションのコントローラのサポート、デフォルトフロントエンドスカフォールドの改善などです。Laravel 5.3 continues the improvements made in Laravel 5.2 by adding a driver based notification system[/docs/5.3/notifications], robust realtime support via Laravel Echo[/docs/5.3/broadcasting], painless OAuth2 servers via Laravel Passport[/docs/5.3/passport], full-text model searching via Laravel Scout[/docs/5.3/scout], Webpack support in Laravel Elixir, "mailable" objects, explicit separation of web and api routes, Closure based console commands, convenient helpers for storing uploaded files, support for POPO and single-action controllers, improved default frontend scaffolding, and more.
通知Notifications
Laracastsでこの機能の無料ビデオチュートリアルがご覧いただけます。{video} There is a free video tutorial[https://laracasts.com/series/whats-new-in-laravel-5-3/episodes/9] for this feature available on Laracasts.
Laravelの通知は、メール、Slack、SMSなどの様々な配信チャンネル庭たり、通知を送信するためのシンプルで記述的なAPIを提供します。たとえば、課金された通知を定義し、メールとSMSにより、その通知を配信できます。簡単なメソッド一つで、通知が送信できます。Laravel Notifications provide a simple, expressive API for sending notifications across a variety of delivery channels such as email, Slack, SMS, and more. For example, you may define a notification that an invoice has been paid and deliver that notification via email and SMS. Then, you may send the notification using a single, simple method:
$user->notify(new InvoicePaid($invoice));
既にコミュニティにより書かれた通知ドライバが、数多く、幅広く用意されています。その中には、iOSやAndroid通知のサポートも含まれています。通知についての詳細を学ぶには、通知のドキュメントをお読みください。There is already a wide variety of community written drivers[http://laravel-notification-channels.com] for notifications, including support for iOS and Android notifications. To learn more about notifications, be sure to check out the full notification documentation[/docs/5.3/notifications].
WebSocket/イベントブロードキャストWebSockets / Event Broadcasting
Laravelの以前のバージョンにも、イベントブロードキャストはありました。Laravel5.3では、プライベート配信のためのチャンネルレベルの認証と、WebSocketプレゼンスチャンネルが追加され、これによりフレームワークのこの機能は大幅に向上しました。While event broadcasting existed in previous versions of Laravel, the Laravel 5.3 release greatly improves this feature of the framework by adding channel-level authentication for private and presence WebSocket channels:
/*
 * チャンネルサブスクリプションの認証
 */
Broadcast::channel('orders.*', function ($user, $orderId) {
    return $user->placedOrder($orderId);
});
NPMによりインストールできる新しいJavaScriptパッケージであるLaravel Echoは、クライアントサイドのJavaScriptアプリケーションの中でチャンネルを購読し、サーバサイドイベントをリッスンするための、簡単で美しいAPIを提供するためにリリースされました。EchoはPusherとSocket.ioもサポートしています。Laravel Echo, a new JavaScript package installable via NPM, has also been released to provide a simple, beautiful API for subscribing to channels and listening for your server-side events in your client-side JavaScript application. Echo includes support for Pusher[https://pusher.com] and Socket.io[http://socket.io]:
Echo.channel('orders.' + orderId)
    .listen('ShippingStatusUpdated', (e) => {
        console.log(e.description);
    });
伝統的なチャンネルを行動くすることに付け加え、Laravel Echoは指定したチャンネルへ誰がリッスンしているかの情報を提供する、プレゼンスチャンネルの購入も簡単にできます。In addition to subscribing to traditional channels, Laravel Echo also makes it a breeze to subscribe to presence channels which provide information about who is listening on a given channel:
Echo.join('chat.' + roomId)
    .here((users) => {
        //
    })
    .joining((user) => {
        console.log(user.name);
    })
    .leaving((user) => {
        console.log(user.name);
    });
Echoとイベントブロードキャストの詳細は、ドキュメントで確認してください。To learn more about Echo and event broadcasting, check out the full documentation[/docs/5.3/broadcasting].
Laravel Passport(OAuth2サーバ)Laravel Passport (OAuth2 Server)
Laracastsでこの機能の無料ビデオチュートリアルがご覧いただけます。{video} There is a free video tutorial[https://laracasts.com/series/whats-new-in-laravel-5-3/episodes/13] for this feature available on Laracasts.
Laravelアプリケーションのためにすぐに用意できる、完全なOAuth2サーバの実装であるLaravel Passportを使うことにより、Laravel5.3でのAPI認証はとても簡単です。Passportは、Alex Bilbie氏によりメンテナンスされている、League OAuth2 server上に構築されています。Laravel 5.3 makes API authentication a breeze using Laravel Passport[/docs/{{version}}/passport], which provides a full OAuth2 server implementation for your Laravel application in a matter of minutes. Passport is built on top of the League OAuth2 server[https://github.com/thephpleague/oauth2-server] that is maintained by Alex Bilbie.
PassportはOAuth2認証コードによるアクセストークンの発行を苦労なしにしてくれます。皆さんのユーザーに対し「パーソナルアクセストークン」をWeb UIから作成することもできます。素早く開始できるように、クライアント作成、アクセストークンの発行などをユーザーに行ってもらう、OAuth2ダッシュボードの出発地点として役立てることができる、VueコンポーネントもPassportは用意しています。Passport makes it painless to issue access tokens via OAuth2 authorization codes. You may also allow your users to create "personal access tokens" via your web UI. To get you started quickly, Passport includes Vue components[https://vuejs.org] that can serve as a starting point for your OAuth2 dashboard, allowing users to create clients, revoke access tokens, and more:
<passport-clients></passport-clients>
<passport-authorized-clients></passport-authorized-clients>
<passport-personal-access-tokens></passport-personal-access-tokens>
Vueコンポーネントを使用したくない場合は、クライアントとアクセストークンを管理するフロントエンドダッシュボードを作成することもできます。PassportはシンプルなJSON APIを提供していますので、どんなJavaScriptフレームワークを選んでも使用できます。If you do not want to use the Vue components, you are welcome to provide your own frontend dashboard for managing clients and access tokens. Passport exposes a simple JSON API that you may use with any JavaScript framework you choose.
もちろん、アプリケーションのAPI利用者がリクエストするアクセストークンスコープの定義も、Passportでは簡単です。Of course, Passport also makes it simple to define access token scopes that may be requested by application's consuming your API:
Passport::tokensCan([
    'place-orders' => 'Place new orders',
    'check-status' => 'Check order status',
]);
さらに、Passportは認証済みのアクセストークンが必要なトークンスコープを含んでいるかを確認するための、便利なミドルウェアも用意しています。In addition, Passport includes helpful middleware for verifying that an access token authenticated request contains the necessary token scopes:
Route::get('/orders/{order}/status', function (Order $order) {
    // アクセストークンは、"check-status"スコープを持っている
})->middleware('scope:check-status');
最後に、Passportではアクセストークンを渡す手間を取らなくても、JavaScriptアプリケーションから皆さん自身のAPIを使ってもらうサポートもしています。Passportは皆さんがアプリケーションの重要点に集中できるように、暗号化済みJWTクッキーと同期済みCSRFトークンを用い、これを実現しています。Passportの詳細は、ドキュメントで確認してください。Lastly, Passport includes support for consuming your own API from your JavaScript application without worrying about passing access tokens. Passport achieves this through encrypted JWT cookies and synchronized CSRF tokens, allowing you to focus on what matters: your application. For more information on Passport, be sure to check out its full documentation[/docs/5.3/passport].
検索(Laravel Scout)Search (Laravel Scout)
Laravel ScoutはEloquentモデルへフルテキスト検索機能を追加するための、シンプルなドライバベースのソルーションを提供します。モデルオブザーバを使い、Scoutは自動的にサーチインデックスとEloquentレコードの同期を保ちます。現在、ScoutはAlgoliaドライバを用意していますが、シンプルなカスタムドライバをプログラムし、自由に独自の検索実装でScoutを拡張できます。Laravel Scout provides a simple, driver based solution for adding full-text search to your Eloquent models[/docs/5.3/eloquent]. Using model observers, Scout will automatically keep your search indexes in sync with your Eloquent records. Currently, Scout ships with an Algolia[https://www.algolia.com/] driver; however, writing custom drivers is simple and you are free to extend Scout with your own search implementations.
モデルを検索可能にするには、モデルにSearchableトレイトをただ追加するだけです。Making models searchable is as simple as adding a Searchable trait to the model:
<?php

namespace App;

use Laravel\Scout\Searchable;
use Illuminate\Database\Eloquent\Model;

class Post extends Model
{
    use Searchable;
}
トレイトをモデルへ追加したら、その情報はモデルを保存するごとに、検索インデックスと同期されます。Once the trait has been added to your model, its information will be kept in sync with your search indexes by simply saving the model:
$order = new Order;

// ...

$order->save();
モデルがインデックスされると、全モデルに対するフルテキスト検索の実行は簡単です。検索結果をページ付けもできます。Once your models have been indexed, its a breeze to perform full-text searches across all of your models. You may even paginate your search results:
return Order::search('Star Trek')->get();

return Order::search('Star Trek')->where('user_id', 1)->paginate();
もちろん、Scoutはもっと機能を持っており、ドキュメントで説明しています。Of course, Scout has many more features which are covered in the full documentation[/docs/5.3/scout].
MailableオブジェクトMailable Objects
Laracastsでこの機能の無料ビデオチュートリアルがご覧いただけます。{video} There is a free video tutorial[https://laracasts.com/series/whats-new-in-laravel-5-3/episodes/6] for this feature available on Laracasts.
Laravel5.3はMailableオブジェクトをサポートしています。このオブジェクトは、クロージャーの中でメールメッセージをカスタマイズする代わりに、シンプルなオブジェクトとしてメールメッセージを表現できるようにしてくれます。例として、"Welcome"メールのために、シンプルなMailableオブジェクトを定義してみましょう。Laravel 5.3 ships with support for mailable objects. These objects allow you to represent your email messages as a simple objects instead of customizing mail messages within Closures. For example, you may define a simple mailable object for a "welcome" email:
class WelcomeMessage extends Mailable
{
    use Queueable, SerializesModels;

    /**
     * メッセージの構築
     *
     * @return $this
     */
    public function build()
    {
        return $this->view('emails.welcome');
    }
}
Mailableオブジェクトを定義できたら、シンプルで記述的なAPIを使用し、ユーザーへ送ることができます。Mailableオブジェクトはコードを読み解く時に、メッセージの意図を見つけやすくしてくれます。Once the mailable object has been defined, you can send it to a user using a simple, expressive API. Mailable objects are great for discovering the intent of your messages while scanning your code:
Mail::to($user)->send(new WelcomeMessage);
もちろん、Mailableオブジェクトをキューワーカによりバックグランドで送信できるように、「キュー投入可能」としてマーク付けできます。Of course, you may also mark mailable objects as "queueable" so that they will be sent in the background by your queue workers:
class WelcomeMessage extends Mailable implements ShouldQueue
{
    //
}
Mailableオブジェクトの情報は、メールのドキュメントで確認してください。For more information on mailable objects, be sure to check out the mail documentation[/docs/5.3/mail].
アップロードファイルの保存Storing Uploaded Files
Laracastsでこの機能の無料ビデオチュートリアルがご覧いただけます。{video} There is a free video tutorial[https://laracasts.com/series/whats-new-in-laravel-5-3/episodes/12] for this feature available on Laracasts.
Webアプリケーションにおいてファイル保存の最も一般的なユースケースは、プロファイルや写真、ドキュメントなど、ユーザーがアップロードしたファイルを保存する場合です。Laravel5.3では、アップロードファイルインスタンスに対しstoreメソッドを使用すれば、アップロード済みファイルを簡単に保存できます。アップロードファイルを保存したいパスを引数に、ただstoreメソッドを呼び出してください。In web applications, one of the most common use-cases for storing files is storing user uploaded files such as profile pictures, photos, and documents. Laravel 5.3 makes it very easy to store uploaded files using the new store method on an uploaded file instance. Simply call the store method with the path at which you wish to store the uploaded file:
/**
 * ユーザーのアバター更新
 *
 * @param  Request  $request
 * @return Response
 */
public function update(Request $request)
{
    $path = $request->file('avatar')->store('avatars', 's3');

    return $path;
}
アップロード済みファイルの保存についての情報は、ドキュメントをお読みください。For more information on storing uploaded files, check out the full documentation[/docs/{{version}}/filesystem#file-uploads].
WebpackとLaravel ElixirWebpack & Laravel Elixir
Laravel5.3と同時に、WebpackとRollup JavaScript モジュールバンドラのサポートを伴い、Laravel Elixir 6.0がリリースされました。デフォルトでLaravel5.3のgulpfile.jsファイルは、WebpackをJavaScriptをコンパイルするために使用します。Laravel Elixirのドキュメントには、両バンドラに対するより多くの情報が用意されています。Along with Laravel 5.3, Laravel Elixir 6.0 has been released with baked-in support for the Webpack and Rollup JavaScript module bundlers. By default, the Laravel 5.3 gulpfile.js file now uses Webpack to compile your JavaScript. The full Laravel Elixir documentation[/docs/5.3/elixir] contains more information on both of these bundlers:
elixir(mix => {
    mix.sass('app.scss')
       .webpack('app.js');
});
フロントエンド構造Frontend Structure
Laracastsでこの機能の無料ビデオチュートリアルがご覧いただけます。{video} There is a free video tutorial[https://laracasts.com/series/whats-new-in-laravel-5-3/episodes/4] for this feature available on Laracasts.
Laravel5.3はよりモダンなフロントエンド構造になりました。これは主にmake:auth認証スカフォールドに影響を与えています。フロントエンドアセットをCDNからロードする代わりに、依存パッケージがデフォルトのpackage.jsonファイルで指定されています。Laravel 5.3 ships with a more modern frontend structure. This primarily affects the make:auth authentication scaffolding. Instead of loading frontend assets from a CDN, dependencies are specified in the default package.json file.
さらに、シングルファイルVueコンポーネントが初めから含まれています。サンプルExample.vueコンポーネントが、resources/assets/js/componentsディレクトリに用意されています。それに付け加え、新しいresources/assets/js/app.jsファイルがJavaScriptライブラリ、適切であればVueコンポーネントも起動、設定しています。In addition, support for single file Vue components[https://vuejs.org] is now included out of the box. A sample Example.vue component is included in the resources/assets/js/components directory. In addition, the new resources/assets/js/app.js file bootstraps and configures your JavaScript libraries and, if applicable, Vue components.
この構造は、モダンで堅牢なJavaScriptアプリケーションの構築を特定のJavaScriptやCSSフレームワークを必要とせずに、開発し始めるためのガイダンスとなるでしょう。モダンなLaravelフロント開発を始めるための情報は、新しいフロントエンド入門のドキュメントで確認してください。This structure provides more guidance on how to begin developing modern, robust JavaScript applications, without requiring your application to use any given JavaScript or CSS framework. For more information on getting started with modern Laravel frontend development, check out the new introductory frontend documentation[/docs/5.3/frontend].
ルートファイルRoutes Files
デフォルトで真新しいLaravel5.3アプリケーションには、新しいトップレベルのroutesディレクトリの中に、2つのHTTPルートファイルを用意しています。webとapiルートファイルは、WebインターフェイスとAPIのルートをどう分けたら良いかという、明確なガイダンスを提供します。apiルーファイル内のルートは、自動的にRouteServiceProviderにより、apiプレフィックスが割りつけられます。By default, fresh Laravel 5.3 applications contain two HTTP route files in a new top-level routes directory. The web and api route files provide more explicit guidance in how to split the routes for your web interface and your API. The routes in the api route file are automatically assigned the api prefix by the RouteServiceProvider.
クロージャコンソールコマンドClosure Console Commands
コマンドクラスとしての定義に付け加え、Artisanコマンドはシンプルなクロージャとして、app/Console/Kernel.phpファイルのcommandsメソッドで、定義できるようになりました。真新しいLaravel5.3アプリケーションでは、コンソールコマンドをルートのように、アプリケーションを指し示すクロージャベースのエントリ定義するroutes/console.phpファイルをcommandsメソッドがロードします。In addition to being defined as command classes, Artisan commands may now be defined as simple Closures in the commands method of your app/Console/Kernel.php file. In fresh Laravel 5.3 applications, the commands method loads a routes/console.php file which allows you to define your Console commands as route-like, Closure based entry points into your application:
Artisan::command('build {project}', function ($project) {
    $this->info('Building project...');
});
クロージャコマンドについての情報は、Artisanのドキュメントで確認してください。For more information on Closure commands, check out the full Artisan documentation[/docs/5.3/artisan#closure-commands].
$loop変数The $loop Variable
Laracastsでこの機能の無料ビデオチュートリアルがご覧いただけます。{video} There is a free video tutorial[https://laracasts.com/series/whats-new-in-laravel-5-3/episodes/7] for this feature available on Laracasts.
Bladeテンプレートの中でループする場合、$loop変数が使用できます。現在のループインデックスやループの最初や最後の繰り返しかどうかなどの、便利なちょっとした情報へ、この変数でアクセスできます。When looping within a Blade template, a $loop variable will be available inside of your loop. This variable provides access to some useful bits of information such as the current loop index and whether this is the first or last iteration through the loop:
@foreach ($users as $user)
    @if ($loop->first)
        これは最初の繰り返し
    @endif

    @if ($loop->last)
        これは最後の繰り返し
    @endif

    <p>これは{{ $user->id }}のユーザー</p>
@endforeach
より多くの情報は、Bladeのドキュメントをお読みください。For more information, consult the full Blade documentation[/docs/5.3/blade#the-loop-variable].
Laravel 5.2Laravel 5.2
Laravel5.2は5.1に引き続き、持続的な向上を目指し、複数認証ドライバのサポート、暗黙のモデル結合、Eloquentグローバルスコープの簡略化、オプトイン認証スカフォールド、ミドルウェアグループ、レート限定ミドルウェア、配列バリデーションの向上などを追加しています。Laravel 5.2 continues the improvements made in Laravel 5.1 by adding multiple authentication driver support, implicit model binding, simplified Eloquent global scopes, opt-in authentication scaffolding, middleware groups, rate limiting middleware, array validation improvements, and more.
認証ドライバ/「複数認証」Authentication Drivers / "Multi-Auth"
Laravelの以前のバージョンではデフォルトのみの、セッションベースの認証ドライバーをサポートしており、アプリケーションで2つ以上の認証モデルが使えませんでした。In previous versions of Laravel, only the default, session-based authentication driver was supported out of the box, and you could not have more than one authenticatable model instance per application.
しかし、Laravel5.2では、追加の認証ドライバを定義でき、同時に複数の認証モデルやユーザーテーブルも定義可能です。それぞれ独立して認証プロセスをコントロールできます。たとえば、"admin(管理者)"ユーザーのデータベーステーブルと、"student(生徒)"のデータベーステーブルを用意し、それぞれのテーブルに対し独立して認証するためにAuthのメソッドが使えるようになりました。However, in Laravel 5.2, you may define additional authentication drivers as well define multiple authenticatable models or user tables, and control their authentication process separately from each other. For example, if your application has one database table for "admin" users and one database table for "student" users, you may now use the Auth methods to authenticate against each of these tables separately.
認証のスカフォールドAuthentication Scaffolding
Laravelでは既に、バックエンドの認証を簡単に処理できるようになっています。しかし、Laravel5.2では便利に、素早くフロントエンドの認証ビューをスカフォールドする方法を提供しました。ターミナルで、ただmake:authコマンドを実行するだけです。Laravel already makes it easy to handle authentication on the back-end; however, Laravel 5.2 provides a convenient, lightning-fast way to scaffold the authentication views for your front-end. Simply execute the make:auth command on your terminal:
php artisan make:auth
このコマンドは単純なBootstrapと互換性のある、ユーザーログイン、登録、パスワードリセットのビューを生成します。コマンドはさらに、適切なルート追加するように、ルートファイルを更新します。This command will generate plain, Bootstrap compatible views for user login, registration, and password reset. The command will also update your routes file with the appropriate routes.
Note: この機能は新しいアプリケーションだけで使用スべきもので、アプリケーションのアップグレードでは行わないでください。{note} This feature is only meant to be used on new applications, not during application upgrades.
暗黙のモデル結合Implicit Model Binding
暗黙のモデル結合は、ルートやコントローラに直接関連のあるモデルを何の苦労もなしに依存注入します。たとえば、以下のようなルート定義を考えましょう。Implicit model binding makes it painless to inject relevant models directly into your routes and controllers. For example, assume you have a route defined like the following:
use App\User;

Route::get('/user/{user}', function (User $user) {
    return $user;
});
Laravel5.1では通常、Route::modelメソッドを使い、ルート定義中の{user}パラメータには、App\Userインスタンスを注入するように指示する必要がありました。しかし、Laravel5.2では、必要なモデルインスタンスに素早くアクセスできるように、フレームワークが自動的にURIセグメントに基づき依存注入します。In Laravel 5.1, you would typically need to use the Route::model method to instruct Laravel to inject the App\User instance that matches the {user} parameter in your route definition. However, in Laravel 5.2, the framework will automatically inject this model based on the URI segment, allowing you to quickly gain access to the model instances you need.
ルートパラメータのセグメント({user})が、ルートクロージャかコントローラメソッドの対応する変数名('$user')であり、その変数のタイプヒントがEloquentモデルクラスの場合、自動的にそのモデルを依存注入します。Laravel will automatically inject the model when the route parameter segment ({user}) matches the route Closure or controller method's corresponding variable name ($user) and the variable is type-hinting an Eloquent model class.
ミドルウェアグループMiddleware Groups
ミドルウェアグループは、ルートへ一度に多くのミドルウェアを割りつけられるように、一つの手頃なキーに多くのルートミドルウェアをまとめる機能です。たとえばこれは、同じアプリケーションでWebのUIとAPIを構築する時に便利です。webグループにはセッションとCSRFミドルウェアをまとめ、たぶんapiグループではレート制限をまとめたいと考えるでしょう。Middleware groups allow you to group several route middleware under a single, convenient key, allowing you to assign several middleware to a route at once. For example, this can be useful when building a web UI and an API within the same application. You may group the session and CSRF routes into a web group, and perhaps the rate limiter in the api group.
実際、Laravel5.2のデフォルトアプリケーション構造は、このアプローチに従っています。例えば、デフォルトのApp\Http\Kernel.phpファイルには、以下のコードが含まれています。In fact, the default Laravel 5.2 application structure takes exactly this approach. For example, in the default App\Http\Kernel.php file you will find the following:
/**
 * アプリケーションのミドルウェアグループ
 *
 * @var array
 */
protected $middlewareGroups = [
    'web' => [
        \App\Http\Middleware\EncryptCookies::class,
        \Illuminate\Cookie\Middleware\AddQueuedCookiesToResponse::class,
        \Illuminate\Session\Middleware\StartSession::class,
        \Illuminate\View\Middleware\ShareErrorsFromSession::class,
        \App\Http\Middleware\VerifyCsrfToken::class,
    ],

    'api' => [
        'throttle:60,1',
    ],
];
ですから、webグループは、ルートに次のように割りつけられます。Then, the web group may be assigned to routes like so:
Route::group(['middleware' => ['web']], function () {
    //
});
しかし、RouteServiceProviderの中において、デフォルトミドルウェアグループ下でルートファイルをincludeしているため、デフォルト状態でルートには、既にwebミドルウェアグループが適用されることを覚えておいてください。However, keep in mind the web middleware group is already applied to your routes by default since the RouteServiceProvider includes it in the default middleware group.
レート制限Rate Limiting
新しいレート制限ミドルウェアがフレームワークに含まれ、あるIPアドレスからの、一分間に指定した回数より多いルートへのアクセスを簡単に制限できるようになりました。たとえば、あるIPからのアクセスを毎分60回に制限したい場合は、次のように指定します。A new rate limiter middleware is now included with the framework, allowing you to easily limit the number of requests that a given IP address can make to a route over a specified number of minutes. For example, to limit a route to 60 requests every minute from a single IP address, you may do the following:
Route::get('/api/users', ['middleware' => 'throttle:60,1', function () {
    //
}]);
配列のバリデーションArray Validation
配列のフォーム入力フィールドに対するバリデーションは、Laravel5.2でより簡単になりました。指定した配列の各メールアドレスフィールドがユニークであることをバリデートするには、次のようにします。Validating array form input fields is much easier in Laravel 5.2. For example, to validate that each e-mail in a given array input field is unique, you may do the following:
$validator = Validator::make($request->all(), [
    'person.*.email' => 'email|unique:users'
]);
同様に*文字を使い、配列ベースのフィールドでも通常のバリデーションメッセージと同じように簡単に、言語ファイル中のバリデーションメッセージを指定できます。Likewise, you may use the * character when specifying your validation messages in your language files, making it a breeze to use a single validation message for array based fields:
'custom' => [
    'person.*.email' => [
        'unique' => 'Each person must have a unique e-mail address',
    ]
],
BailバリデーションルールBail Validation Rule
新しいbail(保釈)バリデーションルールが追加されました。これはバリデータに、ルールで指定された最初のバリデーションに失敗したら、その後のバリデーションを停止するように指示します。たとえば、以下の例では属性がintegerのチェックに失敗したら、バリデータはuniqueのチェックを行いません。A new bail validation rule has been added, which instructs the validator to stop validating after the first validation failure for a given rule. For example, you may now prevent the validator from running a unique check if an attribute fails an integer check:
$this->validate($request, [
    'user_id' => 'bail|integer|unique:users'
]);
Eloquentグローバルスコープの向上Eloquent Global Scope Improvements
以前のバージョンのLaravelでは、グローバルEloquentスコープは複雑で間違いやすい実装でした。しかし5.2では、グローバルクエリスコープはシンプルなメソッド、applyひとつだけを実装するだけです。In previous versions of Laravel, global Eloquent scopes were complicated and error-prone to implement; however, in Laravel 5.2, global query scopes only require you to implement a single, simple method: apply.
グローバルスコープを書くための情報は、十分な説明のあるEloquentのドキュメントを参照してください。For more information on writing global scopes, check out the full Eloquent documentation[/docs/{{version}}/eloquent#global-scopes].
Laravel 5.1.11Laravel 5.1.11
Laravel 5.1.11では認可が初めからサポートされています! アプリケーションの認可ロジックをシンプルなコールバックかポリシークラスを使い便利に統合でき、アクションをシンプルで記述的なメソッドを使い認可できます。Laravel 5.1.11 introduces authorization[/docs/{{version}}/authorization] support out of the box! Conveniently organize your application's authorization logic using simple callbacks or policy classes, and authorize actions using simple, expressive methods.
詳細は認可のドキュメントを参照してください。For more information, please refer to the authorization documentation[/docs/{{version}}/authorization].
Laravel 5.1.4Laravel 5.1.4
Laravel5.1.4でシンプルなログイン制限がフレームワークに導入されました。詳細は認証のドキュメントで確認してください。Laravel 5.1.4 introduces simple login throttling to the framework. Consult the authentication documentation[/docs/{{version}}/authentication#authentication-throttling] for more information.
Laravel 5.1Laravel 5.1
Laravel5.1はPSR-2を採用し、イベントのブロードキャスト、ミドルウェアパラメーター、Artisanの改良など、Laravel5.0から継続的に向上しています。Laravel 5.1 continues the improvements made in Laravel 5.0 by adopting PSR-2 and adding event broadcasting, middleware parameters, Artisan improvements, and more.
PHP 5.5.9+PHP 5.5.9+
PHP5.4は9月に「役目を終える」ことになり、PHP開発チームからセキュリティアップデートを受けられなくなりますので、Laravel5.1はPHP5.5.9以上を動作要件とします。PHP5.5.9はGuzzleやAWS SDKのように人気のあるPHPライブラリーの最新バージョンと互換性があります。Since PHP 5.4 will enter "end of life" in September and will no longer receive security updates from the PHP development team, Laravel 5.1 requires PHP 5.5.9 or greater. PHP 5.5.9 allows compatibility with the latest versions of popular PHP libraries such as Guzzle and the AWS SDK.
LTSLTS
Laravel5.1は最初の長期間サポートリリースになります。Laravel5.1はバグフィックスを2年間、セキュリティフィックスを3年間提供します。このサポート期間は今までのリリースで一番長く、安定性と心の平和を大きなエンタープライズの顧客に提供します。Laravel 5.1 is the first release of Laravel to receive long term support. Laravel 5.1 will receive bug fixes for 2 years and security fixes for 3 years. This support window is the largest ever provided for Laravel and provides stability and peace of mind for larger, enterprise clients and customers.
PSR-2PSR-2
PSR-2コーディングスタイルガイドがLaravelフレームワークの標準スタイルガイドとして採用されました。さらに全ジェネレーターがPSR-2と互換性のある記法を生成するように更新されました。The PSR-2 coding style guide[https://github.com/php-fig/fig-standards/blob/master/accepted/PSR-2-coding-style-guide.md] has been adopted as the default style guide for the Laravel framework. Additionally, all generators have been updated to generate PSR-2 compatible syntax.
ドキュメントDocumentation
Laravelのドキュメントの全ページは注意深く見直され、大きく向上しました。全サンプルコードはレビューされ、より適切でコンテキストに合うように更新されました。Every page of the Laravel documentation has been meticulously reviewed and dramatically improved. All code examples have also been reviewed and expanded to provide more relevance and context.
イベントブロードキャストEvent Broadcasting
近代的なWebアプリケーションでは、リアルタイムですぐに更新されるユーザーインターフェイスを実装するために、Webソケットが使用されています。あるデータがサーバで更新されると、そのメッセージはWebソケット接続を通じ、クライアントで処理されるように送信されます。In many modern web applications, web sockets are used to implement realtime, live-updating user interfaces. When some data is updated on the server, a message is typically sent over a websocket connection to be handled by the client.
こうしたタイプのアプリケーションを構築する手助けになるように、LaravelはイベントをWebソケット接続上へ簡単に「ブロードキャスト」できるようにしました。Laravelイベントをブロードキャストすることにより、同じイベント名をサーバサイドのコードとクライアントサイドのJavaScriptフレームワークとで共有できるようになります。To assist you in building these types of applications, Laravel makes it easy to "broadcast" your events over a websocket connection. Broadcasting your Laravel events allows you to share the same event names between your server-side code and your client-side JavaScript framework.
イベントのブロードキャストをより詳しく知るには、イベントのドキュメントを読んでください。To learn more about event broadcasting, check out the event documentation[/docs/{{version}}/events#broadcasting-events].
ミドルウェアパラメーターMiddleware Parameters
ミドルウェアは追加のカスタムパラメーターを受け取れるようになりました。たとえば、指定されたアクションを取る前に、指定された「役割(role)」を認証済みユーザーが持っているかをアプリケーションで確認する必要があるとします。役割名を追加の引数として受け取るRoleMiddlewareを作成することができます。Middleware can now receive additional custom parameters. For example, if your application needs to verify that the authenticated user has a given "role" before performing a given action, you could create a RoleMiddleware that receives a role name as an additional argument:
<?php

namespace App\Http\Middleware;

use Closure;

class RoleMiddleware
{
    /**
     * リクエストフィルターの実行
     *
     * @param  \Illuminate\Http\Request  $request
     * @param  \Closure  $next
     * @param  string  $role
     * @return mixed
     */
    public function handle($request, Closure $next, $role)
    {
        if (! $request->user()->hasRole($role)) {
            // リダイレクト処理…
        }

        return $next($request);
    }

}
ミドルウエアパラメーターはルートを定義するときに指定され、ミドルウェア名とパラメーターを:で区切ります。複数のパラメーターはカンマで区切ります。Middleware parameters may be specified when defining the route by separating the middleware name and parameters with a :. Multiple parameters should be delimited by commas:
Route::put('post/{id}', ['middleware' => 'role:editor', function ($id) {
    //
}]);
ミドルウェアについての詳細については、ミドルウェアのドキュメントを調べてください。For more information on middleware, check out the middleware documentation[/docs/{{version}}/middleware].
テストのオーバーオールTesting Overhaul
Laravelの組み込みテスト機構は大幅に向上しました。アプリケーションと関連し、レスポンスを調べるためのスラスラと記述しやすいインターフェイスの新しいメソッドが数多く提供されました。以下のテストを見てください。The built-in testing capabilities of Laravel have been dramatically improved. A variety of new methods provide a fluent, expressive interface for interacting with your application and examining its responses. For example, check out the following test:
public function testNewUserRegistration()
{
    $this->visit('/register')
         ->type('Taylor', 'name')
         ->check('terms')
         ->press('Register')
         ->seePageIs('/dashboard');
}
テストの詳細は、テストのドキュメントを確認してください。For more information on testing, check out the testing documentation[/docs/{{version}}/testing].
モデルファクトリModel Factories
モデルファクトリを使い、Eloquentモデルのスタブを簡単に作成する方法が提供されました。モデルファクトリによりEloquentモデルの「デフォルト」属性を定義し、テストやデータベースシーディング(初期値設定)に利用するモデルインスタンスを簡単に生成できます。また、ランダムな属性データーを生成するためのFaker PHPライブラリーの強力な機能をモデルファクトリで使えます。Laravel now ships with an easy way to create stub Eloquent models using model factories[/docs/{{version}}/database-testing#writing-factories]. Model factories allow you to easily define a set of "default" attributes for your Eloquent model, and then generate test model instances for your tests or database seeds. Model factories also take advantage of the powerful Faker[https://github.com/fzaninotto/Faker] PHP library for generating random attribute data:
$factory->define(App\User::class, function ($faker) {
    return [
        'name' => $faker->name,
        'email' => $faker->email,
        'password' => str_random(10),
        'remember_token' => str_random(10),
    ];
});
モデルファクトリの詳細は、ドキュメントを参照してください。For more information on model factories, check out the documentation[/docs/{{version}}/database-testing#writing-factories].
Artisanの向上Artisan Improvements
Artisanコマンドは、コマンドラインの引数とオプションを定義するための、とても簡単なインターフェイスを提供するルート定義のような「使い方」で指定できるようになりました。たとえば、シンプルなコマンドとオプションを定義してみましょう。Artisan commands may now be defined using a simple, route-like "signature", which provides an extremely simple interface for defining command line arguments and options. For example, you may define a simple command and its options like so:
/**
 * コンソールコマンドの名前と使用方法
 *
 * @var string
 */
protected $signature = 'email:send {user} {--force}';
Artisanコマンドの定義の詳細は、Artisanのドキュメントを読んでください。For more information on defining Artisan commands, consult the Artisan documentation[/docs/{{version}}/artisan].
フォルダー構造Folder Structure
より意図が分かりやすいように、app/Commandsディレクトリはapp/Jobsに名前が変更されました。さらに、app/Handlersディレクトリは、イベントリスナ専用のapp/Listenersに統合されました。しかしこれは互換性を崩す変更ではなく、Laravel5.1の新しいフォルダー構造へ更新する必要はありません。To better express intent, the app/Commands directory has been renamed to app/Jobs. Additionally, the app/Handlers directory has been consolidated into a single app/Listeners directory which simply contains event listeners. However, this is not a breaking change and you are not required to update to the new folder structure to use Laravel 5.1.
暗号化Encryption
以前のバージョンのLaravelはPHPのmcrypt拡張により暗号化が行われていました。Laravel5.1からは、より活発にメンテナンスが行われているopenssl拡張により暗号化が処理されます。In previous versions of Laravel, encryption was handled by the mcrypt PHP extension. However, beginning in Laravel 5.1, encryption is handled by the openssl extension, which is more actively maintained.
Laravel 5.0Laravel 5.0
Laravel5.0では、Laravelプロジェクトに対する全く新しいアプリケーション構造が、デフォルトとして導入されました。この新構造は、Laravelで堅牢なアプリケーションを構築するためより良い基礎となり、同時にアプリケーション全体へ新しいオートローディング規約(PSR-4)を適用します。最初に、大きな変更点を確認しましょう。Laravel 5.0 introduces a fresh application structure to the default Laravel project. This new structure serves as a better foundation for building a robust application in Laravel, as well as embraces new auto-loading standards (PSR-4) throughout the application. First, let's examine some of the major changes:
新フォルダー構造New Folder Structure
古いapp/modelsディレクトリは完全に取り除かれました。代わりに、皆さんの全コードは直接appフォルダーの中に記述し、デフォルトではApp名前空間として統合されます。このデフォルト名前空間は、app:name Artisanコマンドを使い、簡単に変更できます。The old app/models directory has been entirely removed. Instead, all of your code lives directly within the app folder, and, by default, is organized to the App namespace. This default namespace can be quickly changed using the new app:name Artisan command.
コントローラー、ミドルウェア、リクエスト(Laravel5.0の新しいクラスタイプ)は、アプリケーションのHTTPトランスポート層と関連するクラスとして、app/Httpディレクトリ下に全部まとめられます。構造を持たない一つのルートフィルターファイルの代わりに、全ミドルウェアーは、それぞれのクラスファイルへ分割されました。Controllers, middleware, and requests (a new type of class in Laravel 5.0) are now grouped under the app/Http directory, as they are all classes related to the HTTP transport layer of your application. Instead of a single, flat file of route filters, all middleware are now broken into their own class files.
新しいapp/Providersディレクトリが、以前のLaravel4.xで使われていたapp/startファイルに置き換わりました。これらのサービスプロバイダは、エラーハンドリング、ロギング、ルートのロードなど、アプリケーションの様々な機能の初期準備を担います。もちろん、自分のアプリケーションのために、追加のサービスプロバイダを自由に作成できます。A new app/Providers directory replaces the app/start files from previous versions of Laravel 4.x. These service providers provide various bootstrapping functions to your application, such as error handling, logging, route loading, and more. Of course, you are free to create additional service providers for your application.
アプリケーションの言語ファイルとビューは、resourcesディレクトリへ移動しました。Application language files and views have been moved to the resources directory.
契約Contracts
Laravelの主要なコンポーネント全ての実装インターフェイスが、illuminate/contractsリポジトリーの中に設置されてました。このリポジトリーは外部依存していません。分離性と依存注入のため、使用しているインターフェイスが一箇所にまとまっている利点により、Laravelファサードへ別の選択肢を簡単に導入できるでしょう。All major Laravel components implement interfaces which are located in the illuminate/contracts repository. This repository has no external dependencies. Having a convenient, centrally located set of interfaces you may use for decoupling and dependency injection will serve as an easy alternative option to Laravel Facades.
契約の詳細は、ドキュメントに全て記載されています。For more information on contracts, consult the full documentation[/docs/{{version}}/contracts].
ルートキャッシュRoute Cache
If your application is made up entirely of controller routes, you may utilize the new route:cache Artisan command to drastically speed up the registration of your routes. This is primarily useful on applications with 100+ routes and will drastically speed up this portion of your application.If your application is made up entirely of controller routes, you may utilize the new route:cache Artisan command to drastically speed up the registration of your routes. This is primarily useful on applications with 100+ routes and will drastically speed up this portion of your application.
ルートミドルウェアRoute Middleware
Laravel4スタイルのルート「フィルター」に付け加え、Laravel5ではHTTPミドルウェアもサポートしています。認証やCSRF「フィルター」はミドルウェアに変更されました。ミドルウェアはリクエストがアプリケーションに完全に届く前に検査や、拒否さえも簡単にできるように、全タイプのフィルターを置き換えられる一つの首尾一貫したインターフェイスを提供します。In addition to Laravel 4 style route "filters", Laravel 5 now supports HTTP middleware, and the included authentication and CSRF "filters" have been converted to middleware. Middleware provides a single, consistent interface to replace all types of filters, allowing you to easily inspect, and even reject, requests before they enter your application.
ミドルウェアの詳細は、ドキュメントで確認してください。For more information on middleware, check out the documentation[/docs/{{version}}/middleware].
コントローラーメソッドインジェクションController Method Injection
既存のコンストラクターインジェクションに付け加え、今度はコントローラーメソッドでもタイプヒントによる依存指定ができるようになりました。ルートメソッドに別の引数が存在していても、サービスコンテナが自動的に依存を注入します。In addition to the existing constructor injection, you may now type-hint dependencies on controller methods. The service container[/docs/{{version}}/container] will automatically inject the dependencies, even if the route contains other parameters:
public function createPost(Request $request, PostRepository $posts)
{
    //
}
認証のスカフォールドAuthentication Scaffolding
ユーザー登録、認証、パスワードリセットコントローラーは、最初から準備されています。同時に対応するビューも、resources/views/authに用意されます。さらに、"users"テーブルのマイグレーションも含まれています。簡単なリソースが用意されていることにより、認証の定形コードに手間取ること無く、アプリケーションのアイデアを素早く開発できるようになります。認証ビューへアクセスするルートは、auth/loginとauth/registerです。App\Services\Auth\Registrarサービスは、ユーザーバリデーションと作成に責任を持っています。User registration, authentication, and password reset controllers are now included out of the box, as well as simple corresponding views, which are located at resources/views/auth. In addition, a "users" table migration has been included with the framework. Including these simple resources allows rapid development of application ideas without bogging down on authentication boilerplate. The authentication views may be accessed on the auth/login and auth/register routes. The App\Services\Auth\Registrar service is responsible for user validation and creation.
イベントオブジェクトEvent Objects
イベントは単なる文字列の代わりに、オブジェクトとして定義されます。以下のイベント例で確認してください。You may now define events as objects instead of simply using strings. For example, check out the following event:
<?php

class PodcastWasPurchased
{
    public $podcast;

    public function __construct(Podcast $podcast)
    {
        $this->podcast = $podcast;
    }
}
イベントは普通にディスパッチできます。The event may be dispatched like normal:
Event::fire(new PodcastWasPurchased($podcast));
もちろん、イベントハンドラは、データのリストの代わりに、イベントオブジェクトを受け取ります。Of course, your event handler will receive the event object instead of a list of data:
<?php

class ReportPodcastPurchase
{
    public function handle(PodcastWasPurchased $event)
    {
        //
    }
}
イベント関連の詳細情報は、ドキュメントで完全に記載されています。For more information on working with events, check out the full documentation[/docs/{{version}}/events].
コマンド/キューイングCommands / Queueing
Laravel4でサポートしているキュージョブの形式に付け加え、Laravel5ではキューするジョブをシンプルなコマンドオブジェクトとして表すことができるようになりました。これらのコマンドは、app/Commandsディレクトリに設置します。サンプルコマンドをご覧ください。In addition to the queue job format supported in Laravel 4, Laravel 5 allows you to represent your queued jobs as simple command objects. These commands live in the app/Commands directory. Here's a sample command:
<?php

class PurchasePodcast extends Command implements SelfHandling, ShouldBeQueued
{
    use SerializesModels;

    protected $user, $podcast;

    /**
     * 新しいコマンドインスタンスの生成
     *
     * @return void
     */
    public function __construct(User $user, Podcast $podcast)
    {
        $this->user = $user;
        $this->podcast = $podcast;
    }

    /**
     * コマンド実行
     *
     * @return void
     */
    public function handle()
    {
        // ポッドキャスト購入ロジックの処理…

        event(new PodcastWasPurchased($this->user, $this->podcast));
    }
}
コマンドを簡単に実行できるように、ベースLaravelコントローラーで、DispatchesCommandsトレイトが使用されています。The base Laravel controller utilizes the new DispatchesCommands trait, allowing you to easily dispatch your commands for execution:
$this->dispatch(new PurchasePodcastCommand($user, $podcast));
もちろん、(キューに入れず)タスクを同期的に実行するコマンドを使用することもできます。実際、アプリケーションで実行する必要のある複雑なタスクをカプセル化するため、コマンドは良い手段です。詳細は、コマンドバスのドキュメントで確認してください。Of course, you may also use commands for tasks that are executed synchronously (are not queued). In fact, using commands is a great way to encapsulate complex tasks your application needs to perform. For more information, check out the command bus[/docs/5.0/bus] documentation.
データベースキューDatabase Queue
databaseキュードライバがLaravelに追加されました。データベースソフトウェアの他、余計な追加パッケージが必要がない、シンプルなローカルのキュードライバです。A database queue driver is now included in Laravel, providing a simple, local queue driver that requires no extra package installation beyond your database software.
LaravelスケジューラーLaravel Scheduler
これまで開発者は、時間で実行したいコンソールコマンドに対し、一つ一つCronエントリーを作成してきました。しかし、これは面倒でした。コンソールスケジューラーはソースコントロールされておらず、Cronエントリを追加するためにSSHでサーバに接続する必要がありました。人生をより簡単にしましょう。LaravelコマンドスケジューラーはLaravel自身の中でコマンドスケジュールがスラスラと記述的に定義できるようにしてくれ、サーバに必要なCronエントリはたったひとつだけです。In the past, developers have generated a Cron entry for each console command they wished to schedule. However, this is a headache. Your console schedule is no longer in source control, and you must SSH into your server to add the Cron entries. Let's make our lives easier. The Laravel command scheduler allows you to fluently and expressively define your command schedule within Laravel itself, and only a single Cron entry is needed on your server.
以下のような定義します。It looks like this:
$schedule->command('artisan:command')->dailyAt('15:00');
もちろん、スケジューラーの全てを学習したい場合は、ドキュメントを確認してください。Of course, check out the full documentation[/docs/{{version}}/scheduling] to learn all about the scheduler!
Tinker/PsyshTinker / Psysh
php artisan tinkerコマンドは、より堅牢なPHP REPLであるJustin Hileman作成のPsyshを使用するようになりました。Laravel4のBorisがお気に入りなら、Psyshはもっと好みでしょう。より良いことに、Windowsでも動作します!php artisan tinkerで試し始めてください。The php artisan tinker command now utilizes Psysh[https://github.com/bobthecow/psysh] by Justin Hileman, a more robust REPL for PHP. If you liked Boris in Laravel 4, you're going to love Psysh. Even better, it works on Windows! To get started, just try:
php artisan tinker
DotEnvDotEnv
環境設定ディレクトリがネストし、色々と混乱させる代わりに、Laravel5ではVance Lucas制作のDotEnvを使用しています。このライブラリーは環境設定を管理するとても単純な手法を提供しており、Laravel5での環境決定は簡単です。詳細は、設定のドキュメントをご覧ください。Instead of a variety of confusing, nested environment configuration directories, Laravel 5 now utilizes DotEnv[https://github.com/vlucas/phpdotenv] by Vance Lucas. This library provides a super simple way to manage your environment configuration, and makes environment detection in Laravel 5 a breeze. For more details, check out the full configuration documentation[/docs/{{version}}/installation#environment-configuration].
Laravel ElixirLaravel Elixir
Laravel ElixirはJeffrey Wayにより開発された、アセットをコンパイルしたり、結合したりするためにスラスラと表現できるインターフェイスを提供しています。もしもGruntやGulpの学習が恐ろしくても、怖がる必要はありません。ElixirはLessやSass、CoffeeScriptをコンパイルするために、Gulpを簡単に使い始めさせてくれます。さらにテストまで実行してくれます!Laravel Elixir, by Jeffrey Way, provides a fluent, expressive interface to compiling and concatenating your assets. If you've ever been intimidated by learning Grunt or Gulp, fear no more. Elixir makes it a cinch to get started using Gulp to compile your Less, Sass, and CoffeeScript. It can even run your tests for you!
Elixirの詳細は、ドキュメントで確認してください。For more information on Elixir, check out the full documentation[/docs/5.3/elixir].
Laravel SocialiteLaravel Socialite
Laravel Socialite is an optional, Laravel 5.0+ compatible package that provides totally painless authentication with OAuth providers. Currently, Socialite supports Facebook, Twitter, Google, and GitHub. Here's what it looks like:Laravel Socialite is an optional, Laravel 5.0+ compatible package that provides totally painless authentication with OAuth providers. Currently, Socialite supports Facebook, Twitter, Google, and GitHub. Here's what it looks like:
public function redirectForAuth()
{
    return Socialize::with('twitter')->redirect();
}

public function getUserFromProvider()
{
    $user = Socialize::with('twitter')->user();
}
OAuth認証のフローを書くために、時間を費やす必要はもうありません。数分で使用開始できます!ドキュメントで詳細が全部説明されています。No more spending hours writing OAuth authentication flows. Get started in minutes! The full documentation[/docs/{{version}}/authentication#social-authentication] has all the details.
Flysystemの統合Flysystem Integration
Laravelは強力なFlysystem抽象ファイルシステムライブラリーを採用しました。これにより、統一されたエレガントなAPI一つで、ローカルストレージ、Amazon S3、Rackクラウドストレージを苦労なしに統合できます。Laravel now includes the powerful Flysystem[https://github.com/thephpleague/flysystem] filesystem abstraction library, providing pain free integration with local, Amazon S3, and Rackspace cloud storage - all with one, unified and elegant API! Storing a file in Amazon S3 is now as simple as:
Storage::put('file.txt', 'contents');
LaravelとFlysystemの統合についての詳細は、ドキュメントをご覧ください。For more information on the Laravel Flysystem integration, consult the full documentation[/docs/{{version}}/filesystem].
フォームリクエストForm Requests
Laravel5.0は、Illuminate\Foundation\Http\FormRequestを拡張したクラスである、フォームリクエストを導入しました。このリクエストオブジェクトは、コントローラーメソッドインジェクションにより注入され、定形処理コードを書かなくとも、ユーザー入力のバリデーションが行えます。FormRequestのサンプルを掘り下げ確認してみましょう。Laravel 5.0 introduces form requests, which extend the Illuminate\Foundation\Http\FormRequest class. These request objects can be combined with controller method injection to provide a boiler-plate free method of validating user input. Let's dig in and look at a sample FormRequest:
<?php

namespace App\Http\Requests;

class RegisterRequest extends FormRequest
{
    public function rules()
    {
        return [
            'email' => 'required|email|unique:users',
            'password' => 'required|confirmed|min:8',
        ];
    }

    public function authorize()
    {
        return true;
    }
}
クラスが定義できれば、コントローラーアクションでタイプヒントを指定できます。Once the class has been defined, we can type-hint it on our controller action:
public function register(RegisterRequest $request)
{
    var_dump($request->input());
}
Laravel サービスコンテナがFormRequestインスタンスの注入を認識すると、そのリクエストは自動的にバリデーションが行われます。つまり、コントローラーのアクションが呼び出された時には、そのフォームリクエストクラスに指定したルールに従い、HTTPリクエストは入力のバリデーションに通され確認済みであると、安心して想定できます。さらに、リクエストがバリデーションに引っかかった場合、HTTPリダイレクトが自動的に行われ(カスタマイズ可能)、エラーメッセージもセッションにフラッシュデーターとして保存されるか、JSONに変換されます。 フォームバリデーションはこれまでないくらいにシンプルになりました。 FormRequestバリデーションの詳細は、ドキュメントをご覧ください。When the Laravel service container identifies that the class it is injecting is a FormRequest instance, the request will automatically be validated. This means that if your controller action is called, you can safely assume the HTTP request input has been validated according to the rules you specified in your form request class. Even more, if the request is invalid, an HTTP redirect, which you may customize, will automatically be issued, and the error messages will be either flashed to the session or converted to JSON. Form validation has never been more simple. For more information on FormRequest validation, check out the documentation[/docs/{{version}}/validation#form-request-validation].
シンプルなコントローラーリクエストバリデーションSimple Controller Request Validation
Laravel5のベースコントローラーは、ValidatesRequestsトレイトを取り込んでいます。このトレイトは、やってきたリクエストを手間なくバリデートする、validateメソッドを提供しています。もし、FormRequestがあなたのアプリケーションでは、多少大げさすぎるならば、これを使ってみてください。The Laravel 5 base controller now includes a ValidatesRequests trait. This trait provides a simple validate method to validate incoming requests. If FormRequests are a little too much for your application, check this out:
public function createPost(Request $request)
{
    $this->validate($request, [
        'title' => 'required|max:255',
        'body' => 'required',
    ]);
}
バリデーションが失敗すると、例外が投げられ、適切なHTTPレスポンスが自動的にブラウザへ送り返されます。バリデーションエラーもフラッシュデータとしてセッションに保存されます!AJAXリクエストの場合、Laravelはバリデーションエラーを表すJSONを送り返す面倒も見ます。If the validation fails, an exception will be thrown and the proper HTTP response will automatically be sent back to the browser. The validation errors will even be flashed to the session! If the request was an AJAX request, Laravel even takes care of sending a JSON representation of the validation errors back to you.
この新しいメソッドの詳細は、ドキュメントをご覧ください。For more information on this new method, check out the documentation[/docs/{{version}}/validation#validation-quickstart].
新ジェネレーターNew Generators
新しいデフォルトアプリケーション構造を手助けするため、Artisan生成コマンドが新しくフレームワークに追加されました。詳細は、php artisan listで確認してください。To complement the new default application structure, new Artisan generator commands have been added to the framework. See php artisan list for more details.
設定のキャッシュConfiguration Cache
config:cacheコマンドを使用して、全設定ファイルを一つのファイルへキャッシュできるようになりました。You may now cache all of your configuration in a single file using the config:cache command.
Symfony VarDumperSymfony VarDumper
変数をデバッグ情報としてダンプする、人気のddヘルパ関数が、素晴らしいSymfony VarDumperを使用するようにアップグレードされました。これは出力を色分けし、配列を折りたたむこともできます。プロジェクトで以下のように使用してください。The popular dd helper function, which dumps variable debug information, has been upgraded to use the amazing Symfony VarDumper. This provides color-coded output and even collapsing of arrays. Just try the following in your project:
dd([1, 2, 3]);
Laravel 4.2Laravel 4.2
このリリースの完全な変更リストは、4.2をインストールし、php artisan changesコマンドを実行するか、GitHubで変更を確認してください。このセクションの記述は、リリースの主要な向上点と変更だけを示しています。The full change list for this release by running the php artisan changes command from a 4.2 installation, or by viewing the change file on GitHub[https://github.com/laravel/framework/blob/4.2/src/Illuminate/Foundation/changes.json]. These notes only cover the major enhancements and changes for the release.
注意: 4.2のリリースまでの間に、多くの様々な小さなバグ修正や改善が、Laravel4.1に取り込まれてきました。ですから、Laravel4.1の変更リストも注意深くチェックしてください。{note} During the 4.2 release cycle, many small bug fixes and enhancements were incorporated into the various Laravel 4.1 point releases. So, be sure to check the change list for Laravel 4.1 as well!
PHP 5.4が必要PHP 5.4 Requirement
Laravel4.2を動作させるには、PHP5.4以上が必要です。このPHPに関する動作要件の引き上げにより、Laravelキャッシャーなどのツールで、より記述的なインターフェイスを提供するための、トレイトのような新しい機能を使用することができるようになりました。更に、PHP5.4はPHP5.3よりも、大きな速度と効率の向上をもたらしてくれます。Laravel 4.2 requires PHP 5.4 or greater. This upgraded PHP requirement allows us to use new PHP features such as traits to provide more expressive interfaces for tools like Laravel Cashier[/docs/billing]. PHP 5.4 also brings significant speed and performance improvements over PHP 5.3.
Laravel ForgeLaravel Forge
Laravel Forgeは、新しいWebベースアプリケーションで、皆さんが選んだLinode、DigitalOcean、Rackspace、Amazon EC2のようなクラウド上で、PHPサービスを作成し管理する、シンプルな方法を提供しています。自動的なNginx設定、SSHキーアクセス、cronジョブの自動化、NewRelicとPapertrailによるサーバ監視、「Pushによるデプロイ」、Laravelキュー・ワーカー設定などをサポートしています。Forgeは皆さんのLaravelアプリケーション全部をランチする、最もシンプルで、手に入れやすい手法です。Laravel Forge, a new web based application, provides a simple way to create and manage PHP servers on the cloud of your choice, including Linode, DigitalOcean, Rackspace, and Amazon EC2. Supporting automated Nginx configuration, SSH key access, Cron job automation, server monitoring via NewRelic & Papertrail, "Push To Deploy", Laravel queue worker configuration, and more, Forge provides the simplest and most affordable way to launch all of your Laravel applications.
インストールしたLaravel4.2の中の、app/config/database.php設定ファイルが、デフォルトでForge使用の設定ファイルになり、プラットフォームへ真新しいアプリケーションを便利にデプロイできるようにしてくれます。The default Laravel 4.2 installation's app/config/database.php configuration file is now configured for Forge usage by default, allowing for more convenient deployment of fresh applications onto the platform.
Laravel Forgeの詳細な情報は、Forgeの公式Webサイトをご覧ください。More information about Laravel Forge can be found on the official Forge website[https://forge.laravel.com].
Laravel HomesteadLaravel Homestead
Laravel Homesteadは、強固なLaravelとPHPアプリケーションをデプロイするための、公式Vagrant環境です。配布のためにboxをバッケージする前に、広大な範囲に渡る、必要なboxの準備作業は処理済みですから、非常に素早くboxを起動可能です。Homesteadは、Nginx1.6、PHP5.6、MySQL、Postgres、Redis、Memcached、Beanstalk、Node、Gulp、Grunt、Bowerを用意しています。HomesteadはシンプルなHomestead.yaml設定ファイルを含んでおり、複数のLaravelアプリケーションを一つのboxで管理しています。Laravel Homestead is an official Vagrant environment for developing robust Laravel and PHP applications. The vast majority of the boxes' provisioning needs are handled before the box is packaged for distribution, allowing the box to boot extremely quickly. Homestead includes Nginx 1.6, PHP 5.6, MySQL, Postgres, Redis, Memcached, Beanstalk, Node, Gulp, Grunt, & Bower. Homestead includes a simple Homestead.yaml configuration file for managing multiple Laravel applications on a single box.
インストールしたLaravel4.2に含まれており、初めから用意されているHomesteadデータベースを使用するために設定されている、app/config/local/database.php設定ファイルは、Laravelの初期インストールと設定をより便利にしています。The default Laravel 4.2 installation now includes an app/config/local/database.php configuration file that is configured to use the Homestead database out of the box, making Laravel initial installation and configuration more convenient.
公式ドキュメントにも、Homesteadのドキュメントが追加されました。The official documentation has also been updated to include Homestead documentation[/docs/homestead].
LaravelキャッシャーLaravel Cashier
Laravelキャッシャーは、Stripeを使用し、購読の課金を管理するための、シンプルで記述的なライブラリーです。Laravel4.2で紹介し、キャッシャーのドキュメントも、Laravelのメインドキュメントに含めましたが、コンポーネントのインストールはまだオプションです。このリリースのキャッシャーは、多くのバグが修正され、複数通貨をサポートし、最新のStripe APIとコンパチブルです。Laravel Cashier is a simple, expressive library for managing subscription billing with Stripe. With the introduction of Laravel 4.2, we are including Cashier documentation along with the main Laravel documentation, though installation of the component itself is still optional. This release of Cashier brings numerous bug fixes, multi-currency support, and compatibility with the latest Stripe API.
デーモン・キュー・ワーカーDaemon Queue Workers
Artisanのqueue:workコマンドは、--daemonオプションをサポートし、ワーカーを「デーモンモード」で開始できます。つまり、ワーカーはフレームワークを再起動することなく、ジョブの処理を継続します。この結果、CPU使用率は大幅に減らすことができましたが、アプリケーションのデプロイ手段がやや複雑になるという犠牲を払う必要があります。The Artisan queue:work command now supports a --daemon option to start a worker in "daemon mode", meaning the worker will continue to process jobs without ever re-booting the framework. This results in a significant reduction in CPU usage at the cost of a slightly more complex application deployment process.
デーモン・キュー・ワーカーに関する情報は、キューのドキュメントをご覧ください。More information about daemon queue workers can be found in the queue documentation[/docs/queues#daemon-queue-worker].
メールAPIドライバMail API Drivers
Laravel4.2は、新しいMailgunとMandrill APIドライバをメール機能に導入しました。多くのアプリケーションにとって、SMTPを使用する選択肢よりも、メールを送信する手段として、より早く、より信頼が置けるでしょう。新しいドライバは、Guzzle 4 HTTPライブラリーを使用しています。Laravel 4.2 introduces new Mailgun and Mandrill API drivers for the Mail functions. For many applications, this provides a faster and more reliable method of sending e-mails than the SMTP options. The new drivers utilize the Guzzle 4 HTTP library.
ソフトデリート・トレイトSoft Deleting Traits
PHP5.4のトレイトを使用し、「ソフトデリート」の構造をより美しくし、「グローバルスコープ」を導入しました。この新しい構造により、グローバルトレイトに似た簡単な記述法ができ、フレームワーク内部の関心の分離をよりきれいに実現できます。A much cleaner architecture for "soft deletes" and other "global scopes" has been introduced via PHP 5.4 traits. This new architecture allows for the easier construction of similar global traits, and a cleaner separation of concerns within the framework itself.
新しいSoftDeletingTraitに関する詳細はEloquentのドキュメントをご覧ください。More information on the new SoftDeletingTrait may be found in the Eloquent documentation[/docs/eloquent#soft-deleting].
便利な認証とパスワードリマインダーのトレイトConvenient Auth & Remindable Traits
Laravel4.2は、認証とパスワードリマインダーのユーザーインターフェイスに必要なプロパティを含むシンプルなトレイトを使用するようになりました。これにより、初めから含まれているデフォルトのUserモデルファイルをより美しく提供できます。The default Laravel 4.2 installation now uses simple traits for including the needed properties for the authentication and password reminder user interfaces. This provides a much cleaner default User model file out of the box.
シンプル・ペジネーション"Simple Paginate"
新しいsimplePaginateメソッドが、クエリとEloquentビルダに追加され、ペジネーションビューに、シンプルな「次」と「前」リンクを使用したい場合に、より効率的なクエリが行えるようになりました。A new simplePaginate method was added to the query and Eloquent builder which allows for more efficient queries when using simple "Next" and "Previous" links in your pagination view.
マイグレーション時の確認Migration Confirmation
実働時には、破壊的なマイグレーション操作には、確認を尋ねるようになりました。コマンドをプロンプト無しで実行する場合は、--forceオプションを使用してください。In production, destructive migration operations will now ask for confirmation. Commands may be forced to run without any prompts using the --force command.
Laravel 4.1Laravel 4.1
完全な変更リストFull Change List
このリリースの完全な変更リストは、4.2をインストールし、php artisan changesコマンドを実行するか、GitHubで変更を確認してください。このセクションの記述は、リリースの主要な向上点と変更だけを示しています。The full change list for this release by running the php artisan changes command from a 4.1 installation, or by viewing the change file on GitHub[https://github.com/laravel/framework/blob/4.1/src/Illuminate/Foundation/changes.json]. These notes only cover the major enhancements and changes for the release.
新SSHコンポーネントNew SSH Component
全く新しいSSHコンポーネントがこのリリースで導入されました。これが提供する機能は、SSHを使い簡単にリモートサーバでコマンドを実行することです。詳しくは、SSHコンポーネントのドキュメントをご覧ください。An entirely new SSH component has been introduced with this release. This feature allows you to easily SSH into remote servers and run commands. To learn more, consult the SSH component documentation[/docs/4.1/ssh].
新しいphp artisan tailコマンドは、この新SSHコンポーネントを活用しています。詳細は、tailコマンドドキュメントをご覧ください。The new php artisan tail command utilizes the new SSH component. For more information, consult the tail command documentation[http://laravel.com/docs/ssh#tailing-remote-logs].
TinkerとBorisBoris In Tinker
php artisan tinkerコマンドは、システムがサポートしている場合、Boris REPLを活用します。この機能を利用するには、readlineとpcntl PHP拡張をインストールする必要があります。これらの拡張が用意出来な場合は、4.0以上のシェルが利用できます。The php artisan tinker command now utilizes the Boris REPL[https://github.com/d11wtq/boris] if your system supports it. The readline and pcntl PHP extensions must be installed to use this feature. If you do not have these extensions, the shell from 4.0 will be used.
Eloquentの向上Eloquent Improvements
新しいhasManyThroughリレーションがEloquentに追加されました。どのように使用するかは、Eloquentドキュメントをご覧ください。A new hasManyThrough relationship has been added to Eloquent. To learn how to use it, consult the Eloquent documentation[/docs/eloquent#has-many-through].
また、新しいwhereHasメソッドがリレーションの条件に基づいてモデルを取得するために導入されました。A new whereHas method has also been introduced to allow retrieving models based on relationship constraints[/docs/eloquent#querying-relations].
データベースRead/Write接続Database Read / Write Connections
クエリビルダとEloquent使用時に、データベース層でRead/Write接続により接続を自動的に分けられるようになりました。詳細はドキュメントをご覧ください。Automatic handling of separate read / write connections is now available throughout the database layer, including the query builder and Eloquent. For more information, consult the documentation[/docs/database#read-write-connections].
クエリの優先度Queue Priority
queue:listenコマンドに、カンマ区切りでリストを指定することによる、キュー処理のプライオリティーがサポートされました。Queue priorities are now supported by passing a comma-delimited list to the queue:listen command.
失敗したキュージョブの処理Failed Queue Job Handling
queue:listenへ新しい--triesスイッチをつけることで、失敗したジョブを自動的に処理する機能が追加されました。失敗したジョブに関するより詳しい説明は、キューのドキュメントをご覧ください。The queue facilities now include automatic handling of failed jobs when using the new --tries switch on queue:listen. More information on handling failed jobs can be found in the queue documentation[/docs/queues#failed-jobs].
キャッシュタグCache Tags
キャッシュの"section"は"tags"に置き換わりました。キャッシュのタグにより、複数のタグをキャッシュアイテムにつけることができます。そして、タグを指定することで、一度に全部のアイテムを消去できます。キャッシュタグの使い方の情報は、キャッシュのドキュメントに記載されています。Cache "sections" have been superseded by "tags". Cache tags allow you to assign multiple "tags" to a cache item, and flush all items assigned to a single tag. More information on using cache tags may be found in the cache documentation[/docs/cache#cache-tags].
柔軟になったパスワードリマインダーFlexible Password Reminders
The password reminder engine has been changed to provide greater developer flexibility when validating passwords, flashing status messages to the session, etc. For more information on using the enhanced password reminder engine, consult the documentation.パスワードのバリデーション、セッションにフラッシュアイテムとして保存するメッセージの使用など、パスワードリマインダー(リセット)は、開発者が柔軟に使用できるように変更されました。修正パスワードリマインダーエンジンの詳細は、ドキュメントをご覧ください。The password reminder engine has been changed to provide greater developer flexibility when validating passwords, flashing status messages to the session, etc. For more information on using the enhanced password reminder engine, consult the documentation[/docs/4.1/security#password-reminders-and-reset].
ルーティングエンジンの向上Improved Routing Engine
Laravel 4.1ではルーティング層が完全に書き換えられています。APIに変更はありませんが、ルートの登録は、4.0と比べ完全に100%早くなっています。エンジン全体はとてもシンプルになり、ルートの解釈時のSymfony Routingへの依存が小さくなりました。Laravel 4.1 features a totally re-written routing layer. The API is the same; however, registering routes is a full 100% faster compared to 4.0. The entire engine has been greatly simplified, and the dependency on Symfony Routing has been minimized to the compiling of route expressions.
セッションエンジンの向上Improved Session Engine
このリリースでは、新しいセッションエンジンも導入しました。ルーティングでの向上と同様に、新しいセッション層はより小さく、早くなりました。Symfonyの(そのためにPHPのも)セッション処理機能を使用しなくなり、よりシンプルでメンテナンスしやすいカスタム処理を使用しています。With this release, we're also introducing an entirely new session engine. Similar to the routing improvements, the new session layer is leaner and faster. We are no longer using Symfony's (and therefore PHP's) session handling facilities, and are using a custom solution that is simpler and easier to maintain.
Doctrine DBALDoctrine DBAL
もしrenameColumn機能をマイグレーションで使用している場合、composer.jsonファイルにdoctrine/dbalパッケージを追加する必要があります。このパッケージはデフォルトではLaravelに含まれなくなりました。If you are using the renameColumn function in your migrations, you will need to add the doctrine/dbal dependency to your composer.json file. This package is no longer included in Laravel by default.