イントロダクションIntroduction
メールの送信のサポートに加えて、LaravelはメールやSMS(Vonage経由、以前はNexmoとして知られていました)およびSlackなど、さまざまな配信チャンネルで通知を送信するためのサポートを提供しています。さらに、さまざまなコミュニティが構築した通知チャンネルが作成され、数十の異なるチャンネルで通知を送信できます!通知はWebインターフェイスに表示するため、データベースに保存される場合もあります。In addition to support for sending email[/docs/{{version}}/mail], Laravel provides support for sending notifications across a variety of delivery channels, including email, SMS (via Vonage[https://www.vonage.com/communications-apis/], formerly known as Nexmo), and Slack[https://slack.com]. In addition, a variety of community built notification channels[https://laravel-notification-channels.com/about/#suggesting-a-new-channel] have been created to send notifications over dozens of different channels! Notifications may also be stored in a database so they may be displayed in your web interface.
通常、通知はアプリケーションで何かが起きたことをユーザーへ知らせる、短い情報メッセージです。たとえば、課金アプリを作成しているなら、メールとSMSチャンネルで「課金支払い」を送信できます。Typically, notifications should be short, informational messages that notify users of something that occurred in your application. For example, if you are writing a billing application, you might send an "Invoice Paid" notification to your users via the email and SMS channels.
通知の生成Generating Notifications
Laravelでは、各通知は通常、app/Notificationsディレクトリに保存される単一のクラスで表します。アプリケーションにこのディレクトリが存在しなくても心配しないでください。make:notification Artisanコマンドを実行すると作成されます。In Laravel, each notification is represented by a single class that is typically stored in the app/Notifications directory. Don't worry if you don't see this directory in your application - it will be created for you when you run the make:notification Artisan command:
php artisan make:notification InvoicePaid
このコマンドは app/Notificationsディレクトリに新しい通知クラスを配置します。各通知クラスはviaメソッドとtoMailやtoDatabaseなどのメッセージ構築メソッドを含み、通知を特定のチャンネルに合わせたメッセージに変換します。This command will place a fresh notification class in your app/Notifications directory. Each notification class contains a via method and a variable number of message building methods, such as toMail or toDatabase, that convert the notification to a message tailored for that particular channel.
通知の送信Sending Notifications
Notifiableトレイトの使用Using the Notifiable Trait
通知は、Notifiableトレイトのnotifyメソッドを使用する方法と、Notificationファサードを使用する方法の2つの方法で送信できます。Notifiableトレイトは、アプリケーションのApp\Models\Userモデルにデフォルトで含まれています。Notifications may be sent in two ways: using the notify method of the Notifiable trait or using the Notification facade[/docs/{{version}}/facades]. The Notifiable trait is included on your application's App\Models\User model by default:
<?php

namespace App\Models;

use Illuminate\Foundation\Auth\User as Authenticatable;
use Illuminate\Notifications\Notifiable;

class User extends Authenticatable
{
    use Notifiable;
}
このトレイトが提供するnotifyメソッドは、通知インスタンスを引数に受けます。The notify method that is provided by this trait expects to receive a notification instance:
use App\Notifications\InvoicePaid;

$user->notify(new InvoicePaid($invoice));
Note: どのモデルでも
Notifiableトレイトを使用できることを忘れないでください。Userモデルにだけに限定して含められるわけでありません。[!NOTE]
Remember, you may use theNotifiabletrait on any of your models. You are not limited to only including it on yourUsermodel.
Notificationファサードの使用Using the Notification Facade
別のやり方として、Notificationファサードを介して通知を送信することもできます。このアプローチは、ユーザーのコレクションなど、複数の通知エンティティに通知を送信する必要がある場合に役立ちます。ファサードを使用して通知を送信するには、すべてのnotifiableエンティティと通知インスタンスをsendメソッドに渡します。Alternatively, you may send notifications via the Notification facade[/docs/{{version}}/facades]. This approach is useful when you need to send a notification to multiple notifiable entities such as a collection of users. To send notifications using the facade, pass all of the notifiable entities and the notification instance to the send method:
use Illuminate\Support\Facades\Notification;

Notification::send($users, new InvoicePaid($invoice));
sendNowメソッドを使って通知をすぐに送信することもできます。このメソッドは、通知が ShouldQueue インターフェイスを実装していても、通知を直ちに送信します。You can also send notifications immediately using the sendNow method. This method will send the notification immediately even if the notification implements the ShouldQueue interface:
Notification::sendNow($developers, new DeploymentCompleted($deployment));
配信チャンネルの指定Specifying Delivery Channels
すべての通知クラスは、通知を配信するチャンネルを決定する、viaメソッドを持っています。通知はmail、database、broadcast、vonage、slackチャンネルへ配信されるでしょう。Every notification class has a via method that determines on which channels the notification will be delivered. Notifications may be sent on the mail, database, broadcast, vonage, and slack channels.
Note: TelegramやPusherのような、他の配信チャンネルを利用したい場合は、コミュニティが管理している、Laravel通知チャンネルのWebサイトをご覧ください。[!NOTE]
If you would like to use other delivery channels such as Telegram or Pusher, check out the community driven Laravel Notification Channels website[http://laravel-notification-channels.com].
viaメソッドは、通知を送っているクラスのインスタンスである、$notifiableインスタンスを引数に受け取ります。$notifiableを使い、通知をどこのチャンネルへ配信するかを判定できます。The via method receives a $notifiable instance, which will be an instance of the class to which the notification is being sent. You may use $notifiable to determine which channels the notification should be delivered on:
/**
 * 通知の配信チャンネルを取得
 *
 * @return array<int, string>
 */
public function via(object $notifiable): array
{
    return $notifiable->prefers_sms ? ['vonage'] : ['mail', 'database'];
}
通知のキューイングQueueing Notifications
Warning! 通知をキューへ投入する前に、キューを設定してワーカを起動する必要があります。[!WARNING]
Before queueing notifications you should configure your queue and start a worker[/docs/{{version}}/queues#running-the-queue-worker].
通知の送信には時間がかかる場合があります。特に、チャンネルが通知を配信するために外部API呼び出しを行う必要がある場合に当てはまります。アプリケーションのレスポンス時間を短縮するには、クラスにShouldQueueインターフェイスとQueueableトレイトを追加して、通知をキューに入れてください。インターフェイスとトレイトは、make:notificationコマンドを使用して生成されたすべての通知であらかじめインポートされているため、すぐに通知クラスに追加できます。Sending notifications can take time, especially if the channel needs to make an external API call to deliver the notification. To speed up your application's response time, let your notification be queued by adding the ShouldQueue interface and Queueable trait to your class. The interface and trait are already imported for all notifications generated using the make:notification command, so you may immediately add them to your notification class:
<?php

namespace App\Notifications;

use Illuminate\Bus\Queueable;
use Illuminate\Contracts\Queue\ShouldQueue;
use Illuminate\Notifications\Notification;

class InvoicePaid extends Notification implements ShouldQueue
{
    use Queueable;

    // ...
}
ShouldQueueインターフェイスを通知クラスへ追加したら、通常通りに送信してください。LaravelはクラスのShouldQueueインターフェイスを見つけ、自動的に通知の配信をキューへ投入します。Once the ShouldQueue interface has been added to your notification, you may send the notification like normal. Laravel will detect the ShouldQueue interface on the class and automatically queue the delivery of the notification:
$user->notify(new InvoicePaid($invoice));
通知をキュー投入する場合、受信者とチャンネルの組み合わせごとにジョブを作成し、投入します。例えば、通知が3人の受信者と2つのチャンネルを持つ場合、6つのジョブをキューへディスパッチします。When queueing notifications, a queued job will be created for each recipient and channel combination. For example, six jobs will be dispatched to the queue if your notification has three recipients and two channels.
遅延通知Delaying Notifications
通知の配信を遅らせたい場合、delayメソッドを通知のインスタンスへチェーンしてください。If you would like to delay the delivery of the notification, you may chain the delay method onto your notification instantiation:
$delay = now()->addMinutes(10);

$user->notify((new InvoicePaid($invoice))->delay($delay));
チャンネルごとの遅延通知Delaying Notifications per Channel
特定のチャンネルの遅延量を指定するため、配列をdelayメソッドに渡せます。You may pass an array to the delay method to specify the delay amount for specific channels:
$user->notify((new InvoicePaid($invoice))->delay([
    'mail' => now()->addMinutes(5),
    'sms' => now()->addMinutes(10),
]));
あるいは、Notificationクラス自体にwithDelayメソッドを定義することもできます。withDelayメソッドは、チャンネル名と遅延値の配列を返す必要があります。Alternatively, you may define a withDelay method on the notification class itself. The withDelay method should return an array of channel names and delay values:
/**
 * 通知の送信遅延を決める
 *
 * @return array<string, \Illuminate\Support\Carbon>
 */
public function withDelay(object $notifiable): array
{
    return [
        'mail' => now()->addMinutes(5),
        'sms' => now()->addMinutes(10),
    ];
}
通知キュー接続のカスタマイズCustomizing the Notification Queue Connection
キューへ投入した通知はデフォルトで、アプリケーションのデフォルトのキュー接続を使用してキュー投球します。特定の通知に別の接続を指定する必要がある場合は、通知のコンストラクタから、onConnectionメソッドを呼び出します。By default, queued notifications will be queued using your application's default queue connection. If you would like to specify a different connection that should be used for a particular notification, you may call the onConnection method from your notification's constructor:
<?php

namespace App\Notifications;

use Illuminate\Bus\Queueable;
use Illuminate\Contracts\Queue\ShouldQueue;
use Illuminate\Notifications\Notification;

class InvoicePaid extends Notification implements ShouldQueue
{
    use Queueable;

    /**
     * 新規通知インスタンスの生成
     */
    public function __construct()
    {
        $this->onConnection('redis');
    }
}
もしくは、通知でサポートしている各通知チャンネルで使用する特定のキュー接続を指定したい場合は、自身の通知にviaConnectionsメソッドを定義してください。このメソッドは、チャンネル名とキュー接続名のペアの配列を返す必要があります。Or, if you would like to specify a specific queue connection that should be used for each notification channel supported by the notification, you may define a viaConnections method on your notification. This method should return an array of channel name / queue connection name pairs:
/**
 * 各通知チャンネルで使用する接続を決定
 *
 * @return array<string, string>
 */
public function viaConnections(): array
{
    return [
        'mail' => 'redis',
        'database' => 'sync',
    ];
}
通知チャンネルキューのカスタマイズCustomizing Notification Channel Queues
各通知チャンネルが使用し、その通知がサポートしている特定のキューを指定する場合、通知へviaQueuesメソッドを定義してください。このメソッドはチャンネル名/キュー名のペアの配列を返してください。If you would like to specify a specific queue that should be used for each notification channel supported by the notification, you may define a viaQueues method on your notification. This method should return an array of channel name / queue name pairs:
/**
 * 各通知チャンネルで使用するキューを判断。
 *
 * @return array<string, string>
 */
public function viaQueues(): array
{
    return [
        'mail' => 'mail-queue',
        'slack' => 'slack-queue',
    ];
}
キュー投入する通知とデータベーストランザクションQueued Notifications and Database Transactions
キューへ投入した通知がデータベーストランザクション内でディスパッチされると、データベーストランザクションがコミットされる前にキューによって処理される場合があります。これが発生した場合、データベーストランザクション中にモデルまたはデータベースレコードに加えた更新は、データベースにまだ反映されていない可能性があります。さらに、トランザクション内で作成されたモデルまたはデータベースレコードは、データベースに存在しない可能性があります。通知がこれらのモデルに依存している場合、キューに入れられた通知を送信するジョブが処理されるときに予期しないエラーが発生する可能性があります。When queued notifications are dispatched within database transactions, they may be processed by the queue before the database transaction has committed. When this happens, any updates you have made to models or database records during the database transaction may not yet be reflected in the database. In addition, any models or database records created within the transaction may not exist in the database. If your notification depends on these models, unexpected errors can occur when the job that sends the queued notification is processed.
キュー接続のafter_commit設定オプションがfalseに設定されている場合でも、通知時にafterCommitメソッドを呼び出せば、キュー投入する特定の通知をオープンしている全データベーストランザクションをコミットした後に、ディスパッチするよう指定できます。If your queue connection's after_commit configuration option is set to false, you may still indicate that a particular queued notification should be dispatched after all open database transactions have been committed by calling the afterCommit method when sending the notification:
use App\Notifications\InvoicePaid;

$user->notify((new InvoicePaid($invoice))->afterCommit());
あるいは、通知のコンストラクタから、afterCommitメソッドを呼び出すこともできます。Alternatively, you may call the afterCommit method from your notification's constructor:
<?php

namespace App\Notifications;

use Illuminate\Bus\Queueable;
use Illuminate\Contracts\Queue\ShouldQueue;
use Illuminate\Notifications\Notification;

class InvoicePaid extends Notification implements ShouldQueue
{
    use Queueable;

    /**
     * 新しいメッセージインスタンスの生成
     */
    public function __construct()
    {
        $this->afterCommit();
    }
}
Note: この問題の回避方法の詳細は、キュー投入されるジョブとデータベーストランザクションに関するドキュメントを確認してください。[!NOTE]
To learn more about working around these issues, please review the documentation regarding queued jobs and database transactions[/docs/{{version}}/queues#jobs-and-database-transactions].
キュー投入した通知を送信するか判定Determining if a Queued Notification Should Be Sent
バックグラウンド処理のため、通知をキューへディスパッチすると、通常はキューワーカがそれを受け取り、意図した受信者へ送信します。After a queued notification has been dispatched for the queue for background processing, it will typically be accepted by a queue worker and sent to its intended recipient.
しかし、キューワーカが処理した後に、そのキュー投入済み通知を送信すべきか最終的に判断したい場合は、通知クラスにshouldSendメソッドを定義してください。このメソッドからfalseを返す場合、通知は送信されません。However, if you would like to make the final determination on whether the queued notification should be sent after it is being processed by a queue worker, you may define a shouldSend method on the notification class. If this method returns false, the notification will not be sent:
/**
 * 通知を送信する必要があるかどうか確認
 */
public function shouldSend(object $notifiable, string $channel): bool
{
    return $this->invoice->isPaid();
}
オンデマンド通知On-Demand Notifications
アプリケーションの「ユーザー」として保存されていない人に通知を送信する必要がある場合があります。Notificationファサードのrouteメソッドを使用して、通知を送信する前にアドホックな通知ルーティング情報を指定します。Sometimes you may need to send a notification to someone who is not stored as a "user" of your application. Using the Notification facade's route method, you may specify ad-hoc notification routing information before sending the notification:
use Illuminate\Broadcasting\Channel;
use Illuminate\Support\Facades\Notification;

Notification::route('mail', 'taylor@example.com')
            ->route('vonage', '5555555555')
            ->route('slack', '#slack-channel')
            ->route('broadcast', [new Channel('channel-name')])
            ->notify(new InvoicePaid($invoice));
オンデマンド通知をmailルートへ送信するとき、受信者名を指定したい場合は、メールアドレスをキーとし、名前を配列の最初の要素の値として含む配列を渡してください。If you would like to provide the recipient's name when sending an on-demand notification to the mail route, you may provide an array that contains the email address as the key and the name as the value of the first element in the array:
Notification::route('mail', [
    'barrett@example.com' => 'Barrett Blair',
])->notify(new InvoicePaid($invoice));
routes`メソッドを使用すると、一度に複数の通知チャネルに対してアドホックなルーティング情報を提供できます。Using the routes method, you may provide ad-hoc routing information for multiple notification channels at once:
Notification::routes([
    'mail' => ['barrett@example.com' => 'Barrett Blair'],
    'vonage' => '5555555555',
])->notify(new InvoicePaid($invoice));
メール通知Mail Notifications
メールメッセージのフォーマットFormatting Mail Messages
通知が電子メール送信をサポートしている場合は、通知クラスでtoMailメソッドを定義する必要があります。このメソッドは$notifiableエンティティを受け取り、Illuminate\Notifications\Messages\MailMessageインスタンスを返す必要があります。If a notification supports being sent as an email, you should define a toMail method on the notification class. This method will receive a $notifiable entity and should return an Illuminate\Notifications\Messages\MailMessage instance.
MailMessageクラスには、トランザクションメールメッセージの作成に役立ついくつかの簡単なメソッドが含まれています。メールメッセージには、「行動を促すフレーズ」だけでなく、テキスト行も含まれる場合があります。toMailメソッドの例を見てみましょう。The MailMessage class contains a few simple methods to help you build transactional email messages. Mail messages may contain lines of text as well as a "call to action". Let's take a look at an example toMail method:
/**
 * 通知のメールプレゼンテーションを取得
 */
public function toMail(object $notifiable): MailMessage
{
    $url = url('/invoice/'.$this->invoice->id);

    return (new MailMessage)
                ->greeting('Hello!')
                ->line('課金が支払われました。')
                ->lineIf($this->amount > 0, "お支払額: {$this->amount}")
                ->action('インボイス確認', $url)
                ->line('私達のアプリケーションをご利用いただき、ありがとうございます。');
}
Note:
toMailメソッドの中で、$this->invoice->idを使っていることに注意してください。通知メッセージを生成するために必要な情報は、どんなものでも通知のコンストラクタへ渡せます。[!NOTE]
Note we are using$this->invoice->idin ourtoMailmethod. You may pass any data your notification needs to generate its message into the notification's constructor.
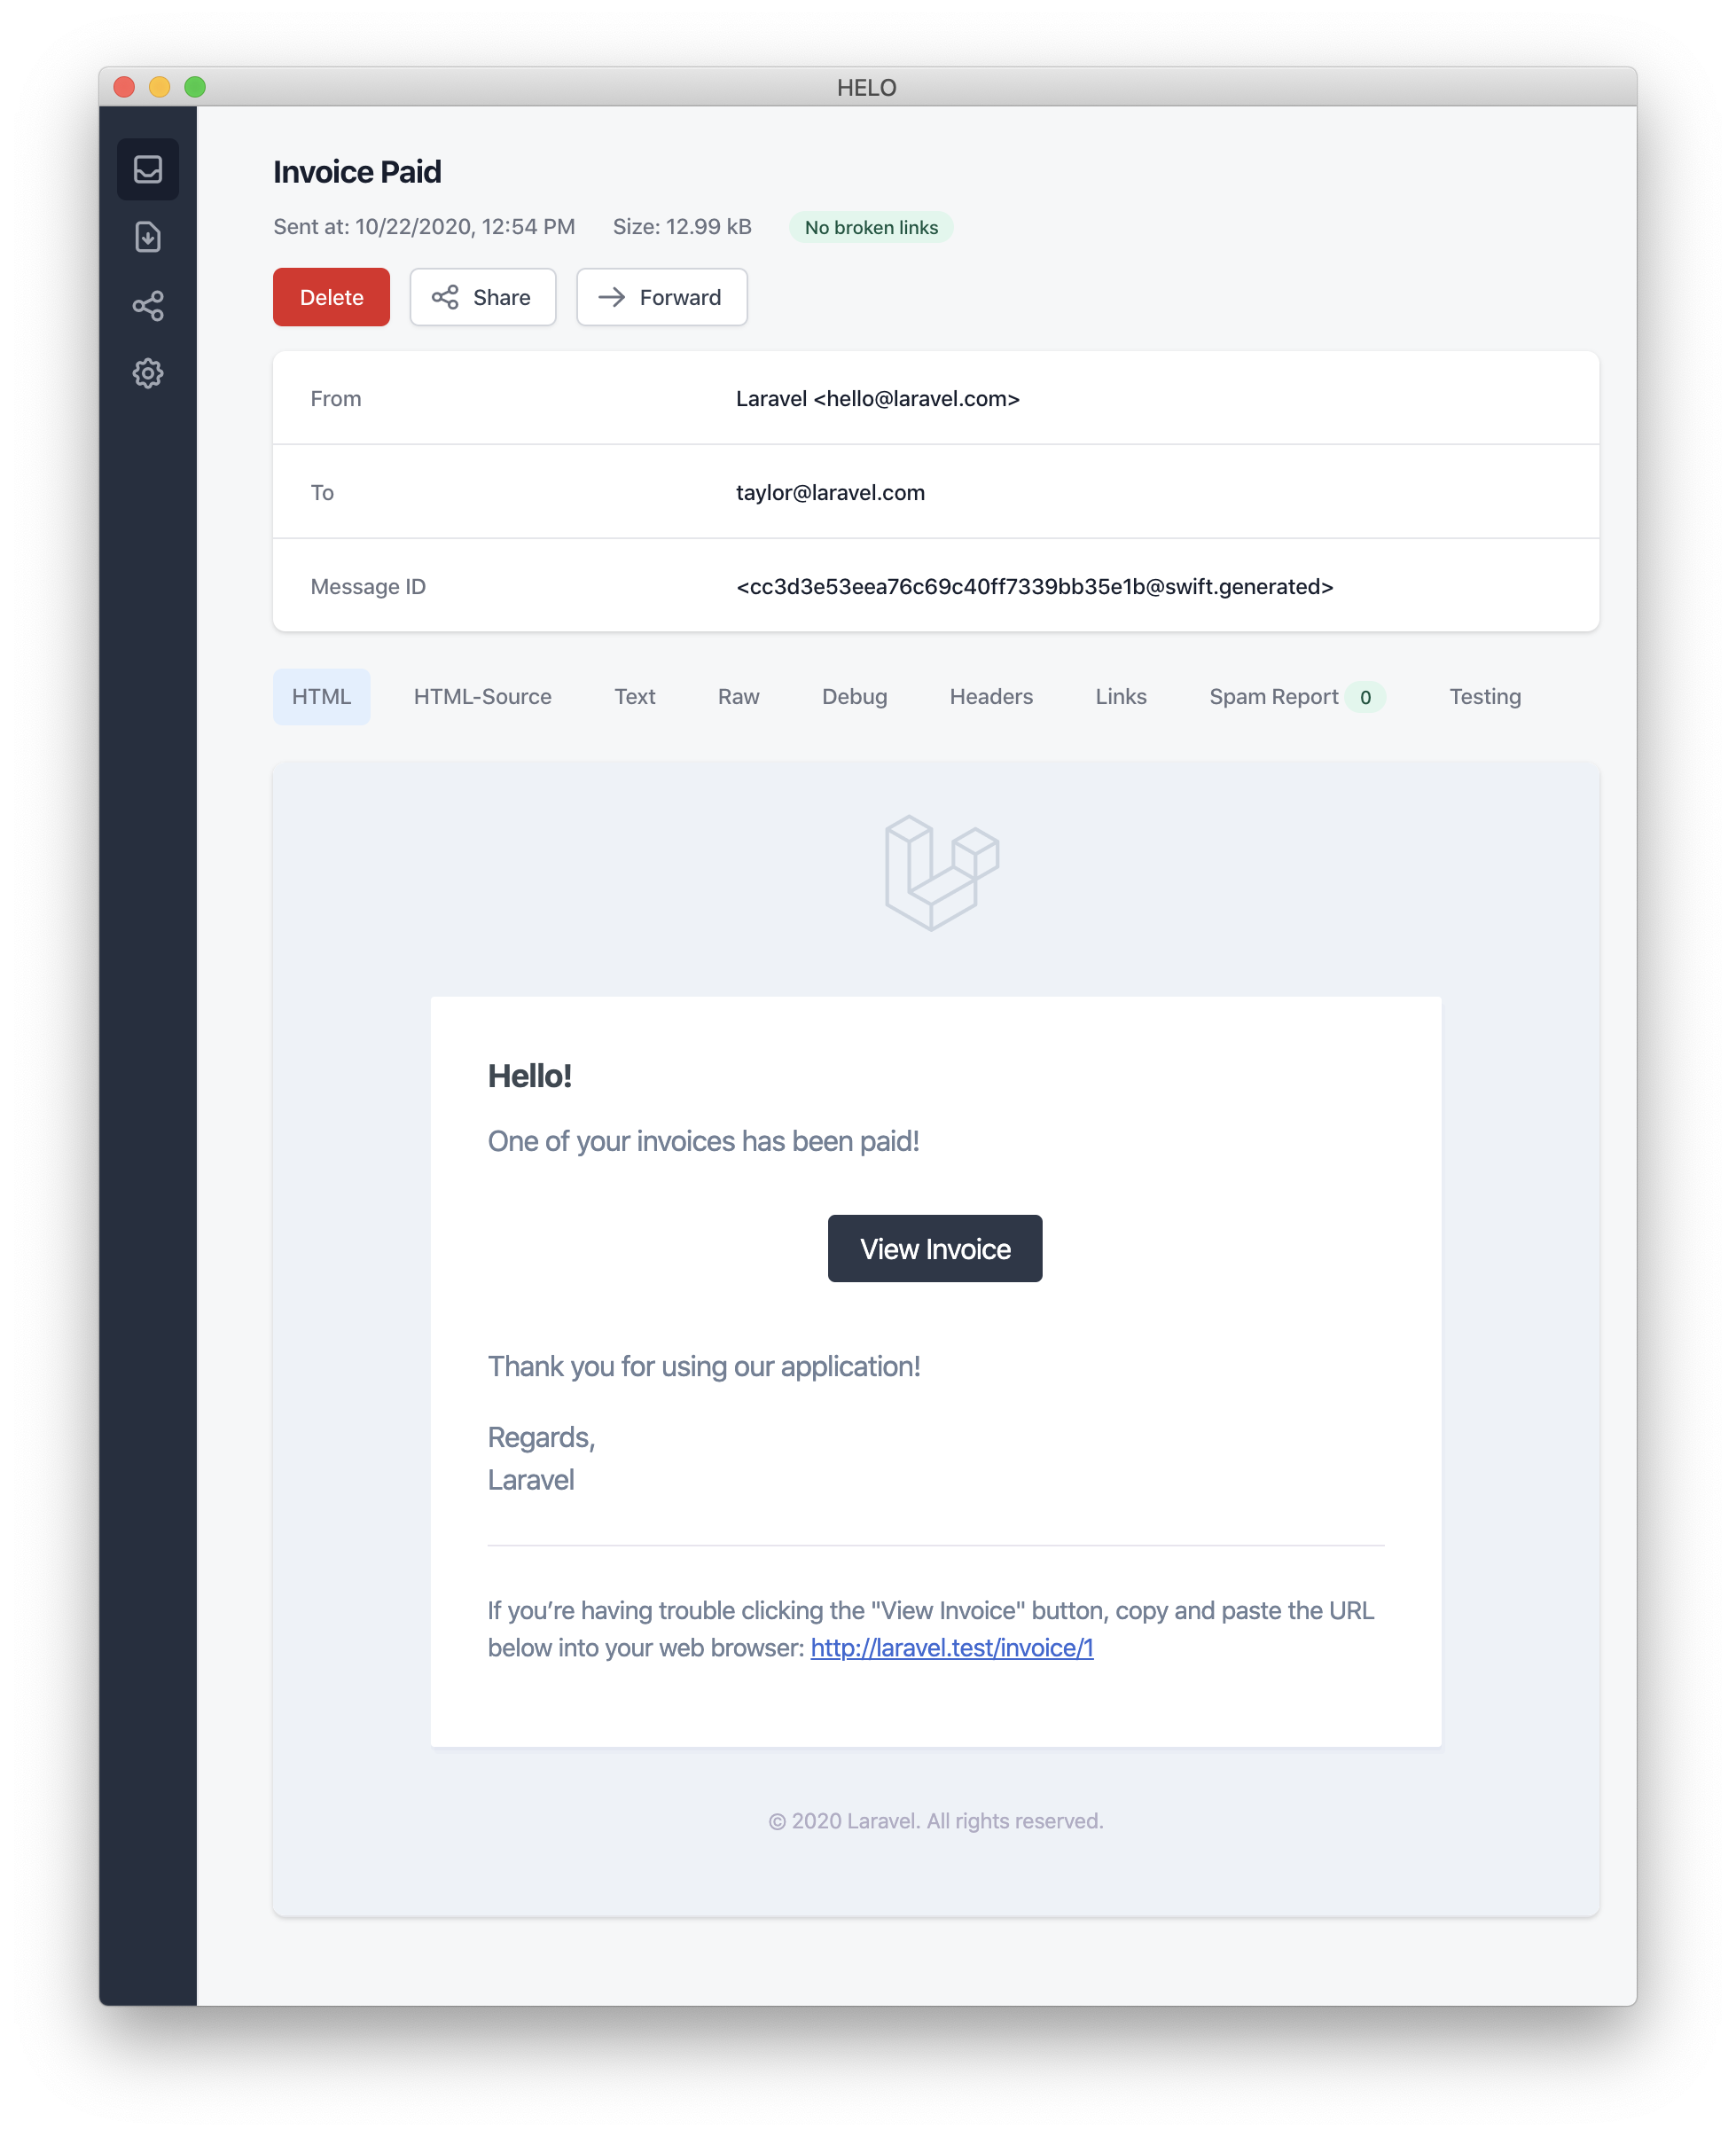
この例では、挨拶、テキスト行、行動を促すフレーズ、そして別のテキスト行を登録します。MailMessageオブジェクトが提供するこれらのメソッドにより、小さなトランザクションメールを簡単かつ迅速にフォーマットできます。次に、メールチャンネルは、メッセージコンポーネントを、平文テキストと対応する美しいレスポンス性の高いHTML電子メールテンプレートに変換します。mailチャンネルが生成する電子メールの例を次に示します。In this example, we register a greeting, a line of text, a call to action, and then another line of text. These methods provided by the MailMessage object make it simple and fast to format small transactional emails. The mail channel will then translate the message components into a beautiful, responsive HTML email template with a plain-text counterpart. Here is an example of an email generated by the mail channel:
Note: メール通知を送信するときは、必ず
config/app.php設定ファイルでname設定オプションを設定してください。この値は、メール通知メッセージのヘッダとフッターに使用されます。[!NOTE]
When sending mail notifications, be sure to set thenameconfiguration option in yourconfig/app.phpconfiguration file. This value will be used in the header and footer of your mail notification messages.
エラーメッセージError Messages
通知の中には、請求書の支払いに失敗したなどのエラーをユーザーへ知らせるものがあります。メッセージを作成時に、errorメソッドを呼び出せば、メールメッセージがエラーに関するものであることを示せます。メールメッセージでerrorメソッドを使用すると、アクションの呼び出しボタンが黒ではなく、赤になります。Some notifications inform users of errors, such as a failed invoice payment. You may indicate that a mail message is regarding an error by calling the error method when building your message. When using the error method on a mail message, the call to action button will be red instead of black:
/**
 * 通知のメールプレゼンテーションを取得
 */
public function toMail(object $notifiable): MailMessage
{
    return (new MailMessage)
                ->error()
                ->subject('Invoice Payment Failed')
                ->line('...');
}
その他のメール通知フォーマットオプションOther Mail Notification Formatting Options
通知クラスの中にテキストの「行(line)」を定義する代わりに、通知メールをレンダするためのカスタムテンプレートをviewメソッドを使い、指定できます。Instead of defining the "lines" of text in the notification class, you may use the view method to specify a custom template that should be used to render the notification email:
/**
 * 通知のメールプレゼンテーションを取得
 */
public function toMail(object $notifiable): MailMessage
{
    return (new MailMessage)->view(
        'mail.invoice.paid', ['invoice' => $this->invoice]
    );
}
viewメソッドに与える配列の2番目の要素としてビュー名を渡すことにより、メールメッセージの平文テキストビューを指定できます。You may specify a plain-text view for the mail message by passing the view name as the second element of an array that is given to the view method:
/**
 * 通知のメールプレゼンテーションを取得
 */
public function toMail(object $notifiable): MailMessage
{
    return (new MailMessage)->view(
        ['mail.invoice.paid', 'mail.invoice.paid-text'],
        ['invoice' => $this->invoice]
    );
}
また、メッセージにプレーンテキストのビューしかない場合は、textメソッドを使うこともできます。Or, if your message only has a plain-text view, you may utilize the text method:
/**
 * 通知のメール表現取得
 */
public function toMail(object $notifiable): MailMessage
{
    return (new MailMessage)->text(
        'mail.invoice.paid-text', ['invoice' => $this->invoice]
    );
}
送信者のカスタマイズCustomizing the Sender
デフォルトのメール送信者/Fromアドレスは、config/mail.php設定ファイルで定義されています。しかし、特定の通知でFromアドレスを指定する場合は、fromメソッドで指定します。By default, the email's sender / from address is defined in the config/mail.php configuration file. However, you may specify the from address for a specific notification using the from method:
/**
 * 通知のメールプレゼンテーションを取得
 */
public function toMail(object $notifiable): MailMessage
{
    return (new MailMessage)
                ->from('barrett@example.com', 'Barrett Blair')
                ->line('...');
}
受信者のカスタマイズCustomizing the Recipient
mailチャンネルを介して通知を送信すると、通知システムは通知エンティティのemailプロパティを自動的に検索します。通知エンティティでrouteNotificationForMailメソッドを定義することにより、通知の配信に使用される電子メールアドレスをカスタマイズできます。When sending notifications via the mail channel, the notification system will automatically look for an email property on your notifiable entity. You may customize which email address is used to deliver the notification by defining a routeNotificationForMail method on the notifiable entity:
<?php

namespace App\Models;

use Illuminate\Foundation\Auth\User as Authenticatable;
use Illuminate\Notifications\Notifiable;
use Illuminate\Notifications\Notification;

class User extends Authenticatable
{
 * @return \Illuminate\Notifications\Message\SlackMessage

    /**
     * メールチャンネルに対する通知をルートする
     *
     * @return  array<string, string>|string
     */
    public function routeNotificationForMail(Notification $notification): array|string
    {
        // メールアドレスのみを返す場合
        return $this->email_address;

        // メールアドレスと名前を返す場合
        return [$this->email_address => $this->name];
    }
}
件名のカスタマイズCustomizing the Subject
デフォルトでは、電子メールの件名は「タイトルケース」にフォーマットされた通知のクラス名です。したがって、通知クラスの名前がInvoicePaidの場合、メールの件名はInvoice Paidになります。メッセージに別の件名を指定する場合は、メッセージを作成するときに「subject」メソッドを呼び出します。By default, the email's subject is the class name of the notification formatted to "Title Case". So, if your notification class is named InvoicePaid, the email's subject will be Invoice Paid. If you would like to specify a different subject for the message, you may call the subject method when building your message:
/**
 * 通知のメールプレゼンテーションを取得
 */
public function toMail(object $notifiable): MailMessage
{
    return (new MailMessage)
                ->subject('Notification Subject')
                ->line('...');
}
MailerのカスタマイズCustomizing the Mailer
デフォルトでは、電子メール通知は、config/mail.php設定ファイルで定義しているデフォルトのメーラーを使用して送信されます。ただし、メッセージの作成時にmailerメソッドを呼び出すことにより、実行時に別のメーラーを指定できます。By default, the email notification will be sent using the default mailer defined in the config/mail.php configuration file. However, you may specify a different mailer at runtime by calling the mailer method when building your message:
/**
 * 通知のメールプレゼンテーションを取得
 */
public function toMail(object $notifiable): MailMessage
{
    return (new MailMessage)
                ->mailer('postmark')
                ->line('...');
}
テンプレートのカスタマイズCustomizing the Templates
通知パッケージのリソースをリソース公開することにより、メール通知で使用されるHTMLと平文テキストのテンプレートを変更することが可能です。次のコマンドを実行した後、メール通知のテンプレートはresources/views/vendor/notificationsディレクトリ下に作成されます。You can modify the HTML and plain-text template used by mail notifications by publishing the notification package's resources. After running this command, the mail notification templates will be located in the resources/views/vendor/notifications directory:
php artisan vendor:publish --tag=laravel-notifications
添付Attachments
電子メール通知に添付ファイルを追加するには、メッセージの作成中にattachメソッドを使用します。attachメソッドは、ファイルへの絶対パスを最初の引数に受けます。To add attachments to an email notification, use the attach method while building your message. The attach method accepts the absolute path to the file as its first argument:
/**
 * 通知のメールプレゼンテーションを取得
 */
public function toMail(object $notifiable): MailMessage
{
    return (new MailMessage)
                ->greeting('Hello!')
                ->attach('/path/to/file');
}
Note: 通知メールメッセージが提供する
attachメソッドは、Attachableオブジェクトも受け付けます。詳細は、包括的なAttachableオブジェクトのドキュメントを参照してください。[!NOTE]
Theattachmethod offered by notification mail messages also accepts attachable objects[/docs/{{version}}/mail#attachable-objects]. Please consult the comprehensive attachable object documentation[/docs/{{version}}/mail#attachable-objects] to learn more.
メッセージにファイルを添付するとき、attachメソッドの第2引数として配列を渡し、表示名やMIMEタイプの指定もできます。When attaching files to a message, you may also specify the display name and / or MIME type by passing an array as the second argument to the attach method:
/**
 * 通知のメールプレゼンテーションを取得
 */
public function toMail(object $notifiable): MailMessage
{
    return (new MailMessage)
                ->greeting('Hello!')
                ->attach('/path/to/file', [
                    'as' => 'name.pdf',
                    'mime' => 'application/pdf',
                ]);
}
Mailableオブジェクトにファイルを添付するのとは異なり、attachFromStorageを使用してストレージディスクから直接ファイルを添付することはできません。むしろ、ストレージディスク上のファイルへの絶対パスを指定してattachメソッドを使用する必要があります。または、toMailメソッドからmailableを返すこともできます。Unlike attaching files in mailable objects, you may not attach a file directly from a storage disk using attachFromStorage. You should rather use the attach method with an absolute path to the file on the storage disk. Alternatively, you could return a mailable[/docs/{{version}}/mail#generating-mailables] from the toMail method:
use App\Mail\InvoicePaid as InvoicePaidMailable;

/**
 * 通知のメールプレゼンテーションを取得
 */
public function toMail(object $notifiable): Mailable
{
    return (new InvoicePaidMailable($this->invoice))
                ->to($notifiable->email)
                ->attachFromStorage('/path/to/file');
}
必要であれば、attachMany メソッドを用いて、複数のファイルをメッセージへ添付できます。When necessary, multiple files may be attached to a message using the attachMany method:
/**
 * 通知のメールプレゼンテーションを取得
 */
public function toMail(object $notifiable): MailMessage
{
    return (new MailMessage)
                ->greeting('Hello!')
                ->attachMany([
                    '/path/to/forge.svg',
                    '/path/to/vapor.svg' => [
                        'as' => 'Logo.svg',
                        'mime' => 'image/svg+xml',
                    ],
                ]);
}
素のデータの添付Raw Data Attachments
attachDataメソッドを使用して、生のバイト文字列を添付ファイルとして添付できます。attachDataメソッドを呼び出すときは、添付ファイルへ割り当てる必要のあるファイル名を指定する必要があります。The attachData method may be used to attach a raw string of bytes as an attachment. When calling the attachData method, you should provide the filename that should be assigned to the attachment:
/**
 * 通知のメールプレゼンテーションを取得
 */
public function toMail(object $notifiable): MailMessage
{
    return (new MailMessage)
                ->greeting('Hello!')
                ->attachData($this->pdf, 'name.pdf', [
                    'mime' => 'application/pdf',
                ]);
}
タグとメタデータの追加Adding Tags and Metadata
MailgunやPostmarkなどのサードパーティのメールプロバイダは、メッセージの「タグ」や「メタデータ」をサポートしており、アプリケーションから送信されたメールをグループ化し、追跡するため使用できます。タグやメタデータは、tagメソッドやmetadataメソッドを使ってメールメッセージへ追加します。Some third-party email providers such as Mailgun and Postmark support message "tags" and "metadata", which may be used to group and track emails sent by your application. You may add tags and metadata to an email message via the tag and metadata methods:
/**
 * 通知のメールプレゼンテーションを取得
 */
public function toMail(object $notifiable): MailMessage
{
    return (new MailMessage)
                ->greeting('Comment Upvoted!')
                ->tag('upvote')
                ->metadata('comment_id', $this->comment->id);
}
Mailgunドライバを使用しているアプリケーションの場合は、タグとメタデータの詳細は、Mailgunのドキュメントを参照してください。同様に、Postmarkのドキュメントのタグとメタデータで、サポートに関するより詳しい情報を得られます。If your application is using the Mailgun driver, you may consult Mailgun's documentation for more information on tags[https://documentation.mailgun.com/en/latest/user_manual.html#tagging-1] and metadata[https://documentation.mailgun.com/en/latest/user_manual.html#attaching-data-to-messages]. Likewise, the Postmark documentation may also be consulted for more information on their support for tags[https://postmarkapp.com/blog/tags-support-for-smtp] and metadata[https://postmarkapp.com/support/article/1125-custom-metadata-faq].
アプリケーションでAmazon SESを使用してメール送信する場合、metadataメソッドを使用して、メッセージへSESのタグを添付する必要があります。If your application is using Amazon SES to send emails, you should use the metadata method to attach SES "tags"[https://docs.aws.amazon.com/ses/latest/APIReference/API_MessageTag.html] to the message.
SymfonyメッセージのカスタマイズCustomizing the Symfony Message
MailMessageクラスのwithSymfonyMessageメソッドを使うと、メッセージを送信する前に、Symfonyメッセージインスタンスで呼び出すクロージャを登録できます。これにより、メッセージが配信される前に、メッセージを細かくカスタマイズする機会を提供しています。The withSymfonyMessage method of the MailMessage class allows you to register a closure which will be invoked with the Symfony Message instance before sending the message. This gives you an opportunity to deeply customize the message before it is delivered:
use Symfony\Component\Mime\Email;

/**
 * 通知のメールプレゼンテーションを取得
 */
public function toMail(object $notifiable): MailMessage
{
    return (new MailMessage)
                ->withSymfonyMessage(function (Email $message) {
                    $message->getHeaders()->addTextHeader(
                        'Custom-Header', 'Header Value'
                    );
                });
}
Mailablesの使用Using Mailables
必要に応じ、通知のtoMailメソッドから完全なMailableオブジェクトを返せます。MailMessageの代わりにMaileableを返すときは、Mailableオブジェクトのtoメソッドを使ってメッセージ受信者を指定する必要があります。If needed, you may return a full mailable object[/docs/{{version}}/mail] from your notification's toMail method. When returning a Mailable instead of a MailMessage, you will need to specify the message recipient using the mailable object's to method:
use App\Mail\InvoicePaid as InvoicePaidMailable;
use Illuminate\Mail\Mailable;

/**
 * 通知のメールプレゼンテーションを取得
 */
public function toMail(object $notifiable): Mailable
{
    return (new InvoicePaidMailable($this->invoice))
                ->to($notifiable->email);
}
Mailablesとオンデマンド通知Mailables and On-Demand Notifications
オンデマンド通知を送信する場合、toMailメソッドに渡される$notifiableインスタンスはIlluminate\Notifications\AnonymousNotifiableインスタンスになります。routeNotificationForメソッドは、オンデマンド通知の送信先のメールアドレスを取得するために使用することができます。If you are sending an on-demand notification[#on-demand-notifications], the $notifiable instance given to the toMail method will be an instance of Illuminate\Notifications\AnonymousNotifiable, which offers a routeNotificationFor method that may be used to retrieve the email address the on-demand notification should be sent to:
use App\Mail\InvoicePaid as InvoicePaidMailable;
use Illuminate\Notifications\AnonymousNotifiable;
use Illuminate\Mail\Mailable;

/**
 * 通知のメールプレゼンテーションを取得
 */
public function toMail(object $notifiable): Mailable
{
    $address = $notifiable instanceof AnonymousNotifiable
            ? $notifiable->routeNotificationFor('mail')
            : $notifiable->email;

    return (new InvoicePaidMailable($this->invoice))
                ->to($address);
}
メール通知のプレビューPreviewing Mail Notifications
メール通知テンプレートを設計するときは、通常のBladeテンプレートのように、レンダリングしたメールメッセージをブラウザですばやくプレビューできると便利です。このため、Laravelはメール通知によって生成したメールメッセージをルートクロージャまたはコントローラから直接返すことができます。MailMessageが返されると、ブラウザにレンダリングされて表示されるため、実際のメールアドレスに送信しなくてもデザインをすばやくプレビューできます。When designing a mail notification template, it is convenient to quickly preview the rendered mail message in your browser like a typical Blade template. For this reason, Laravel allows you to return any mail message generated by a mail notification directly from a route closure or controller. When a MailMessage is returned, it will be rendered and displayed in the browser, allowing you to quickly preview its design without needing to send it to an actual email address:
use App\Invoice;
use App\Notifications\InvoicePaid;

Route::get('/notification', function () {
    $invoice = Invoice::find(1);

    return (new InvoicePaid($invoice))
                ->toMail($invoice->user);
});
Markdownメール通知Markdown Mail Notifications
Markdownメール通知により、事前に構築したテンプレートとメール通知のコンポーネントの利点をMailable中で利用できます。メッセージをMarkdownで記述すると、Laravelは美しいレスポンシブHTMLテンプレートをレンダすると同時に、自動的に平文テキスト版も生成します。Markdown mail notifications allow you to take advantage of the pre-built templates of mail notifications, while giving you more freedom to write longer, customized messages. Since the messages are written in Markdown, Laravel is able to render beautiful, responsive HTML templates for the messages while also automatically generating a plain-text counterpart.
メッセージ生成Generating the Message
対応するMarkdownテンプレートを指定し、Mailableを生成するには、make:notification Artisanコマンドを--markdownオプション付きで使用します。To generate a notification with a corresponding Markdown template, you may use the --markdown option of the make:notification Artisan command:
php artisan make:notification InvoicePaid --markdown=mail.invoice.paid
他のすべてのメール通知と同様に、Markdownテンプレートを使用する通知では、通知クラスにtoMailメソッドを定義する必要があります。ただし、lineメソッドとactionメソッドを使用して通知を作成する代わりに、markdownメソッドを使用して使用するMarkdownテンプレートの名前を指定します。テンプレートで使用できるようにするデータの配列は、メソッドの2番目の引数として渡します。Like all other mail notifications, notifications that use Markdown templates should define a toMail method on their notification class. However, instead of using the line and action methods to construct the notification, use the markdown method to specify the name of the Markdown template that should be used. An array of data you wish to make available to the template may be passed as the method's second argument:
/**
 * 通知のメールプレゼンテーションを取得
 */
public function toMail(object $notifiable): MailMessage
{
    $url = url('/invoice/'.$this->invoice->id);

    return (new MailMessage)
                ->subject('Invoice Paid')
                ->markdown('mail.invoice.paid', ['url' => $url]);
}
メッセージ記述Writing the Message
Markdownメール通知ではBladeコンポーネントとMarkdown記法が利用でき、メールメッセージを簡単に構築できると同時に、Laravelが用意している通知コンポーネントも活用できます。Markdown mail notifications use a combination of Blade components and Markdown syntax which allow you to easily construct notifications while leveraging Laravel's pre-crafted notification components:
<x-mail::message>
# 領収書

領収いたしました。

<x-mail::button :url="$url">
明細を確認
</x-mail::button>

Thanks,<br>
{{ config('app.name') }}
</x-mail::message>
ButtonコンポーネントButton Component
ボタンコンポーネントは、中央寄せに配置したボタンリンクをレンダリングします。コンポーネントは、urlとオプションのcolorの2つの引数を取ります。サポートしている色は、primary、green、redです。通知には、必要なだけボタンコンポーネントを追加できます。The button component renders a centered button link. The component accepts two arguments, a url and an optional color. Supported colors are primary, green, and red. You may add as many button components to a notification as you wish:
<x-mail::button :url="$url" color="green">
明細を確認
</x-mail::button>
PanelコンポーネントPanel Component
パネルコンポーネントは、メッセージの他の部分とは少し異なった背景色のパネルの中に、指定されたテキストブロックをレンダします。これにより、指定するテキストに注目を集められます。The panel component renders the given block of text in a panel that has a slightly different background color than the rest of the notification. This allows you to draw attention to a given block of text:
<x-mail::panel>
This is the panel content.
</x-mail::panel>
TableコンポーネントTable Component
テーブルコンポーネントは、MarkdownテーブルをHTMLテーブルへ変換します。このコンポーネントはMarkdownテーブルを内容として受け入れます。デフォルトのMarkdownテーブルの記法を使った、文字寄せをサポートしています。The table component allows you to transform a Markdown table into an HTML table. The component accepts the Markdown table as its content. Table column alignment is supported using the default Markdown table alignment syntax:
<x-mail::table>
| Laravel  |   テーブル    |   例 |
| -------- | :-----------: | ---: |
| Col 2 is |   Centered    |  $10 |
| Col 3 is | Right-Aligned |  $20 |
</x-mail::table>
コンポーネントカスタマイズCustomizing the Components
自身のアプリケーション向きにカスタマイズできるように、Markdown通知コンポーネントはすべてエクスポートできます。コンポーネントをエクスポートするには、vendor:publish Artisanコマンドを使い、laravel-mailアセットをリソース公開します。You may export all of the Markdown notification components to your own application for customization. To export the components, use the vendor:publish Artisan command to publish the laravel-mail asset tag:
php artisan vendor:publish --tag=laravel-mail
このコマンドにより、resources/views/vendor/mailディレクトリ下にMarkdownメールコンポーネントがリソース公開されます。mailディレクトリ下に、htmlとtextディレクトリがあります。各ディレクトリは名前が示す形式で、利用できるコンポーネントすべてのレスポンシブなプレゼンテーションを持っています。これらのコンポーネントはお好きなよう、自由にカスタマイズしてください。This command will publish the Markdown mail components to the resources/views/vendor/mail directory. The mail directory will contain an html and a text directory, each containing their respective representations of every available component. You are free to customize these components however you like.
Customizing the CSSCustomizing the CSS
コンポーネントをエクスポートすると、resources/views/vendor/mail/html/themesディレクトリに、default.cssファイルが用意されます。このファイル中のCSSをカスタマイズすれば、Markdownメール通知変換後のHTML形式の中に、インラインCSSとして自動的に取り込まれます。After exporting the components, the resources/views/vendor/mail/html/themes directory will contain a default.css file. You may customize the CSS in this file and your styles will automatically be in-lined within the HTML representations of your Markdown notifications.
LaravelのMarkdownコンポーネントの完全に新しいテーマを作成したい場合は、html/themesディレクトリの中にCSSファイルを設置してください。CSSファイルに名前をつけ保存したら、mail設定ファイルのthemeオプションを新しいテーマの名前に更新してください。If you would like to build an entirely new theme for Laravel's Markdown components, you may place a CSS file within the html/themes directory. After naming and saving your CSS file, update the theme option of the mail configuration file to match the name of your new theme.
個別の通知にカスタムテーマを使いたい場合は、通知のメールメッセージを構築する時に、themeメソッドを呼び出してください。themeメソッドの引数は、その通知送信で使用するテーマの名前です。To customize the theme for an individual notification, you may call the theme method while building the notification's mail message. The theme method accepts the name of the theme that should be used when sending the notification:
/**
 * 通知のメールプレゼンテーションを取得
 */
public function toMail(object $notifiable): MailMessage
{
    return (new MailMessage)
                ->theme('invoice')
                ->subject('Invoice Paid')
                ->markdown('mail.invoice.paid', ['url' => $url]);
}
データベース通知Database Notifications
事前要件Prerequisites
database通知チャンネルは、通知情報をデータベーステーブルに格納します。このテーブルには、通知タイプや通知を説明するJSONデータ構造などの情報が含まれます。The database notification channel stores the notification information in a database table. This table will contain information such as the notification type as well as a JSON data structure that describes the notification.
テーブルにクエリを実行して、アプリケーションのユーザーインターフェイスで通知を表示できます。ただし、その前に、通知を保存しておくデータベーステーブルを作成する必要があります。notifications:tableコマンドを使用して、適切なテーブルスキーマを定義するマイグレーションを生成できます。You can query the table to display the notifications in your application's user interface. But, before you can do that, you will need to create a database table to hold your notifications. You may use the notifications:table command to generate a migration[/docs/{{version}}/migrations] with the proper table schema:
php artisan notifications:table

php artisan migrate
Note: 通知可能なモデルでUUIDかULIDの主キーを使用している場合は、通知テーブルのマイグレーションで、
morphsメソッドをuuidMorphs、もしくはulidMorphsへ置換する必要があります。[!NOTE]
If your notifiable models are using UUID or ULID primary keys[/docs/{{version}}/eloquent#uuid-and-ulid-keys], you should replace themorphsmethod withuuidMorphs[/docs/{{version}}/migrations#column-method-uuidMorphs] orulidMorphs[/docs/{{version}}/migrations#column-method-ulidMorphs] in the notification table migration.
データベース通知のフォーマットFormatting Database Notifications
通知でデータベーステーブルへの保存をサポートする場合、通知クラスにtoDatabaseかtoArrayメソッドを定義する必要があります。このメソッドは$notifiableエンティティを受け取り、プレーンなPHP配列を返す必要があります。返された配列はJSONへエンコードされ、notificationsテーブルのdataカラムに保存されます。toArrayメソッドの例を見てみましょう。If a notification supports being stored in a database table, you should define a toDatabase or toArray method on the notification class. This method will receive a $notifiable entity and should return a plain PHP array. The returned array will be encoded as JSON and stored in the data column of your notifications table. Let's take a look at an example toArray method:
/**
 * 通知の配列プレゼンテーションの取得
 *
 * @return array<string, mixed>
 */
public function toArray(object $notifiable): array
{
    return [
        'invoice_id' => $this->invoice->id,
        'amount' => $this->invoice->amount,
    ];
}
通知をアプリケーションのデータベースへ格納するとき、typeカラムには通知クラス名を入力します。しかし、通知クラスにdatabaseTypeメソッドを定義し、この動作をカスタマイズできます。When the notification is stored in your application's database, the type column will be populated with the notification's class name. However, you may customize this behavior by defining a databaseType method on your notification class:
/**
 * 通知のデータベースタイプを取得
 *
 * @return string
 */
public function databaseType(object $notifiable): string
{
    return 'invoice-paid';
}
toDatabase対toArraytoDatabase vs. toArray
toArrayメソッドはbroadcastチャンネルでも使用され、JavaScriptで駆動するフロントエンドへブロードキャストするデータを決定するため使われます。databaseチャンネルとbroadcastチャンネルに別々な2つの配列表現が必要な場合は、toArrayメソッドの代わりにtoDatabaseメソッドを定義する必要があります。The toArray method is also used by the broadcast channel to determine which data to broadcast to your JavaScript powered frontend. If you would like to have two different array representations for the database and broadcast channels, you should define a toDatabase method instead of a toArray method.
通知へのアクセスAccessing the Notifications
通知をデータベースへ保存したら、notifiableエンティティからアクセスするための便利な方法が必要になるでしょう。LaravelのデフォルトのApp\Models\Userモデルに含まれているIlluminate\Notifications\Notificationトレイトには、エンティティのために通知を返すnotificationsEloquentリレーションが含まれています。通知を取得するため、他のEloquentリレーションと同様にこのメソッドにアクセスできます。デフォルトで通知は「created_at」タイムスタンプで並べ替えられ、コレクションの先頭に最新の通知が表示されます。Once notifications are stored in the database, you need a convenient way to access them from your notifiable entities. The Illuminate\Notifications\Notifiable trait, which is included on Laravel's default App\Models\User model, includes a notifications Eloquent relationship[/docs/{{version}}/eloquent-relationships] that returns the notifications for the entity. To fetch notifications, you may access this method like any other Eloquent relationship. By default, notifications will be sorted by the created_at timestamp with the most recent notifications at the beginning of the collection:
$user = App\Models\User::find(1);

foreach ($user->notifications as $notification) {
    echo $notification->type;
}
「未読」通知のみを取得する場合は、unreadNotificationsリレーションを使用します。この場合も、コレクションの先頭に最新の通知を含むよう、created_atタイムスタンプで並べ替えられます。If you want to retrieve only the "unread" notifications, you may use the unreadNotifications relationship. Again, these notifications will be sorted by the created_at timestamp with the most recent notifications at the beginning of the collection:
$user = App\Models\User::find(1);

foreach ($user->unreadNotifications as $notification) {
    echo $notification->type;
}
Note: JavaScriptクライアントから通知にアクセスするには、現在のユーザーなどのnotifiableエンティティの通知を返す、通知コントローラをアプリケーションで定義する必要があります。次に、JavaScriptクライアントからそのコントローラのURLへHTTPリクエストを送信します。[!NOTE]
To access your notifications from your JavaScript client, you should define a notification controller for your application which returns the notifications for a notifiable entity, such as the current user. You may then make an HTTP request to that controller's URL from your JavaScript client.
Readとしての通知作成Marking Notifications as Read
通常、ユーザーが閲覧したときに、その通知を「既読」とマークするでしょう。Illuminate\Notifications\Notifiableトレイトは、通知のデータベースレコード上にある、read_atカラムを更新するmarkAsReadメソッドを提供しています。Typically, you will want to mark a notification as "read" when a user views it. The Illuminate\Notifications\Notifiable trait provides a markAsRead method, which updates the read_at column on the notification's database record:
$user = App\Models\User::find(1);

foreach ($user->unreadNotifications as $notification) {
    $notification->markAsRead();
}
各通知をループで処理する代わりに、markAsReadメソッドを通知コレクションへ直接使用できます。However, instead of looping through each notification, you may use the markAsRead method directly on a collection of notifications:
$user->unreadNotifications->markAsRead();
データベースから取得せずに、全通知に既読をマークするため、複数更新クエリを使用することもできます。You may also use a mass-update query to mark all of the notifications as read without retrieving them from the database:
$user = App\Models\User::find(1);

$user->unreadNotifications()->update(['read_at' => now()]);
テーブルエンティティから通知を削除するために、deleteを使うこともできます。You may delete the notifications to remove them from the table entirely:
$user->notifications()->delete();
ブロードキャスト通知Broadcast Notifications
事前要件Prerequisites
通知をブロードキャストする前に、Laravelのイベントブロードキャストサービスを設定して理解しておく必要があります。イベントブロードキャストは、JavaScriptを利用したフロントエンドから送信するサーバサイドのLaravelイベントに対応する方法を提供しています。Before broadcasting notifications, you should configure and be familiar with Laravel's event broadcasting[/docs/{{version}}/broadcasting] services. Event broadcasting provides a way to react to server-side Laravel events from your JavaScript powered frontend.
ブロードキャスト通知のフォーマットFormatting Broadcast Notifications
broadcastチャンネルは、Laravelのイベントブロードキャストサービスを使用して通知をブロードキャストし、JavaScriptを利用したフロントエンドがリアルタイムで通知をキャッチできるようにします。通知でブロードキャストをサポートする場合は、通知クラスでtoBroadcastメソッドを定義します。このメソッドは$notifyエンティティを受け取り、BroadcastMessageインスタンスを返す必要があります。toBroadcastメソッドが存在しない場合は、toArrayメソッドを使用してブロードキャストする必要のあるデータを収集します。返したデータはJSONへエンコードされ、JavaScriptを利用したフロントエンドにブロードキャストされます。toBroadcastメソッドの例を見てみましょう。The broadcast channel broadcasts notifications using Laravel's event broadcasting[/docs/{{version}}/broadcasting] services, allowing your JavaScript powered frontend to catch notifications in realtime. If a notification supports broadcasting, you can define a toBroadcast method on the notification class. This method will receive a $notifiable entity and should return a BroadcastMessage instance. If the toBroadcast method does not exist, the toArray method will be used to gather the data that should be broadcast. The returned data will be encoded as JSON and broadcast to your JavaScript powered frontend. Let's take a look at an example toBroadcast method:
use Illuminate\Notifications\Messages\BroadcastMessage;

/**
 * 通知のブロードキャストプレゼンテーションの取得
 */
public function toBroadcast(object $notifiable): BroadcastMessage
{
    return new BroadcastMessage([
        'invoice_id' => $this->invoice->id,
        'amount' => $this->invoice->amount,
    ]);
}
ブロードキャストキュー設定Broadcast Queue Configuration
すべてのブロードキャスト通知はキューへ投入されます。ブロードキャスト操作に使用されるキューの接続や名前を設定したい場合は、BroadcastMessageのonConnectionとonQueueメソッドを使用してください。All broadcast notifications are queued for broadcasting. If you would like to configure the queue connection or queue name that is used to queue the broadcast operation, you may use the onConnection and onQueue methods of the BroadcastMessage:
return (new BroadcastMessage($data))
                ->onConnection('sqs')
                ->onQueue('broadcasts');
通知タイプのカスタマイズCustomizing the Notification Type
指定したデータに加えて、すべてのブロードキャスト通知には、通知の完全なクラス名を含むtypeフィールドもあります。通知のtypeをカスタマイズする場合は、通知クラスでbroadcastTypeメソッドを定義します。In addition to the data you specify, all broadcast notifications also have a type field containing the full class name of the notification. If you would like to customize the notification type, you may define a broadcastType method on the notification class:
/**
 * ブロードキャストする通知のタイプ
 */
public function broadcastType(): string
{
    return 'broadcast.message';
}
通知のリッスンListening for Notifications
通知は、{notifiable}.{id}規約を使い、プライベートチャネル形態でブロードキャストされます。つまり、IDが1のApp\Models\Userインスタンスの通知を送信する場合、その通知はApp.Models.User.1のプライベートチャンネルにブロードキャストされます。Laravel Echoを使用すると、notificationメソッドを使用して簡単に、チャンネル上の通知をリッスンできます。Notifications will broadcast on a private channel formatted using a {notifiable}.{id} convention. So, if you are sending a notification to an App\Models\User instance with an ID of 1, the notification will be broadcast on the App.Models.User.1 private channel. When using Laravel Echo[/docs/{{version}}/broadcasting#client-side-installation], you may easily listen for notifications on a channel using the notification method:
Echo.private('App.Models.User.' + userId)
    .notification((notification) => {
        console.log(notification.type);
    });
通知チャンネルのカスタマイズCustomizing the Notification Channel
エンティティのブロードキャスト通知がブロードキャストされるチャンネルをカスタマイズする場合は、notifiableエンティティにreceivesBroadcastNotificationsOnメソッドを定義します。If you would like to customize which channel that an entity's broadcast notifications are broadcast on, you may define a receivesBroadcastNotificationsOn method on the notifiable entity:
<?php

namespace App\Models;

use Illuminate\Broadcasting\PrivateChannel;
use Illuminate\Foundation\Auth\User as Authenticatable;
use Illuminate\Notifications\Notifiable;

class User extends Authenticatable
{
 * @return \Illuminate\Notifications\Message\SlackMessage

    /**
     * ユーザーがブロードキャストされる通知を受け取るチャンネル
     */
    public function receivesBroadcastNotificationsOn(): string
    {
        return 'users.'.$this->id;
    }
}
SMS通知SMS Notifications
事前要件Prerequisites
LaravelでSMS通知を送るには、Vonage(旧Nexmo)を使用します。Vonageで通知を送信する前に、laravel/vonage-notification-channelとguzzlehttp/guzzleパッケージをインストールする必要があります。Sending SMS notifications in Laravel is powered by Vonage[https://www.vonage.com/] (formerly known as Nexmo). Before you can send notifications via Vonage, you need to install the laravel/vonage-notification-channel and guzzlehttp/guzzle packages:
composer require laravel/vonage-notification-channel guzzlehttp/guzzle
パッケージは、設定ファイルを持っています。しかし、この設定ファイルを自分のアプリケーションにエクスポートする必要はありません。環境変数VONAGE_KEYとVONAGE_SECRETを使い、Vonageの公開鍵と秘密鍵を定義するだけです。The package includes a configuration file[https://github.com/laravel/vonage-notification-channel/blob/3.x/config/vonage.php]. However, you are not required to export this configuration file to your own application. You can simply use the VONAGE_KEY and VONAGE_SECRET environment variables to define your Vonage public and secret keys.
キーを定義したら、VONAGE_SMS_FROM環境変数を設定して、デフォルトでSMSメッセージを送信する電話番号を定義する必要があります。この電話番号はVonageコントロールパネルで生成できます。After defining your keys, you should set a VONAGE_SMS_FROM environment variable that defines the phone number that your SMS messages should be sent from by default. You may generate this phone number within the Vonage control panel:
VONAGE_SMS_FROM=15556666666
SMS通知のフォーマットFormatting SMS Notifications
通知のSMS送信をサポートする場合、通知クラスでtoVonageメソッドを定義する必要があります。このメソッドは$notifiableエンティティを受け取り、Illuminate\Notifications\Messages\VonageMessageインスタンスを返す必要があります。If a notification supports being sent as an SMS, you should define a toVonage method on the notification class. This method will receive a $notifiable entity and should return an Illuminate\Notifications\Messages\VonageMessage instance:
use Illuminate\Notifications\Messages\VonageMessage;

/**
 * 通知のVonage/SMS表現を取得
 */
public function toVonage(object $notifiable): VonageMessage
{
    return (new VonageMessage)
                ->content('Your SMS message content');
}
ユニコードコンテンツUnicode Content
SMSメッセージにunicodeが含まれる場合は、VonageMessageインスタンス作成する時に、unicodeメソッドを呼び出す必要があります。If your SMS message will contain unicode characters, you should call the unicode method when constructing the VonageMessage instance:
use Illuminate\Notifications\Messages\VonageMessage;

/**
 * 通知のVonage/SMS表現を取得
 */
public function toVonage(object $notifiable): VonageMessage
{
    return (new VonageMessage)
                ->content('Your unicode message')
                ->unicode();
}
発信元電話番号のカスタマイズCustomizing the "From" Number
VONAGE_SMS_FROM環境変数で指定した電話番号とは異なる番号から通知を送りたい場合は、VonageMessageインスタンスのfromメソッドを呼び出します。If you would like to send some notifications from a phone number that is different from the phone number specified by your VONAGE_SMS_FROM environment variable, you may call the from method on a VonageMessage instance:
use Illuminate\Notifications\Messages\VonageMessage;

/**
 * 通知のVonage/SMS表現を取得
 */
public function toVonage(object $notifiable): VonageMessage
{
    return (new VonageMessage)
                ->content('Your SMS message content')
                ->from('15554443333');
}
クライアントリファレンスの追加Adding a Client Reference
ユーザー、チーム、または顧客ごとのコストを追跡したい場合は、通知に「クライアントリファレンス」を追加することができます。Vonageでは、このクライアントリファレンスを使用してレポートを作成することができますので、特定の顧客のSMS使用状況をよりわかりやすく理解することができます。リライアントリファレンスは、40文字以内の任意の文字列です。If you would like to keep track of costs per user, team, or client, you may add a "client reference" to the notification. Vonage will allow you to generate reports using this client reference so that you can better understand a particular customer's SMS usage. The client reference can be any string up to 40 characters:
use Illuminate\Notifications\Messages\VonageMessage;

/**
 * 通知のVonage/SMS表現を取得
 */
public function toVonage(object $notifiable): VonageMessage
{
    return (new VonageMessage)
                ->clientReference((string) $notifiable->id)
                ->content('Your SMS message content');
}
SMS通知のルート指定Routing SMS Notifications
Vonageの通知を適切な電話番号に回すには、NotifiableなエンティティにrouteNotificationForVonageメソッドを定義してください。To route Vonage notifications to the proper phone number, define a routeNotificationForVonage method on your notifiable entity:
<?php

namespace App\Models;

use Illuminate\Foundation\Auth\User as Authenticatable;
use Illuminate\Notifications\Notifiable;
use Illuminate\Notifications\Notification;

class User extends Authenticatable
{
 * @return \Illuminate\Notifications\Message\SlackMessage

    /**
     * 通知をVonageチャンネルへ回す
     */
    public function routeNotificationForVonage(Notification $notification): string
    {
        return $this->phone_number;
    }
}
Slack通知Slack Notifications
事前要件Prerequisites
Slack通知を送信する前にComposeを使い、Slack通知チャンネルをインストールする必要があります。Before sending Slack notifications, you should install the Slack notification channel via Composer:
composer require laravel/slack-notification-channel
さらに、Slackワークスペース用のSlack Appを作成する必要もあります。Additionally, you must create a Slack App[https://api.slack.com/apps?new_app=1] for your Slack workspace.
作成したAppと同じSlackワークスペースにのみ通知を送る必要がある場合は、Appへchat:write、chat:write.public、chat:write.customizeのスコープを確実に持たせてください。これらのスコープは、Slack内の"OAuth & Permissions" App管理タブで追加できます。If you only need to send notifications to the same Slack workspace that the App is created in, you should ensure that your App has the chat:write, chat:write.public, and chat:write.customize scopes. These scopes can be added from the "OAuth & Permissions" App management tab within Slack.
次に、アプリの"Bot User OAuth Token"をコピーし、アプリケーションのservices.php設定ファイル内のslack設定配列内へ配置します。このトークンはSlackの"OAuth & Permissions"タブにあります。Next, copy the App's "Bot User OAuth Token" and place it within a slack configuration array in your application's services.php configuration file. This token can be found on the "OAuth & Permissions" tab within Slack:
'slack' => [
    'notifications' => [
        'bot_user_oauth_token' => env('SLACK_BOT_USER_OAUTH_TOKEN'),
        'channel' => env('SLACK_BOT_USER_DEFAULT_CHANNEL'),
    ],
],
アプリ配信App Distribution
アプリケーションのユーザーが所有する外部のSlackワークスペースへ通知を送信する場合は、Slack経由でアプリケーションを「配布(distribution)」する必要があります。アプリの配布は、Slack内のアプリの"Manage Distribution"タブから管理できます。アプリを配布したら、Socialiteを使い、アプリのユーザーに代わり、Slack Botトークンを取得する必要があります。If your application will be sending notifications to external Slack workspaces that are owned by your application's users, you will need to "distribute" your App via Slack. App distribution can be managed from your App's "Manage Distribution" tab within Slack. Once your App has been distributed, you may use Socialite[/docs/{{version}}/socialite] to obtain Slack Bot tokens[/docs/{{version}}/socialite#slack-bot-scopes] on behalf of your application's users.
Slack通知のフォーマットFormatting Slack Notifications
通知をSlackメッセージとして送信することをサポートする場合、Notificationクラスに toSlackメソッドを定義する必要があります。このメソッドは$notifiableエンティティを受け取り、Illuminate\Notifications\Slack\SlackMessageインスタンスを返します。SlackのBlock Kit APIを使ってリッチな通知を構築できます。以下の例は、SlackのBlock Kit builderの中で確認できます。If a notification supports being sent as a Slack message, you should define a toSlack method on the notification class. This method will receive a $notifiable entity and should return an Illuminate\Notifications\Slack\SlackMessage instance. You can construct rich notifications using Slack's Block Kit API[https://api.slack.com/block-kit]. The following example may be previewed in Slack's Block Kit builder[https://app.slack.com/block-kit-builder/T01KWS6K23Z#{%22blocks%22:%5B{%22type%22:%22header%22,%22text%22:{%22type%22:%22plain_text%22,%22text%22:%22Invoice%20Paid%22}},{%22type%22:%22context%22,%22elements%22:%5B{%22type%22:%22plain_text%22,%22text%22:%22Customer%20%231234%22}%5D},{%22type%22:%22section%22,%22text%22:{%22type%22:%22plain_text%22,%22text%22:%22An%20invoice%20has%20been%20paid.%22},%22fields%22:%5B{%22type%22:%22mrkdwn%22,%22text%22:%22*Invoice%20No:*%5Cn1000%22},{%22type%22:%22mrkdwn%22,%22text%22:%22*Invoice%20Recipient:*%5Cntaylor@laravel.com%22}%5D},{%22type%22:%22divider%22},{%22type%22:%22section%22,%22text%22:{%22type%22:%22plain_text%22,%22text%22:%22Congratulations!%22}}%5D}]:
use Illuminate\Notifications\Slack\BlockKit\Blocks\ContextBlock;
use Illuminate\Notifications\Slack\BlockKit\Blocks\SectionBlock;
use Illuminate\Notifications\Slack\BlockKit\Composites\ConfirmObject;
use Illuminate\Notifications\Slack\SlackMessage;

/**
 * 通知のSlackプレゼンテーションを取得
 */
public function toSlack(object $notifiable): SlackMessage
{
    return (new SlackMessage)
            ->text('One of your invoices has been paid!')
            ->headerBlock('Invoice Paid')
            ->contextBlock(function (ContextBlock $block) {
                $block->text('Customer #1234');
            })
            ->sectionBlock(function (SectionBlock $block) {
                $block->text('An invoice has been paid.');
                $block->field("*Invoice No:*\n1000")->markdown();
                $block->field("*Invoice Recipient:*\ntaylor@laravel.com")->markdown();
            })
            ->dividerBlock()
            ->sectionBlock(function (SectionBlock $block) {
                $block->text('Congratulations!');
            });
}
Slack操作Slack Interactivity
SlackのBlock Kit通知システムは、ユーザーインタラクションを処理するための強力な機能を提供します。この機能を利用するには、Slackアプリで"Interactivity"を有効にし、アプリケーションが提供するURLを指す、"Request URL"を設定する必要があります。これらの設定は、Slack内の "Interactivity & Shortcuts"アプリ管理タブから管理できます。Slack's Block Kit notification system provides powerful features to handle user interaction[https://api.slack.com/interactivity/handling]. To utilize these features, your Slack App should have "Interactivity" enabled and a "Request URL" configured that points to a URL served by your application. These settings can be managed from the "Interactivity & Shortcuts" App management tab within Slack.
以下の例ではactionsBlockメソッドを利用していますが、SlackはボタンをクリックしたSlackユーザー、クリックしたボタンのIDなどを含むペイロードを持つ、POSTリクエストを"Request URL"へ送信します。あなたのアプリケーションは、ペイロードに基づいて実行するアクションを決定することができます。また、リクエストがSlackによって行われたことを確認する必要があります。In the following example, which utilizes the actionsBlock method, Slack will send a POST request to your "Request URL" with a payload containing the Slack user who clicked the button, the ID of the clicked button, and more. Your application can then determine the action to take based on the payload. You should also verify the request[https://api.slack.com/authentication/verifying-requests-from-slack] was made by Slack:
use Illuminate\Notifications\Slack\BlockKit\Blocks\ActionsBlock;
use Illuminate\Notifications\Slack\BlockKit\Blocks\ContextBlock;
use Illuminate\Notifications\Slack\BlockKit\Blocks\SectionBlock;
use Illuminate\Notifications\Slack\SlackMessage;

/**
 * 通知のSlackプレゼンテーションを取得
 */
public function toSlack(object $notifiable): SlackMessage
{
    return (new SlackMessage)
            ->text('One of your invoices has been paid!')
            ->headerBlock('Invoice Paid')
            ->contextBlock(function (ContextBlock $block) {
                $block->text('Customer #1234');
            })
            ->sectionBlock(function (SectionBlock $block) {
                $block->text('An invoice has been paid.');
            })
            ->actionsBlock(function (ActionsBlock $block) {
                 // ID defaults to "button_acknowledge_invoice"...
                $block->button('Acknowledge Invoice')->primary();

                // Manually configure the ID...
                $block->button('Deny')->danger()->id('deny_invoice');
            });
}
モデルの確認Confirmation Modals
ユーザーがアクションを実行する前に確認したい場合は、ボタンを定義するときにconfirmメソッドを呼び出します。confirmメソッドはメッセージとConfirmObjectインスタンスを受けるクロージャを引数に取ります。If you would like users to be required to confirm an action before it is performed, you may invoke the confirm method when defining your button. The confirm method accepts a message and a closure which receives a ConfirmObject instance:
use Illuminate\Notifications\Slack\BlockKit\Blocks\ActionsBlock;
use Illuminate\Notifications\Slack\BlockKit\Blocks\ContextBlock;
use Illuminate\Notifications\Slack\BlockKit\Blocks\SectionBlock;
use Illuminate\Notifications\Slack\BlockKit\Composites\ConfirmObject;
use Illuminate\Notifications\Slack\SlackMessage;

/**
 * 通知のSlackプレゼンテーションを取得
 */
public function toSlack(object $notifiable): SlackMessage
{
    return (new SlackMessage)
            ->text('One of your invoices has been paid!')
            ->headerBlock('Invoice Paid')
            ->contextBlock(function (ContextBlock $block) {
                $block->text('Customer #1234');
            })
            ->sectionBlock(function (SectionBlock $block) {
                $block->text('An invoice has been paid.');
            })
            ->actionsBlock(function (ActionsBlock $block) {
                $block->button('Acknowledge Invoice')
                    ->primary()
                    ->confirm(
                        'Acknowledge the payment and send a thank you email?',
                        function (ConfirmObject $dialog) {
                            $dialog->confirm('Yes');
                            $dialog->deny('No');
                        }
                    );
            });
}
Slackブロックの調査Inspecting Slack Blocks
ビルドしているブロックをすぐに確認したい場合は、SlackMessageインスタンスのddメソッドを呼び出します。ddメソッドは SlackのBlock Kit BuilderへのURLを生成してダンプし、ペイロードと通知のプレビューをブラウザに表示します。生のペイロードをダンプするにはddメソッドへtrueを渡します。If you would like to quickly inspect the blocks you've been building, you can invoke the dd method on the SlackMessage instance. The dd method will generate and dump a URL to Slack's Block Kit Builder[https://app.slack.com/block-kit-builder/], which displays a preview of the payload and notification in your browser. You may pass true to the dd method to dump the raw payload:
return (new SlackMessage)
        ->text('One of your invoices has been paid!')
        ->headerBlock('Invoice Paid')
        ->dd();
Slack通知のルート指定Routing Slack Notifications
Slackの通知を適切なSlackチームとチャンネルへ送るには、通知可能モデルにrouteNotificationForSlackメソッドを定義します。このメソッドは3つの値のどれかを返します。To direct Slack notifications to the appropriate Slack team and channel, define a routeNotificationForSlack method on your notifiable model. This method can return one of three values:
null- これは通知自体に設定したチャンネルへ、ルーティングを委ねます。SlackMessageをビルドするときにtoメソッドを使用して、通知内でチャネルを設定してください。null- which defers routing to the channel configured in the notification itself. You may use thetomethod when building yourSlackMessageto configure the channel within the notification.- 通知を送信するSlack チャンネルを指定する文字列。例:
#support-channelA string specifying the Slack channel to send the notification to, e.g.#support-channel. SlackRouteインスタンス。OAuthトークンとチャンネル名が指定できます。例:SlackRoute::make($this->slack_channel, $this->slack_token)このメソッドは、外部のワークスペースへ通知を送るときに使用します。ASlackRouteinstance, which allows you to specify an OAuth token and channel name, e.g.SlackRoute::make($this->slack_channel, $this->slack_token). This method should be used to send notifications to external workspaces.
一例として、routeNotificationForSlackメソッドから#support-channelを返すことにより、アプリケーションのservices.php設定ファイルにある、Bot User OAuthトークンへ関連付けたワークスペースの、#support-channelチャネルへ通知を送信してみましょう。For instance, returning #support-channel from the routeNotificationForSlack method will send the notification to the #support-channel channel in the workspace associated with the Bot User OAuth token located in your application's services.php configuration file:
<?php

namespace App\Models;

use Illuminate\Foundation\Auth\User as Authenticatable;
use Illuminate\Notifications\Notifiable;
use Illuminate\Notifications\Notification;

class User extends Authenticatable
{
    use Notifiable;

    /**
     * Slackチャンネルへの通知ルート
     */
    public function routeNotificationForSlack(Notification $notification): mixed
    {
        return '#support-channel';
    }
}
外部のSlackワークスペースへの通知Notifying External Slack Workspaces
Note: 外部Slackワークスペースへ通知を送信する前に、Slackアプリを配布する必要があります。[!NOTE]
Before sending notifications to external Slack workspaces, your Slack App must be distributed[#slack-app-distribution].
もちろん、アプリケーションのユーザーが所有するSlackワークスペースへ、通知を送りたいことも多いでしょう。そのためには、まずユーザーのSlack OAuthトークンを取得する必要があります。嬉しいことに、Laravel SocialiteにはSlackドライバが含まれており、アプリケーションのユーザーをSlackで簡単に認証し、ボットトークンを取得できます。Of course, you will often want to send notifications to the Slack workspaces owned by your application's users. To do so, you will first need to obtain a Slack OAuth token for the user. Thankfully, Laravel Socialite[/docs/{{version}}/socialite] includes a Slack driver that will allow you to easily authenticate your application's users with Slack and obtain a bot token[/docs/{{version}}/socialite#slack-bot-scopes].
ボットトークンを取得し、アプリケーションのデータベースへ保存したら、SlackRoute::makeメソッドを使用して、ユーザーのワークスペースへ通知をルーティングできます。さらに、あなたのアプリケーションでは、通知をどのチャンネルに送るかをユーザーが指定できるようにする必要があるでしょう:Once you have obtained the bot token and stored it within your application's database, you may utilize the SlackRoute::make method to route a notification to the user's workspace. In addition, your application will likely need to offer an opportunity for the user to specify which channel notifications should be sent to:
<?php

namespace App\Models;

use Illuminate\Foundation\Auth\User as Authenticatable;
use Illuminate\Notifications\Notifiable;
use Illuminate\Notifications\Notification;
use Illuminate\Notifications\Slack\SlackRoute;

class User extends Authenticatable
{
 * @return \Illuminate\Notifications\Message\SlackMessage

    /**
     * Slackチャンネルに対する通知をルートする
     */
    public function routeNotificationForSlack(Notification $notification): mixed
    {
        return SlackRoute::make($this->slack_channel, $this->slack_token);
    }
}
通知のローカライズLocalizing Notifications
Laravelを使用すると、HTTPリクエストの現在のロケール以外のロケールで通知を送信でき、通知をキュー投入する場合でもこのロケールを記憶しています。Laravel allows you to send notifications in a locale other than the HTTP request's current locale, and will even remember this locale if the notification is queued.
このために、Illuminate\Notifications\Notificationクラスは目的の言語を指定するためのlocaleメソッドを提供しています。通知が評価されると、アプリケーションはこのロケールに変更され、評価が完了すると前のロケールに戻ります。To accomplish this, the Illuminate\Notifications\Notification class offers a locale method to set the desired language. The application will change into this locale when the notification is being evaluated and then revert back to the previous locale when evaluation is complete:
$user->notify((new InvoicePaid($invoice))->locale('es'));
通知可能な複数のエンティティをローカライズするのも、Notificationファサードにより可能です。Localization of multiple notifiable entries may also be achieved via the Notification facade:
Notification::locale('es')->send(
    $users, new InvoicePaid($invoice)
);
ユーザー希望のローケルUser Preferred Locales
ユーザーの希望するローケルをアプリケーションで保存しておくことは良くあります。notifiableモデルでHasLocalePreference契約を実装すると、通知送信時にこの保存してあるローケルを使用するように、Laravelへ指示できます。Sometimes, applications store each user's preferred locale. By implementing the HasLocalePreference contract on your notifiable model, you may instruct Laravel to use this stored locale when sending a notification:
use Illuminate\Contracts\Translation\HasLocalePreference;

class User extends Model implements HasLocalePreference
{
    /**
     * ユーザーの希望するローケルの取得
     */
    public function preferredLocale(): string
    {
        return $this->locale;
    }
}
このインターフェイスを実装すると、そのモデルに対しmailableや通知を送信する時に、Laravelは自動的に好みのローケルを使用します。そのため、このインターフェイスを使用する場合、localeメソッドを呼び出す必要はありません。Once you have implemented the interface, Laravel will automatically use the preferred locale when sending notifications and mailables to the model. Therefore, there is no need to call the locale method when using this interface:
$user->notify(new InvoicePaid($invoice));
テストTesting
Notificationファサードのfakeメソッドを使用すれば、通知を実際に送信しなくてすみます。通常、通知の送信は、実際にテストしているコードとは無関係です。ほとんどの場合、Laravelが指定された通知を送信するように指示されたことを単純にアサートすれば十分です。You may use the Notification facade's fake method to prevent notifications from being sent. Typically, sending notifications is unrelated to the code you are actually testing. Most likely, it is sufficient to simply assert that Laravel was instructed to send a given notification.
Notificationファサードのfakeメソッドを呼び出したあとに、ユーザーへ通知を送る指示したことをアサートし、その通知が受け取ったデータを調べることもできます。After calling the Notification facade's fake method, you may then assert that notifications were instructed to be sent to users and even inspect the data the notifications received:
<?php

namespace Tests\Feature;

use App\Notifications\OrderShipped;
use Illuminate\Support\Facades\Notification;
use Tests\TestCase;

class ExampleTest extends TestCase
{
    public function test_orders_can_be_shipped(): void
    {
        Notification::fake();

        // 注文発送処理…

        // 通知が一つも送信されないことをアサート
        Notification::assertNothingSent();

        // 指定ユーザーへ通知されることをアサート
        Notification::assertSentTo(
            [$user], OrderShipped::class
        );

        // 通知が送られないことをアサート
        Notification::assertNotSentTo(
            [$user], AnotherNotification::class
        );

        // 指定回数の通知が送られたことをアサート
        Notification::assertCount(3);
    }
}
指定「真偽値テスト」にパスした通知が送信されたことをアサートするため、assertSentToまたはassertNotSentToメソッドへクロージャを渡せます。指定真偽値テストにパスする通知が最低1つ送信された場合、そのアサートはパスします。You may pass a closure to the assertSentTo or assertNotSentTo methods in order to assert that a notification was sent that passes a given "truth test". If at least one notification was sent that passes the given truth test then the assertion will be successful:
Notification::assertSentTo(
    $user,
    function (OrderShipped $notification, array $channels) use ($order) {
        return $notification->order->id === $order->id;
    }
);
オンデマンド通知On-Demand Notifications
テストするコードが、オンデマンド通知を送信する場合、assertSentOnDemandメソッドでオンデマンド通知を送信したことをテストできます。If the code you are testing sends on-demand notifications[#on-demand-notifications], you can test that the on-demand notification was sent via the assertSentOnDemand method:
Notification::assertSentOnDemand(OrderShipped::class);
assertSentOnDemandメソッドの第2引数にクロージャを渡すことで、オンデマンド通知が正しい「ルート」アドレスに送信されたかを判断できます。By passing a closure as the second argument to the assertSentOnDemand method, you may determine if an on-demand notification was sent to the correct "route" address:
Notification::assertSentOnDemand(
    OrderShipped::class,
    function (OrderShipped $notification, array $channels, object $notifiable) use ($user) {
        return $notifiable->routes['mail'] === $user->email;
    }
);
通知イベントNotification Events
通知送信前イベントNotification Sending Event
通知を送信するときは、通知システムが Illuminate\Notifications\Events\NotificationSendingイベントを発行します。このイベントは、"notifiable "エンティティと通知インスタンス自体を含んでいます。アプリケーションのEventServiceProviderでこのイベントのリスナを登録できます。When a notification is sending, the Illuminate\Notifications\Events\NotificationSending event[/docs/{{version}}/events] is dispatched by the notification system. This contains the "notifiable" entity and the notification instance itself. You may register listeners for this event in your application's EventServiceProvider:
use App\Listeners\CheckNotificationStatus;
use Illuminate\Notifications\Events\NotificationSending;

/**
 * アプリケーションにマップするイベントリスナの登録
 *
 * @var array
 */
protected $listen = [
    NotificationSending::class => [
        CheckNotificationStatus::class,
    ],
];
NotificationSendingイベントのイベントリスナが、そのhandleメソッドからfalseを返した場合、通知は送信されません。The notification will not be sent if an event listener for the NotificationSending event returns false from its handle method:
use Illuminate\Notifications\Events\NotificationSending;

/**
 * イベントの処理
 */
public function handle(NotificationSending $event): bool
{
    return false;
}
イベントリスナの中では、イベントのnotifiable、notification、channelプロパティへアクセスし、通知先や通知自体の詳細を調べられます。Within an event listener, you may access the notifiable, notification, and channel properties on the event to learn more about the notification recipient or the notification itself:
/**
 * イベントの処理
 */
public function handle(NotificationSending $event): void
{
    // $event->channel
    // $event->notifiable
    // $event->notification
}
通知送信後イベントNotification Sent Event
通知が送信されると通知システムが、Illuminate\Notifications\Events\NotificationSentイベントを発行します。このイベントは、"notifiable"エンティティと通知インスタンス自体を含んでいます。このイベントのリスナはEventServiceProviderで登録できます。When a notification is sent, the Illuminate\Notifications\Events\NotificationSent event[/docs/{{version}}/events] is dispatched by the notification system. This contains the "notifiable" entity and the notification instance itself. You may register listeners for this event in your EventServiceProvider:
use App\Listeners\LogNotification;
use Illuminate\Notifications\Events\NotificationSent;

/**
 * アプリケーションにマップするイベントリスナの登録
 *
 * @var array
 */
protected $listen = [
    NotificationSent::class => [
        LogNotification::class,
    ],
];
Note:
EventServiceProviderでリスナを登録した後に、event:generateArtisanコマンドを使うと、リスナクラスが素早く生成できます。[!NOTE]
After registering listeners in yourEventServiceProvider, use theevent:generateArtisan command to quickly generate listener classes.
イベントリスナ内では、イベントの notifiable、notification、channel、responseプロパティにアクセスして、通知先や通知自体の詳細を知ることができます。Within an event listener, you may access the notifiable, notification, channel, and response properties on the event to learn more about the notification recipient or the notification itself:
/**
 * イベントの処理
 */
public function handle(NotificationSent $event): void
{
    // $event->channel
    // $event->notifiable
    // $event->notification
    // $event->response
}
カスタムチャンネルCustom Channels
Laravelには通知チャンネルがいくつか付属していますが、他のチャンネルを介して通知を配信する独自のドライバを作成することもできます。Laravelではこれをシンプルに実現できます。作成開始するには、sendメソッドを含むクラスを定義します。このメソッドは、$notifyingと$notificationの2つの引数を受け取る必要があります。Laravel ships with a handful of notification channels, but you may want to write your own drivers to deliver notifications via other channels. Laravel makes it simple. To get started, define a class that contains a send method. The method should receive two arguments: a $notifiable and a $notification.
sendメソッド内で、通知メソッドを呼び出して、チャンネルが理解できるメッセージオブジェクトを取得し、必要に応じて通知を$notifiableインスタンスに送信します。Within the send method, you may call methods on the notification to retrieve a message object understood by your channel and then send the notification to the $notifiable instance however you wish:
<?php

namespace App\Notifications;

use Illuminate\Notifications\Notification;

class VoiceChannel
{
    /**
     * 指定された通知の送信
     */
    public function send(object $notifiable, Notification $notification): void
    {
        $message = $notification->toVoice($notifiable);

        // 通知を$notifiableインスタンスへ送信する…
    }
}
通知チャンネルクラスを定義したら、任意の通知のviaメソッドからクラス名を返せます。この例では、通知のtoVoiceメソッドは、ボイスメッセージを表すために選択するどんなオブジェクトも返せます。たとえば、次のメッセージを表すために独自のVoiceMessageクラスを定義できます。Once your notification channel class has been defined, you may return the class name from the via method of any of your notifications. In this example, the toVoice method of your notification can return whatever object you choose to represent voice messages. For example, you might define your own VoiceMessage class to represent these messages:
<?php

namespace App\Notifications;

use App\Notifications\Messages\VoiceMessage;
use App\Notifications\VoiceChannel;
use Illuminate\Bus\Queueable;
use Illuminate\Contracts\Queue\ShouldQueue;
use Illuminate\Notifications\Notification;

class InvoicePaid extends Notification
{
    use Queueable;

    /**
     * 通知チャンネルの取得
     */
    public function via(object $notifiable): string
    {
        return VoiceChannel::class;
    }

    /**
     * 通知の音声プレゼンテーションを取得
     */
    public function toVoice(object $notifiable): VoiceMessage
    {
        // ...
    }
}