イントロダクションIntroduction
このクイックスタートガイドはLaravelフレームワークの中級レベルの入門で、データベースマイグレーション、Eloqunt ORM、ルーティング、認証、認可、依存注入、バリデーション、ビュー、Bladeテンプレートを内容として含んでいます。Laravelフレームワークや一般的なPHPフレームワークの基本を習熟している方に最適です。This quickstart guide provides an intermediate introduction to the Laravel framework and includes content on database migrations, the Eloquent ORM, routing, authentication, authorization, dependency injection, validation, views, and Blade templates. This is a great starting point if you are familiar with the basics of the Laravel framework or PHP frameworks in general.
Laravelの持つ機能の基本的な部分を試せるように、完了したいタスク全てを管理できるタスクリストを構築してみます。(典型的なToDoリスト)このチュートリアルによりユーザーがアプリケーションへアカウントを作成したり、ログインできるようになります。このプロジェクトの最終の完全なソースコードはGitHubから取得可能です。To sample a basic selection of Laravel features, we will build a task list we can use to track all of the tasks we want to accomplish (the typical "to-do list" example). In contrast to the "basic" quickstart, this tutorial will allow users to create accounts and authenticate with the application. The complete, finished source code for this project is available on GitHub[http://github.com/laravel/quickstart-intermediate].
インストールInstallation
もちろん、最初にLararavelフレームワークを真新しくインストールする必要があります。Homestead仮想マシーンか、フレームワークを実行するために選択したローカルのPHP環境を使用します。ローカル環境が整ったら、Composerを使用しLaravelフレームワークをインストールできます。Of course, first you will need a fresh installation of the Laravel framework. You may use the Homestead virtual machine[/docs/{{version}}/homestead] or the local PHP environment of your choice to run the framework. Once your local environment is ready, you may install the Laravel framework using Composer:
composer create-project laravel/laravel quickstart --prefer-dist
このクイックスタートの残りの部分をただ読み進めることもできますが、ソースコードをダウンロードしてローカルマシーンで実行したい場合は、Gitリポジトリーをクローンし、依存パッケージをインストールします。You're free to just read along for the remainder of this quickstart; however, if you would like to download the source code for this quickstart and run it on your local machine, you may clone its Git repository and install its dependencies:
git clone https://github.com/laravel/quickstart-intermediate quickstart
cd quickstart
composer install
php artisan migrate
ローカル開発環境の構築についてのドキュメントは、Homesteadとインストールのドキュメントを参照してください。For more complete documentation on building a local Laravel development environment, check out the full Homestead[/docs/{{version}}/homestead] and installation[/docs/{{version}}/installation] documentation.
データベースの準備Prepping The Database
データベースマイグレーションDatabase Migrations
最初に全タスクを保持しておくためのデータベーステーブルを定義する、マイグレーション(migration:移行)を使ってみましょう。Laravelのデータベースマイグレーションはスラスラ書ける記述的なPHPコードを用いて、データベーステーブルの構造を定義し修正するための簡単な方法を提供しています。チームメンバーへ個別で用意しているデータベースのコピーへカラムを各自自分で追加するように伝える代わりに、あなたがソース管理にPushしたマイグレーションを実行してもらえます。First, let's use a migration to define a database table to hold all of our tasks. Laravel's database migrations provide an easy way to define your database table structure and modifications using fluent, expressive PHP code. Instead of telling your team members to manually add columns to their local copy of the database, your teammates can simply run the migrations you push into source control.
usersテーブルThe users Table
ユーザーからアプリケーションにアカウントを作成してもらえるようにするには、ユーザー全員を保持するテーブルが必要です。ありがたいことに基本的なusersテーブルを作成するマイグレーションは最初からLaravelに用意されているので、自分で作成する必要はありません。デフォルトのusersテーブルのマイグレーションは、database/migrationsディレクトリーに設置されています。Since we are going to allow users to create their accounts within the application, we will need a table to store all of our users. Thankfully, Laravel already ships with a migration to create a basic users table, so we do not need to manually generate one. The default migration for the users table is located in the database/migrations directory.
tasksテーブルThe tasks Table
つぎに全タスクを保持するデータベーステーブルを構築しましょう。Artisan CLIは様々なクラスの生成に利用でき、Laravelプロジェクトを構築するためにたくさんタイプする手間を省いてくれます。今回はtasksテーブルのために、新しいデータベースマイグレーションをmake:migrationコマンドを使って生成します。Next, let's build a database table that will hold all of our tasks. The Artisan CLI[/docs/{{version}}/artisan] can be used to generate a variety of classes and will save you a lot of typing as you build your Laravel projects. In this case, let's use the make:migration command to generate a new database migration for our tasks table:
php artisan make:migration create_tasks_table --create=tasks
マイグレーションはプロジェクトのdatabase/migrationsディレクトリーの中に設置されます。お分かりでしょうが、make:maigrationコマンドは、マイグレーションファイルへ自動増分IDとタイムスタンプの追加を始めに定義しています。このファイルを編集し、タスクの名前を保存するstringカラムと、tasksとusersテーブルを結びつけるuser_idカラムを追加しましょう。The migration will be placed in the database/migrations directory of your project. As you may have noticed, the make:migration command already added an auto-incrementing ID and timestamps to the migration file. Let's edit this file and add an additional string column for the name of our tasks, as well as a user_id column which will link our tasks and users tables:
<?php

use Illuminate\Database\Schema\Blueprint;
use Illuminate\Database\Migrations\Migration;

class CreateTasksTable extends Migration
{
    /**
     * マイグレーション実行
     *
     * @return void
     */
    public function up()
    {
        Schema::create('tasks', function (Blueprint $table) {
            $table->increments('id');
            $table->integer('user_id')->index();
            $table->string('name');
            $table->timestamps();
        });
    }

    /**
     * マイグレーションの巻き戻し
     *
     * @return void
     */
    public function down()
    {
        Schema::drop('tasks');
    }
}
マイグレーションを実行するには、migrate Artisanコマンドを使います。Homesteadを使っている場合、ホストからは直接データベースへ接続できないため、このコマンドは仮想マシーンで実行してください。To run our migrations, we will use the migrate Artisan command. If you are using Homestead, you should run this command from within your virtual machine, since your host machine will not have direct access to the database:
php artisan migrate
このコマンドは全データベーステーブルを生成します。お好きなクライアントを使用し、データベーステーブルを調べてもらえば、マイグレーションで定義したカラムを含んだ新しいtasksとusersテーブルを見つけることができるでしょう。これでEloquent ORMモデルを定義する準備ができました!This command will create all of our database tables. If you inspect the database tables using the database client of your choice, you should see new tasks and users tables which contains the columns defined in our migration. Next, we're ready to define our Eloquent ORM models!
EloquentモデルEloquent Models
EloquentはLaravelのデフォルトORM(object-relational mapper)です。Eloquentは明確に定義された「モデル」を用いることで、苦労せずにデータベースへのデータ保存/取得を行わせてくれます。通常各Eloquentモデルは、一つのデータベーステーブルに対応します。Eloquent[/docs/{{version}}/eloquent] is Laravel's default ORM (object-relational mapper). Eloquent makes it painless to retrieve and store data in your database using clearly defined "models". Usually, each Eloquent model corresponds directly with a single database table.
UserモデルThe User Model
最初にusersデータベーステーブルに対応するモデルが必要です。しかしプロジェクトのappディレクトリーを探してもらえば、Laravelが最初からUserモデルを用意してあるのを発見するでしょう。ですから、自分で作成する必要はありません。First, we need a model that corresponds to our users database table. However, if you look in the app directory of your project, you will see that Laravel already ships with a User model, so we do not need to generate one manually.
TaskモデルThe Task Model
では、作ったばかりのtasksデータベーステーブルに対応するTaskモデルを定義してみましょう。このモデルを生成するために、再度Artisanコマンドを使用します。この場合はmake:modelコマンドを使用します。So, let's define a Task model that corresponds to our tasks database table we just created. Again, we can use an Artisan command to generate this model. In this case, we'll use the make:model command:
php artisan make:model Task
このモデルはアプリケーションのappディレクトリーに設置されます。デフォルトではこのクラスは空です。データベーステーブルはモデルの複数形の名前だと想定されているため、Eloquentモデルがどのテーブルに対応するかを明確に宣言する必要はありません。ですから、この場合Taskモデルはtasksデータベーステーブルと対応していると想定しています。The model will be placed in the app directory of your application. By default, the model class is empty. We do not have to explicitly tell the Eloquent model which table it corresponds to because it will assume the database table is the plural form of the model name. So, in this case, the Task model is assumed to correspond with the tasks database table.
このモデルにいくらか追加しましょう。最初にモデルに対し「複数代入」ができるようname属性を登録します。Let's add a few things to this model. First, we will state that the name attribute on the model should be "mass-assignable":
<?php

namespace App;

use Illuminate\Database\Eloquent\Model;

class Task extends Model
{
    /**
     * 複数代入する属性
     *
     * @var array
     */
    protected $fillable = ['name'];
}
アプリケーションにルートを追加してから、Eloquentモデルについて更に学びましょう。もちろん、ご自由にEloquentの完全なドキュメントを読んで、更に情報を学んでもかまいません。We'll learn more about how to use Eloquent models as we add routes to our application. Of course, feel free to consult the complete Eloquent documentation[/docs/{{version}}/eloquent] for more information.
EloquentリレーションEloquent Relationships
これでモデルが定義できましたので、関係づける必要があります。たとえばあるUserは複数のTaskインスタンスを所有することができます。一方、あるTaskは一つのUserに紐付けられます。関連付けを定義づけることにより、リレーションがスラスラと利用できるようになります。次のようにです。Now that our models are defined, we need to link them. For example, our User can have many Task instances, while a Task is assigned to one User. Defining a relationship will allow us to fluently walk through our relations like so:
$user = App\User::find(1);

foreach ($user->tasks as $task) {
	echo $task->name;
}
tasksのリレーションThe tasks Relationship
最初にUserモデルに対するtasksリレーションを定義付けましょう。Eloquentのリレーションはモデルのメソッドとして定義します。Eloquentは様々なタイプのリレーションをサポートしていますので、より詳細は完全なEloquentのドキュメントで確認してください。この場合は、Eloquentに用意されているhasManyメソッドを呼び出し、Userモデルに対するtasksメソッドを定義しています。First, let's define the tasks relationship on our User model. Eloquent relationships are defined as methods on models. Eloquent supports several different types of relationships, so be sure to consult the full Eloquent documentation[/docs/{{version}}/eloquent-relationships] for more information. In this case, we will define a tasks function on the User model which calls the hasMany method provided by Eloquent:
<?php

namespace App;

// 名前空間のインポート…

class User extends Model implements AuthenticatableContract,
                                    AuthorizableContract,
                                    CanResetPasswordContract
{
    use Authenticatable, Authorizable, CanResetPassword;

    // 他のEloquentプロパティー

    /**
     * 特定ユーザーの全タスク取得
     */
    public function tasks()
    {
        return $this->hasMany(Task::class);
    }
}
userのリレーションThe user Relationship
次に、Taskモデルに対するuserリレーションを定義しましょう。再度モデルのメソッドとしてリレーションを定義します。今回はEloquentの提供するbelongsToメソッドを使用してリレーションを定義付けます。Next, let's define the user relationship on the Task model. Again, we will define the relationship as a method on the model. In this case, we will use the belongsTo method provided by Eloquent to define the relationship:
<?php

namespace App;

use App\User;
use Illuminate\Database\Eloquent\Model;

class Task extends Model
{
    /**
     * 複数代入する属性
     *
     * @var array
     */
    protected $fillable = ['name'];

    /**
     * タスク所有ユーザーの取得
     */
    public function user()
    {
        return $this->belongsTo(User::class);
    }
}
すばらしい!これでリレーションは定義できました。コントローラーにとりかかりましょう!Wonderful! Now that our relationships are defined, we can start building our controllers!
ルーティングRouting
タスクリストアプリケーションの基本バージョンでは、routes.phpファイルの中で全ロジックをクロージャーにより定義しました。このアプリケーションではルートを系統立てるためにコントローラーを使用します。コントローラーにより、HTTPリクエスト処理ロジックを複数のファイルに分割できるので、より組織立てられます。In the basic version[/docs/{{version}}/quickstart] of our task list application, we defined all of our logic using Closures within our routes.php file. For the majority of this application, we will use controllers[/docs/{{version}}/controllers] to organize our routes. Controllers will allow us to break out HTTP request handling logic across multiple files for better organization.
ビューの表示Displaying A View
アプリケーションにやって来たゲストユーザーのためにシンプルなランディングページを表示する/ルートのみ、唯一クロージャーを使ってルート定義します。では、/ルートを書いてしまいましょう。このルートでは、「ウエルカム」ページのコンテンツのHTMLテンプレートを表示します。We will have a single route that uses a Closure: our / route, which will simply be a landing page for application guests. So, let's fill out our / route. From this route, we want to render an HTML template that contains the "welcome" page:
Laravelの全HTMLテンプレートはresources/viewsディレクトリーに設置されます。ルートからこれらのテンプレートの一つを返すためにviewヘルパが使えます。In Laravel, all HTML templates are stored in the resources/views directory, and we can use the view helper to return one of these templates from our route:
Route::get('/', function () {
	return view('welcome');
});
もちろんこのビューを実際に定義する必要があります。後ほど行いましょう!Of course, we need to actually define this view. We'll do that in a bit!
認証Authentication
ユーザーにアカウントを作ってもらい、アプリケーションにログインしてもらう必要があることを思い出してください。通常、Webアプリケーションに認証レイヤー全体を組み込むのは退屈な仕事です。しかし、こうした共通したニーズに対し、Laravelは全く苦労なしに実現できるように努力しています。Remember, we also need to let users create accounts and login to our application. Typically, it can be a tedious task to build an entire authentication layer into a web application. However, since it is such a common need, Laravel attempts to make this procedure totally painless.
既にapp/Http/Controllers/Auth/AuthControllerがLaravelアプリケーションに用意されていることに注目しましょう。このコントローラーはユーザーを作成したり、認証したりするのに必要なロジックを全部含んでいる、特別なAuthenticatesAndRegistersUsersトレイトを使用しています。First, notice that there is already a app/Http/Controllers/Auth/AuthController included in your Laravel application. This controller uses a special AuthenticatesAndRegistersUsers trait which contains all of the necessary logic to create and authenticate users.
認証ルートAuthentication Routes
では、残りは何を行えばよいのでしょうか?そうですね…まだ登録とログインのテンプレートを作成する必要がありますし、同時に認証コントローラーを実行できるようにルートを定義しなくてはなりません。最初にapp/Http/routes.phpへルートを追加しましょう。So, what's left for us to do? Well, we still need to create the registration and login templates as well as define the routes to point to the authentication controller. First, let's add the routes we need to our app/Http/routes.php file:
// 認証ルート…
Route::get('auth/login', 'Auth\AuthController@getLogin');
Route::post('auth/login', 'Auth\AuthController@postLogin');
Route::get('auth/logout', 'Auth\AuthController@getLogout');

// 登録ルート…
Route::get('auth/register', 'Auth\AuthController@getRegister');
Route::post('auth/register', 'Auth\AuthController@postRegister');
認証ビューAuthentication Views
認証を行うにはresources/views/authディレクトリーへlogin.blade.phpとregister.blade.phpを作成する必要があります。もちろん、これらのビューのデザインやスタイルは重要ではありませんが、最低でも基本的なフィールドは用意しなくてはなりません。Authentication requires us to create login.blade.php and register.blade.php within the resources/views/auth directory. Of course, the design and styling of these views is unimportant; however, they should at least contain some basic fields.
register.blade.phpファイルはname、email、password、password_confirmationフィールドを含むフォームを構成し、/auth/registerルートへPOSTする必要があります。The register.blade.php file should contain a form that includes name, email, password, and password_confirmation fields and makes a POST request to the /auth/register route.
login.blade.phpファイルはemailとpasswordフィールドのフォームを含み、/auth/loginへPOSTリクエストを送る必要があります。The login.blade.php file should contain a form that includes email and password fields and makes a POST request to /auth/login.
注意: これらのビューの完全なサンプルが必要であれば、アプリケーションの全コードはGitHubから入手できることを思い出してください。Note: If you would like to view complete examples for these views, remember that the entire application's source code is available on GitHub[https://github.com/laravel/quickstart-intermediate].
タスクコントローラーThe Task Controller
タスクを取得したり、保存したりする必要がありますので、新しいコントローラーをapp/Http/Controllersディレクトリーへ生成するArtisan CLIを使い、TaskControllerを作成しましょう。Since we know we're going to need to retrieve and store tasks, let's create a TaskController using the Artisan CLI, which will place the new controller in the app/Http/Controllers directory:
php artisan make:controller TaskController --plain
これでコントローラーが生成できました。続いてこのコントローラーを実行するルートをapp/Http/routes.phpファイルへスタブ(空の代用コード)として作成します。Now that the controller has been generated, let's go ahead and stub out some routes in our app/Http/routes.php file to point to the controller:
Route::get('/tasks', 'TaskController@index');
Route::post('/task', 'TaskController@store');
Route::delete('/task/{task}', 'TaskController@destroy');
全タスクルートの認証Authenticating All Task Routes
このアプリケーションのタスクルートは全て認証ユーザーだけにアクセスを許します。言い換えれば、タスクを作成するにはアプリケーションに「ログイン」している必要があります。ですから、タスクルートは認証済みユーザーのみアクセスできるように制限する必要があります。Laravelではミドルウェアを使えばあっという間です。For this application, we want all of our task routes to require an authenticated user. In other words, the user must be "logged into" the application in order to create a task. So, we need to restrict access to our task routes to only authenticated users. Laravel makes this a cinch using middleware[/docs/{{version}}/middleware].
コントローラーの全アクションに対して認証を要求するには、コントローラーのコンストラクターから、middlewareメソッドを呼び出します。利用可能な全ルートミドルウェアはapp/Http/Kernel.phpで定義されています。この場合、authミドルウェアをコントローラーの全アクションに対して適用します。To require an authenticated users for all actions on the controller, we can add a call to the middleware method from the controller's constructor. All available route middleware are defined in the app/Http/Kernel.php file. In this case, we want to assign the auth middleware to all actions on the controller:
<?php

namespace App\Http\Controllers;

use App\Http\Requests;
use Illuminate\Http\Request;
use App\Http\Controllers\Controller;

class TaskController extends Controller
{
    /**
     * 新しいコントローラーインスタンスの生成
     *
     * @return void
     */
    public function __construct()
    {
        $this->middleware('auth');
    }
}
レイアウトとビューの構築Building Layouts & Views
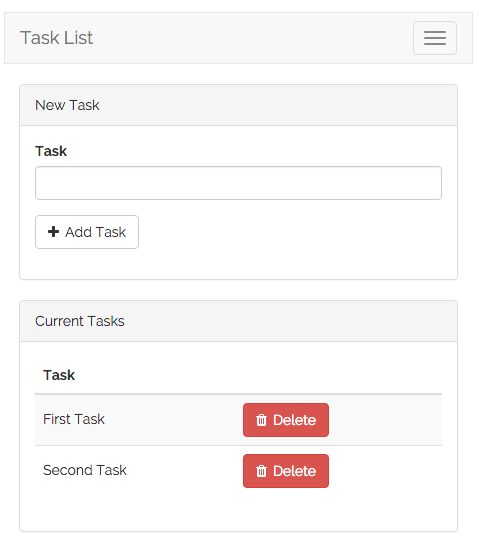
このアプリケーションは新しいタスクを追加するためのフォームを含み、同時に現在のタスクをリストするビューを一つだけ持ちます。ビューを想像するために役立つように、基本的なBootstrapのCSSスタイルを適用した、最終段階のアプリケーションのスナップショットをご覧ください。This application only has a single view which contains a form for adding new tasks as well as a listing of all current tasks. To help you visualize the view, here is a screenshot of the finished application with basic Bootstrap CSS styling applied:
レイアウトの定義Defining The Layout
ほとんど全てのアプリケーションでは同じレイアウトをページに渡り共有します。たとえばこのアプリケーションは全ページ(一つ以上のページが存在する場合)で表示する、典型的なトップナビバーがあります。LaravelはBladeレイアウトを使い、こうしたページ間共通のフューチャーを簡単に共有できるようになっています。Almost all web applications share the same layout across pages. For example, this application has a top navigation bar that would be typically present on every page (if we had more than one). Laravel makes it easy to share these common features across every page using Blade layouts.
前に説明したように、Laravelの全ビューはresources/viewsに設置されます。ですから新しいレイアウトビューもresources/views/layouts/app.blade.phpとして定義します。.blade.php拡張子はビューを表示するときにBladeテンプレートエンジンを使用することをフレームワークへ指示します。もちろんLaravelでも普通のPHPテンプレートが使用できます。しかしBladeなら簡潔できれいなテンプレートを書くための便利なショートカットが利用できます。As we discussed earlier, all Laravel views are stored in resources/views. So, let's define a new layout view in resources/views/layouts/app.blade.php. The .blade.php extension instructs the framework to use the Blade templating engine[/docs/{{version}}/blade] to render the view. Of course, you may use plain PHP templates with Laravel. However, Blade provides convenient short-cuts for writing cleaner, terse templates.
app.blade.phpビューは以下のような構成になるでしょう。Our app.blade.php view should look like the following:
// resources/views/layouts/app.blade.php

<!DOCTYPE html>
<html lang="en">
	<head>
		<title>Laravel Quickstart - Intermediate</title>

		<!-- CSSJavaScript -->
	</head>

	<body>
		<div class="container">
			<nav class="navbar navbar-default">
				<!-- ナビバーの内容 -->
			</nav>
		</div>

		@yield('content')
	</body>
</html>
レイアウトの@yield('content')の部分に注目です。これはレイアウトを拡張する全部の子ページが、自身のコンテンツを親へ注入できる場所を指定するための特別なBladeディレクティブ(指定子)です。次に、このレイアウトを使用しメインコンテンツを表示する、子のビューを定義しましょう。Note the @yield('content') portion of the layout. This is a special Blade directive that specifies where all child pages that extend the layout can inject their own content. Next, let's define the child view that will use this layout and provide its primary content.
子ビューの定義Defining The Child View
素晴らしい。アプリケーションのレイアウトは完成しました。次に新しいタスクを作成するためのフォームと、存在する全タスクを同時に表示するビューを定義する必要があります。TaskControllerのindexメソッドに対応する、resources/views/tasks.blade.phpを定義しましょう。Great, our application layout is finished. Next, we need to define a view that contains a form to create a new task as well as a table that lists all existing tasks. Let's define this view in resources/views/tasks/index.blade.php, which will correspond to the index method in our TaskController.
Bootstrap CSSの定形コードを省いて、重要な部分に焦点を当てましょう。アプリケーションの完全なソースコードは、GitHubからダウンロードできることは覚えておいてください。We'll skip over some of the Bootstrap CSS boilerplate and only focus on the things that matter. Remember, you can download the full source for this application on GitHub[https://github.com/laravel/quickstart-intermediate]:
// resources/views/tasks/index.blade.php

@extends('layouts.app')

@section('content')

    <!-- Bootstrapの定形コード… -->

	<div class="panel-body">
        <!-- バリデーションエラーの表示 -->
		@include('common.errors')

		<!-- 新タスクフォーム -->
		<form action="/task" method="POST" class="form-horizontal">
			{{ csrf_field() }}

            <!-- タスク名 -->
			<div class="form-group">
				<label for="task-name" class="col-sm-3 control-label">Task</label>

				<div class="col-sm-6">
					<input type="text" name="name" id="task-name" class="form-control">
				</div>
			</div>

            <!-- タスク追加ボタン -->
			<div class="form-group">
				<div class="col-sm-offset-3 col-sm-6">
					<button type="submit" class="btn btn-default">
						<i class="fa fa-plus"></i> Add Task
					</button>
				</div>
			</div>
		</form>
	</div>

	<!-- TODO: 現在のタスク -->
@endsection
簡単な説明A Few Notes Of Explanation
先に進む前に、このテンプレートについて多少説明しましょう。最初に@extendsディレクティブにより、resources/views/layouts/app.blade.phpに定義したレイアウトを使用することをBladeに指示しています。@section('content')から@endsectionの間のコンテンツが、app.blade.phpレイアウトの中の@yield('content')ディレクティブの場所に挿入されます。Before moving on, let's talk about this template a bit. First, the @extends directive informs Blade that we are using the layout we defined at resources/views/layouts/app.blade.php. All of the content between @section('content') and @endsection will be injected into the location of the @yield('content') directive within the app.blade.php layout.
これでアプリケーションの基本レイアウトとビューが定義できました。続けてTaskControllerのindexメソッドから、このビューを返しましょう。Now we have defined a basic layout and view for our application. Let's go ahead and return this view from the index method of our TaskController:
/**
 * ユーザーの全タスクをリスト表示
 *
 * @param  Request  $request
 * @return Response
 */
public function index(Request $request)
{
	return view('tasks.index');
}
次に、フォーム入力を処理し、データベースに新しいタスクを追加するPOST /taskルートのコントローラーメソッドを追加しましょう。Next, we're ready to add code to our POST /task route's controller method to handle the incoming form input and add a new task to the database.
注意:
@include('common.errors)ディレクティブはresources/views/common/errors.blade.phpのテンプレートをロードします。このテンプレートは定義していませんが、すぐに行います!Note: The@include('common.errors')directive will load the template located atresources/views/common/errors.blade.php. We haven't defined this template, but we will soon!
タスク追加Adding Tasks
バリデーションValidation
これでビューにフォームが用意できましたので、フォームの入力の正当性を確認し(バリデーション)、新しいタスクを作成するTaskController@storeメソッドを追加しましょう。最初に、入力のバリデーションです。Now that we have a form in our view, we need to add code to our TaskController@store method to validate the incoming form input and create a new task. First, let's validate the input.
このフォームでは、nameフィールドの入力が必須で、内容が255文字以下であることを確認しましょう。バリデーションに失敗したら、ユーザーを/tasksのURLへリダイレクトし、同時に以前の入力とエラーをsessionへフラッシュデータとして保存します。For this form, we will make the name field required and state that it must contain less than 255 characters. If the validation fails, we want to redirect the user back to the /tasks URL, as well as flash the old input and errors into the session[/docs/{{version}}/session]:
/**
 * 新タスク作成
 *
 * @param  Request  $request
 * @return Response
 */
public function store(Request $request)
{
	$this->validate($request, [
		'name' => 'required|max:255',
	]);

	// タスクの作成…
}
基本のクイックスタートを行っているなら、このバリデーションコードは全く異なっていることに気がつくでしょう!コントローラーを使っていますので、Laravelのベースコントローラーで取り込んでいるValidatesRequestsトレイトの機能を活用できます。このトレイトはリクエストと配列のバリデーションルールを引数に取る、シンプルなvalidateメソッドを提供しています。If you followed along with the basic quickstart[/docs/{{version}}/quickstart], you'll notice this validation code looks quite a bit different! Since we are in a controller, we can leverage the convenience of the ValidatesRequests trait that is included in the base Laravel controller. This trait exposes a simple validate method which accepts a request and an array of validation rules.
バリデーションが失敗したかとか、リダイレクトとかを自分で行う必要さえありません。指定したルールのバリデーションに失敗したら、ユーザーを自動的に直前のページヘリダイレクトし、エラーも自動的にセッションへフラッシュデーターとして保存されます!We don't even have to manually determine if the validation failed or do manual redirection. If the validation fails for the given rules, the user will automatically be redirected back to where they came from and the errors will automatically be flashed to the session. Nice!
$errors変数The $errors Variable
フォームのバリデーションエラーを表示するために@include('common.errors')ディレクティブをビューで使用したことを思い出してください。common.errorsによりバリデーションエラーを同じ形式で、全ページに渡り簡単に表示できるようにしています。このビューの内容を定義しましょう。Remember that we used the @include('common.errors') directive within our view to render the form's validation errors. The common.errors will allow us to easily show validation errors in the same format across all of our pages. Let's define the contents of this view now:
// resources/views/common/errors.blade.php

@if (count($errors) > 0)
    <!-- フォームのエラーリスト -->
    <div class="alert alert-danger">
        <strong>おや?何かがおかしいようです!</strong>

        <br><br>

        <ul>
            @foreach ($errors->all() as $error)
                <li>{{ $error }}</li>
            @endforeach
        </ul>
    </div>
@endif
注意:
$errors変数は全てのLaravelビューの中で参照できます。バリデーションエラーが存在しない場合は、ViewErrorBagの空のインスタンスです。Note: The$errorsvariable is available in every Laravel view. It will simply be an empty instance ofViewErrorBagif no validation errors are present.
タスク作成Creating The Task
これで入力のバリデーションは処理できました。新しいタスクを実際に作成するためにルート処理の定義を続けましょう。新しくタスクを生成したら、ユーザーを/tasksのURLへリダイレクトします。タスクを作成するために、Eloquentリレーションのパワーを活用しましょう。Now that input validation is handled, let's actually create a new task by continuing to fill out our route. Once the new task has been created, we will redirect the user back to the /tasks URL. To create the task, we are going to leverage the power of Eloquent's relationships.
ほとんどのLaravelリレーションではcreateメソッドが準備されます。このメソッドは属性の配列を受け取り、データベースへ保存する前に、関連するモデルの外部キー値を自動的に設定します。以下の場合、createメソッドは、$request->user()でアクセスできる現在の認証済みユーザのIDを指定したタスクのuser_idプロパティへ自動的に設定します。Most of Laravel's relationships expose a create method, which accepts an array of attributes and will automatically set the foreign key value on the related model before storing it in the database. In this case, the create method will automatically set the user_id property of the given task to the ID of the currently authenticated user, which we are accessing using $request->user():
/**
 * 新しいタスクの作成
 *
 * @param  Request  $request
 * @return Response
 */
public function store(Request $request)
{
    $this->validate($request, [
        'name' => 'required|max:255',
    ]);

    $request->user()->tasks()->create([
        'name' => $request->name,
    ]);

    return redirect('/tasks');
}
いいですね!これでタスクを作成できるようになりました。次に存在する全タスクをリストするビューを追加していきましょう。Great! We can now successfully create tasks. Next, let's continue adding to our view by building a list of all existing tasks.
既存タスク表示Displaying Existing Tasks
最初に、TaskController@indexメソッドを編集し、既存の全タスクをビューに渡しましょう。view関数は第2引数に、ビューで使用するデータを配列で受け付けます。配列のキーはビューの中で変数となります。たとえば次のように使用します。First, we need to edit our TaskController@index method to pass all of the existing tasks to the view. The view function accepts a second argument which is an array of data that will be made available to the view, where each key in the array will become a variable within the view. For example, we could do this:
/**
 * ユーザーの全タスクをリスト表示
 *
 * @param  Request  $request
 * @return Response
 */
public function index(Request $request)
{
	$tasks = Task::where('user_id', $request->user()->id)->get();

    return view('tasks.index', [
        'tasks' => $tasks,
    ]);
}
これでも動作しますが、全データアクセスに対して利用するTaskRepositoryをLaravelの依存注入能力を使い、TaskControllerに注入することにしましょう。However, let's explore some of the dependency injection capabilities of Laravel to inject a TaskRepository into our TaskController, which we will use for all of our data access.
依存注入Dependency Injection
Laravelのサービスコンテナはフレームワーク全体で最もパワフルな機能です。このクイックスタートを読んだ後、コンテナのドキュメントを全て読んでください。Laravel's service container[/docs/{{version}}/container] is one of the most powerful features of the entire framework. After reading this quickstart, be sure to read over all of the container's documentation.
リポジトリーの作成Creating The Repository
説明した通り、Taskモデルとの全アクセスロジックを持つ、TaskRepositoryを定義しましょう。これは特にアプリケーションが大きくなり、アプリケーション全体からEloquentクエリーを共有する必要が起きるようになると有効な手段です。As we mentioned earlier, we want to define a TaskRepository that holds all of our data access logic for the Task model. This will be especially useful if the application grows and you need to share some Eloquent queries across the application.
では、app/Repositoriesディレクトリーを作成し、TaskRepositoryクラスを追加しましょう。LaravelのappフォルダーはPSR-4オートロード規約に従いオートロードされますので、必要に応じていくらでも追加のフォルダーを作成できます。So, let's create an app/Repositories directory and add a TaskRepository class. Remember, all Laravel app folders are auto-loaded using the PSR-4 auto-loading standard, so you are free to create as many extra directories as needed:
<?php

namespace App\Repositories;

use App\User;
use App\Task;

class TaskRepository
{
    /**
     * 指定ユーザーの全タスク取得
     *
     * @param  User  $user
     * @return Collection
     */
    public function forUser(User $user)
    {
        return Task::where('user_id', $user->id)
                    ->orderBy('created_at', 'asc')
                    ->get();
    }
}
リポジトリーの注入Injecting The Repository
ポジトリーが定義できたら、TaskControllerのコンストラクターで「タイプヒント」するだけで、indexルートで活用できるようになります。Laravelは全コントローラーの依存解決にコンテナを使っていますので、依存はコントローラーインスタンスへ自動的に注入されます。Once our repository is defined, we can simply "type-hint" it in the constructor of our TaskController and utilize it within our index route. Since Laravel uses the container to resolve all controllers, our dependencies will automatically be injected into the controller instance:
<?php

namespace App\Http\Controllers;

use App\Task;
use App\Http\Requests;
use Illuminate\Http\Request;
use App\Http\Controllers\Controller;
use App\Repositories\TaskRepository;

class TaskController extends Controller
{
    /**
     * タスクリポジトリーインスタンス
     *
     * @var TaskRepository
     */
    protected $tasks;

    /**
     * 新しいコントローラーインスタンスの生成
     *
     * @param  TaskRepository  $tasks
     * @return void
     */
    public function __construct(TaskRepository $tasks)
    {
        $this->middleware('auth');

        $this->tasks = $tasks;
    }

    /**
     * ユーザーの全タスクをリスト表示
     *
     * @param  Request  $request
     * @return Response
     */
    public function index(Request $request)
    {
        return view('tasks.index', [
            'tasks' => $this->tasks->forUser($request->user()),
        ]);
    }
}
タスク表示Displaying The Tasks
データを渡したら、tasks/index.blade.phpビューの中でタスクを反復処理し、テーブルとして表示します。とても早く通常のPHPコードにコンパイルできる@foreach Blade構造文で簡単にループが記述できます。Once the data is passed, we can spin through the tasks in our tasks/index.blade.php view and display them in a table. The @foreach Blade construct allows us to write concise loops that compile down into blazing fast plain PHP code:
@extends('layouts.app')
@section('content')
<!-- タスクフォームの作成… -->
<!-- 現在のタスク -->
@if (count($tasks) > 0)
<div class="panel panel-default">
<div class="panel-heading">
現在のタスク
</div>
<div class="panel-body">
<table class="table table-striped task-table">
<!-- テーブルヘッダー -->
<thead>
<th>Task</th>
<th> </th>
</thead>
<!-- テーブルボディー -->
<tbody>
@foreach ($tasks as $task)
<tr>
<!-- タスク名 -->
<td class="table-text">
<div>{{ $task->name }}</div>
</td>
<td>
<!-- TODO: 削除ボタン -->
</td>
</tr>
@endforeach
</tbody>
</table>
</div>
</div>
@endif
@endsection
タスクアプリケーションはほとんど完成です。しかし、終了した既存タスクを削除する手段がありません。次に実装しましょう。Our task application is almost complete. But, we have no way to delete our existing tasks when they're done. Let's add that next!
タスク削除Deleting Tasks
削除ボタンの追加Adding The Delete Button
コード中、削除ボタンを設置する場所に"TODO"を残してあります。では、tasks/index.blade.phpビューのタスクリストの各行に、削除ボタンを追加しましょう。小さなボタンひとつのフォームをリストの各タスクごとに作成します。ボタンがクリックされると、DELETE /taskリクエストがアプリケーションに送信され、TaskController@destroyメソッドが起動されます。We left a "TODO" note in our code where our delete button is supposed to be. So, let's add a delete button to each row of our task listing within the tasks/index.blade.php view. We'll create a small single-button form for each task in the list. When the button is clicked, a DELETE /task request will be sent to the application which will trigger our TaskController@destroy method:
<tr>
    <!-- タスク名 -->
    <td class="table-text">
        <div>{{ $task->name }}</div>
    </td>

    <!-- 削除ボタン -->
    <td>
        <form action="/task/{{ $task->id }}" method="POST">
            {{ csrf_field() }}
            {{ method_field('DELETE') }}

            <button>タスク削除</button>
        </form>
    </td>
</tr>
見せかけのメソッドの説明A Note On Method Spoofing
削除ボタンフォームのmethodがPOSTを使用しているのにかかわらず、定義しているルートはRoute::deleteである点に注目です。HTMLフォームはGETとPOST HTTP動詞のみを許しています。そのため、フォームのDELETEリクエストを見せかける手段が必要になります。Note that the delete button's form method is listed as POST, even though we are responding to the request using a Route::delete route. HTML forms only allow the GET and POST HTTP verbs, so we need a way to spoof a DELETE request from the form.
フォームの中でmethod_field('DELETE')関数の結果を出力しています。この関数は、Laravelで認識され、実際のHTTPリクエストメソッドをオーバーライドする隠しフォーム入力を生成します。生成されるフィールドは次の内容です。We can spoof a DELETE request by outputting the results of the method_field('DELETE') function within our form. This function generates a hidden form input that Laravel recognizes and will use to override the actual HTTP request method. The generated field will look like the following:
<input type="hidden" name="_method" value="DELETE">
ルートモデル結合Route Model Binding
これでTaskControllerのdestroyメソッドを定義する準備が整いました。しかし、最初にこのルート定義を見てみましょう。Now, we're almost ready to define the destroy method on our TaskController. But, first, let's revisit our route declaration for this route:
Route::delete('/task/{task}', 'TaskController@destroy');
他に追加のコードを加えること無く、Laravelは指定されたタスクIDをTaskController@destroyメソッドへ、次のように注入できます。Without adding any additional code, Laravel would inject the given task ID into the TaskController@destroy method, like so:
/**
 * 指定タスクの削除
 *
 * @param  Request  $request
 * @param  string  $taskId
 * @return Response
 */
public function destroy(Request $request, $taskId)
{
	//
}
しかしながらこの前に、このメソッドへ指定されたIDを使いデータベースからTaskインスタンスを取得させる必要があります。最初の時点でLaravelがIDの一致するTaskインスタンスを注入してくれたら、素敵だと思いませんか?そうしましょう!However, the very first thing we will need to do in this method is retrieve the Task instance from the database using the given ID. So, wouldn't it be nice if Laravel could just inject the Task instance that matches the ID in the first place? Let's make it happen!
app/Providers/RouteServiceProvider.phpファイルのbootメソッドに、次のコードを追加してください。In your app/Providers/RouteServiceProvider.php file's boot method, let's add the following line of code:
$router->model('task', 'App\Task');
この僅かなコードで、ルート宣言に{task}があれば、いつでも指定されたIDに対応するTaskモデルを取得するようにLaravelへ指示しています。これにより、destroyメソッドは次のように定義できます。This small line of code will instruct Laravel to retrieve the Task model that corresponds to a given ID whenever it sees {task} in a route declaration. Now we can define our destroy method like so:
/**
 * 指定タスクの削除
 *
 * @param  Request  $request
 * @param  Task  $task
 * @return Response
 */
public function destroy(Request $request, Task $task)
{
    //
}
認可Authorization
これでTaskインスタンスはdestroyメソッドへ注入できました。しかし、認証済みのユーザーが指定したタスクを「所有」している保証はありません。たとえば他のユーザーのタスクを削除するために/tasks/{task}のURLへランダムなタスクIDを渡すことで、悪意のあるリクエストを仕込むことが可能です。そこでルートに注入されたTaskインスタンスが実際に認証済みユーザーが所有していることを確認するため、Laravelの認可機能を使う必要があります。Now, we have a Task instance injected into our destroy method; however, we have no guarantee that the authenticated user actually "owns" the given task. For example, a malicious request could have been concocted in an attempt to delete another user's tasks by passing a random task ID to the /tasks/{task} URL. So, we need to use Laravel's authorization capabilities to make sure the authenticated user actually owns the Task instance that was injected into the route.
ポリシーCreating A Policy
認証ロジックを単純で小さなクラスへ系統立てるため、Laravelは「ポリシー」を使っています。通常、各ポリシーはモデルに対応しています。では、Artisan CLIを使いTaskPolicyを作成しましょう。app/Policies/TaskPolicy.phpとして生成されます。Laravel uses "policies" to organize authorization logic into simple, small classes. Typically, each policy corresponds to a model. So, let's create a TaskPolicy using the Artisan CLI, which will place the generated file in app/Policies/TaskPolicy.php:
php artisan make:policy TaskPolicy
次にdestroyメソッドをポリシーへ追加します。このメソッドはUserインスタンスとTaskインスタンスを引数に取ります。このメソッドはシンプルにユーザーのIDがタスクのuser_idと一致するかを調べるだけです。実際、全ポリシーメソッドはtrueかfalseを返す必要があります。Next, let's add a destroy method to the policy. This method will receive a User instance and a Task instance. The method should simply check if the user's ID matches the user_id on the task. In fact, all policy methods should either return true or false:
<?php

namespace App\Policies;

use App\User;
use App\Task;
use Illuminate\Auth\Access\HandlesAuthorization;

class TaskPolicy
{
    use HandlesAuthorization;

    /**
     * 指定されたユーザーが指定されたタスクを削除できるか決定
     *
     * @param  User  $user
     * @param  Task  $task
     * @return bool
     */
    public function destroy(User $user, Task $task)
    {
        return $user->id === $task->user_id;
    }
}
最後にTaskモデルをTaskPolicyと関連付ける必要があります。app/Providers/AuthServiceProvider.phpファイルの$policiesプロパティに一行加えることで可能です。これによりTaskインスタンスに対するアクションを認可したい場合に毎回使われるべきポリシーをLaravelに指定しています。Finally, we need to associate our Task model with our TaskPolicy. We can do this by adding a line in the app/Providers/AuthServiceProvider.php file's $policies property. This will inform Laravel which policy should be used whenever we try to authorize an action on a Task instance:
/**
 * アプリケーションにマップするポリシー
 *
 * @var array
 */
protected $policies = [
    Task::class => TaskPolicy::class,
];
アクションの認可Authorizing The Action
これでポリシーが書き上がりましたので、destroyメソッドで使用しましょう。Laravelの全コントローラーから、AuthorizesRequestトレイトにより提供されているauthorizeメソッドを呼び出せます。Now that our policy is written, let's use it in our destroy method. All Laravel controllers may call an authorize method, which is exposed by the AuthorizesRequest trait:
/**
 * 指定タスクの削除
 *
 * @param  Request  $request
 * @param  Task  $task
 * @return Response
 */
public function destroy(Request $request, Task $task)
{
    $this->authorize('destroy', $task);

    // タスクの削除…
}
このメソッド呼び出しを少し調べてみましょう。authorizeメソッド最初の引数は、呼び出したいポリシーメソッドの名前です。2つ目の引数は現在関心を向けているモデルインスタンスです。現在TaskPolicyに関連付けたTaskモデルについてLaravelに語りかけているわけですから、フレームワークはどのポリシーのdestroyメソッドを起動すればよいのか理解しています。現在のユーザーは自動的にポリシーメソッドに送られますので、わざわざ渡す必要はありません。Let's examine this method call for a moment. The first argument passed to the authorize method is the name of the policy method we wish to call. The second argument is the model instance that is our current concern. Remember, we recently told Laravel that our Task model corresponds to our TaskPolicy, so the framework knows on which policy to fire the destroy method. The current user will automatically be sent to the policy method, so we do not need to manually pass it here.
アクションが許可されたら、コードは通常通り続けられます。しかし、アクションが非許可になれば(つまりポリシーのdestroyメソッドがfalseを返したら)、403例外が投げられ、ユーザーにエラーページが表示されます。If the action is authorized, our code will continue executing normally. However, if the action is not authorized (meaning the policy's destroy method returned false), a 403 exception will be thrown and an error page will be displayed to the user.
注意: Laravelが提供する認可サービスを取り扱う方法は、他にもたくさんあります。認可のドキュメントを十分に読んでください。Note: There are several other ways to interact with the authorization services Laravel provides. Be sure to browse the complete authorization documentation[/docs/{{version}}/authorization].
タスク削除Deleting The Task
最後に、指定したタスクを実際に削除するロジックをdestroyメソッドに付け加え、完成させましょう。データベースから指定したモデルインスタンスを削除するには、deleteEloquentのdeleteメソッドを使います。レコードを削除したら、ユーザーを/tasksのURLへリダイレクトします。Finally, let's finish adding the logic to our destroy method to actually delete the given task. We can use Eloquent's delete method to delete the given model instance in the database. Once the record is deleted, we will redirect the user back to the /tasks URL:
/**
 * 指定タスクの削除
 *
 * @param  Request  $request
 * @param  Task  $task
 * @return Response
 */
public function destroy(Request $request, Task $task)
{
    $this->authorize('destroy', $task);

    $task->delete();

    return redirect('/tasks');
}