イントロダクションIntroduction
メール送信に加え、LaravelはSMS(Nexmo使用)、Slackなどの、さまざまな複数チャンネルへ渡る通知をサポートしています。通知はWebインターフェイスで表示できるように、データバースに保存することもできます。In addition to support for sending email[/docs/{{version}}/mail], Laravel provides support for sending notifications across a variety of delivery channels, including mail, SMS (via Nexmo[https://www.nexmo.com/]), and Slack[https://slack.com]. Notifications may also be stored in a database so they may be displayed in your web interface.
通常、通知はアプリケーションで何かが起きたことをユーザへ知らせる、短い情報メッセージです。たとえば、課金アプリを作成しているなら、メールとSMSチャンネルで「課金支払い」を送信できます。Typically, notifications should be short, informational messages that notify users of something that occurred in your application. For example, if you are writing a billing application, you might send an "Invoice Paid" notification to your users via the email and SMS channels.
通知の作成Creating Notifications
Laravelの各通知は、(通常、app/Notificationsディレクトリに設置される)クラスにより表されます。このディレクトリがアプリケーションで見つからなくても、心配ありません。make:notification Artisanコマンドを実行すると、作成されます。In Laravel, each notification is represented by a single class (typically stored in the app/Notifications directory). Don't worry if you don't see this directory in your application, it will be created for you when you run the make:notification Artisan command:
php artisan make:notification InvoicePaid
このコマンドにより、真新しい通知クラスが、app/Notificationsディレクトリに生成されます。各通知クラスはviaメソッドと、特定のチャンネルに最適化したメッセージへ変換する、いくつかのメッセージ構築メソッド(toMail、toDatabaseなど)を含んでいます。This command will place a fresh notification class in your app/Notifications directory. Each notification class contains a via method and a variable number of message building methods (such as toMail or toDatabase) that convert the notification to a message optimized for that particular channel.
通知の送信Sending Notifications
Notifiableトレイトの使用Using The Notifiable Trait
通知は2つの方法で送信されます。Notifiableトレイトのnotifyメソッドか、Notificationファサードを使う方法です。最初に、Notifiableトレイトを見ていきましょう。このトレイトは、デフォルトのApp\Userモデルで使用されており、通知を送るためのnotifyメソッドを一つ含んでいます。notifyメソッドは通知インスタンスを受け取ります。Notifications may be sent in two ways: using the notify method of the Notifiable trait or using the Notification facade[/docs/{{version}}/facades]. First, let's examine the Notifiable trait. This trait is used by the default App\User model and contains one method that may be used to send notifications: notify. The notify method expects to receive a notification instance:
use App\Notifications\InvoicePaid;

$user->notify(new InvoicePaid($invoice));
">Tip!! みなさんのどんなモデルであっても、
Illuminate\Notifications\Notifiableトレイトを使えることを覚えておきましょう。使用はUserモデルだけに限定されているわけでありません。{tip} Remember, you may use theIlluminate\Notifications\Notifiabletrait on any of your models. You are not limited to only including it on yourUsermodel.
Notificationファサードの使用Using The Notification Facade
ほかに、Notificationファサードを使用し、通知を送る方法もあります。これは主にユーザコレクションのような、複数の通知可能エンティティに対し、通知する場合に便利です。ファサードを使い通知するには、sendメソッドへ通知可能エンティティ全部と、通知インスタンスを渡します。Alternatively, you may send notifications via the Notification facade[/docs/{{version}}/facades]. This is useful primarily when you need to send a notification to multiple notifiable entities such as a collection of users. To send notifications using the facade, pass all of the notifiable entities and the notification instance to the send method:
Notification::send($users, new InvoicePaid($invoice));
配信チャンネルの指定Specifying Delivery Channels
通知を配信するチャンネルを指定するため、すべての通知クラスはviaメソッドを持っています。通知はmail、database、broadcast、nexmo、slackへ送れるようになっています。Every notification class has a via method that determines on which channels the notification will be delivered. Out of the box, notifications may be sent on the mail, database, broadcast, nexmo, and slack channels.
">Tip!! TelegramやPusherのような、他の配信チャンネルを利用したい場合は、コミュニティが管理している、Laravel Notification Channels websiteをご覧ください。{tip} If you would like to use other delivery channels such as Telegram or Pusher, check out the community driven Laravel Notification Channels website[http://laravel-notification-channels.com].
viaメソッドは、通知を送っているクラスのインスタンスである、$notifiableインスタンスを引数に受け取ります。$notifiableを使い、通知をどこに配信するチャンネルなのかを判定することができます。The via method receives a $notifiable instance, which will be an instance of the class to which the notification is being sent. You may use $notifiable to determine which channels the notification should be delivered on:
/**
 * 通知の配信チャンネルを取得
 *
 * @param  mixed  $notifiable
 * @return array
 */
public function via($notifiable)
{
    return $notifiable->prefers_sms ? ['nexmo'] : ['mail', 'database'];
}
通知のキューイングQueueing Notifications
Note: 通知のキューイングを行う前に、キューを設定し、ワーカを起動する必要があります。{note} Before queueing notifications you should configure your queue and start a worker[/docs/{{version}}/queues].
通知の送信には時間が取られます。特にそのチャンネルが通知を配信するために、外部のAPIを呼び出す必要がある場合は特にです。アプリケーションのレスポンスタイムを向上させるには、クラスにShouldQueueインターフェイスと、Queueableトレイトを追加し、キューイングしましょう。このインターフェイスとトレイトは、make:notificationを使用して生成された全通知でインポート済みですから、すぐに通知クラスに追加できます。Sending notifications can take time, especially if the channel needs an external API call to deliver the notification. To speed up your application's response time, let your notification be queued by adding the ShouldQueue interface and Queueable trait to your class. The interface and trait are already imported for all notifications generated using make:notification, so you may immediately add them to your notification class:
<?php

namespace App\Notifications;

use Illuminate\Bus\Queueable;
use Illuminate\Notifications\Notification;
use Illuminate\Contracts\Queue\ShouldQueue;

class InvoicePaid extends Notification implements ShouldQueue
{
    use Queueable;

    // ...
}
ShouldQueueインターフェイスを通知クラスへ追加したら、通常通りに送信してください。LaravelはクラスのShouldQueueインターフェイスを見つけ、自動的に通知の配信をキューへ投入します。Once the ShouldQueue interface has been added to your notification, you may send the notification like normal. Laravel will detect the ShouldQueue interface on the class and automatically queue the delivery of the notification:
$user->notify(new InvoicePaid($invoice));
If you would like to delay the deliver of the notification, you may chain the delay method onto your notification instantiation:If you would like to delay the deliver of the notification, you may chain the delay method onto your notification instantiation:
$when = Carbon::now()->addMinutes(10);

$user->notify((new InvoicePaid($invoice))->delay($when));
メール通知Mail Notifications
メールメッセージのフォーマットFormatting Mail Messages
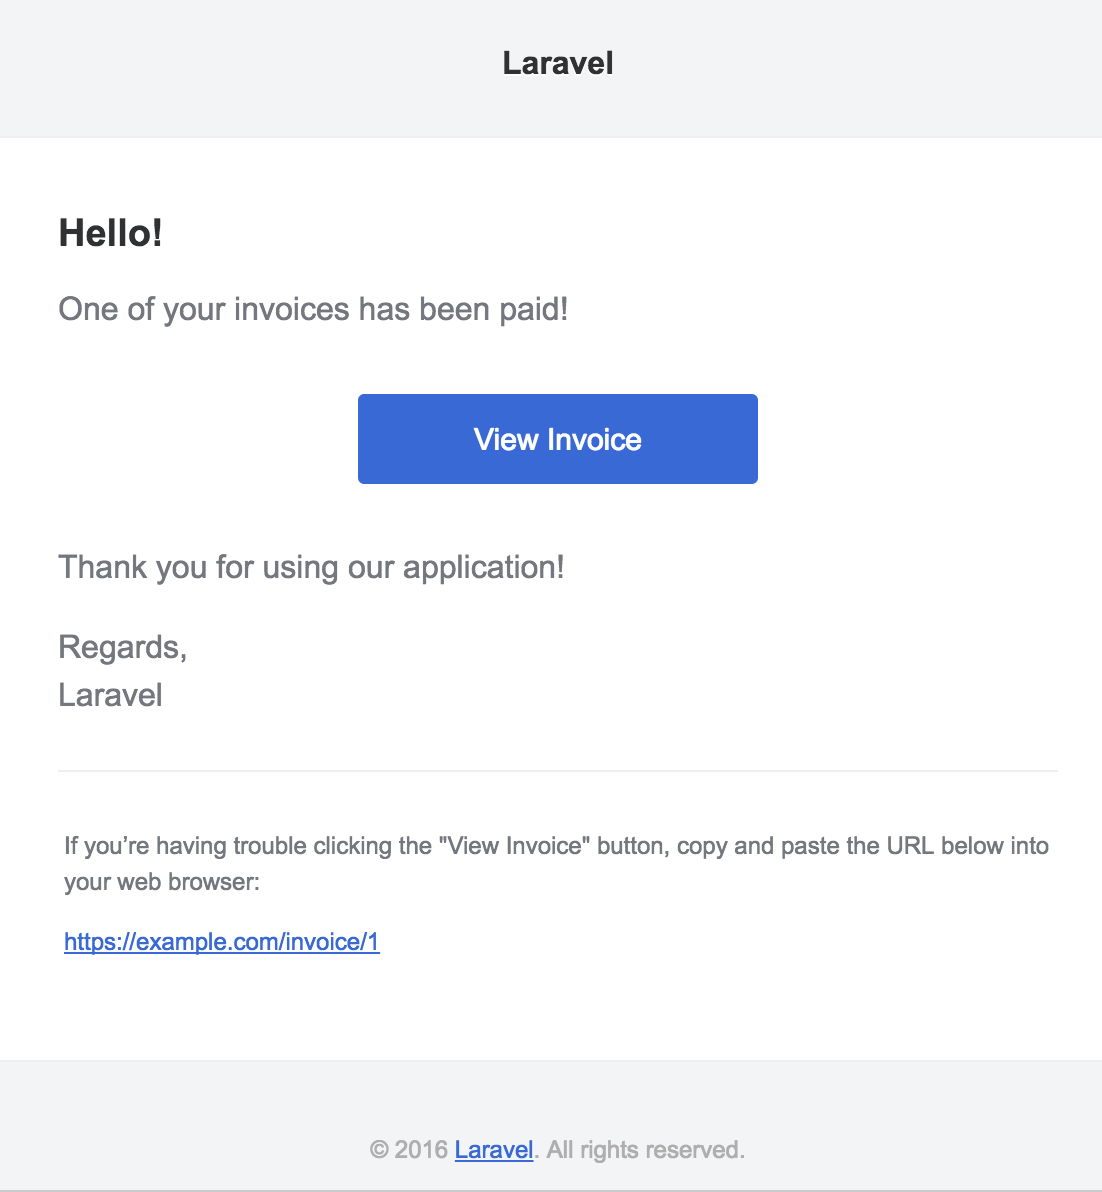
ある通知でメール送信をサポートする場合、通知クラスにtoMailメソッドを定義してください。このメソッドは、$notifiableエンティティを受け取り、Illuminate\Notifications\Messages\MailMessageインスタンスを返す必要があります。メールメッセージはテキスト行と、同時に"call to action"(アクションの呼び出し)を含むことでしょう。toMailメソッドの例を見てみましょう。If a notification supports being sent as an email, you should define a toMail method on the notification class. This method will receive a $notifiable entity and should return a Illuminate\Notifications\Messages\MailMessage instance. Mail messages may contains lines of text as well as a "call to action". Let's take a look at an example toMail method:
/**
 * 通知のメールプレゼンテーションを取得
 *
 * @param  mixed  $notifiable
 * @return \Illuminate\Notifications\Messages\MailMessage
 */
public function toMail($notifiable)
{
    $url = url('/invoice/'.$this->invoice->id);

    return (new MailMessage)
                ->greeting('Hello!')
                ->line('課金が支払われました。')
                ->action('インボイス確認', $url)
                ->line('私達のアプリケーションをご利用いただき、ありがとうございます。');
}
">Tip!!
messageメソッドの中で、$this->invoice->idを使っていることに注意してください。通知メッセージを生成するために必要な情報は、どんなものでも通知のコンストラクタへ渡せます。{tip} Note we are using$this->invoice->idin ourmessagemethod. You may pass any data your notification needs to generate its message into the notification's constructor.
この例では、挨拶、テキスト行、アクションの呼び出し、別のテキスト行を登録しています。これらのメソッドは、小さなトランザクションメールをシンプルで素早くフォーマットする、MailMessageオブジェクトが提供しています。メールチャンネルはテンプレートにより、メッセージの構成物をきれいでレスポンシブなHTMLメールへ、変換します。平文メールも用意されます。以下はmailチャンネルにより生成されたメールの例です。IIn this example, we register a greeting, a line of text, a call to action, and then another line of text. These methods provided by the MailMessage object make it simple and fast to format small transactional emails. The mail channel will then translate the message components into a nice, responsive HTML email template with a plain-text counterpart. Here is an example of an email generated by the mail channel:
">Tip!! メール通知を行うときは、
config/app.php設定ファイルのname値を確実に設定してください。この値は、メール通知メッセージのヘッダとフッタで使用されます。{tip} When sending mail notifications, be sure to set thenamevalue in yourconfig/app.phpconfiguration file. This value will be used in the header and footer of your mail notification messages.
受取人のカスタマイズCustomizing The Recipient
mailチャンネルを使い、通知を送る場合、通知システムは自動的にemailプロパティを通知エンティティを探します。通知を配信するために使用するメールアドレスをカスタマイズするには、エンティティに対しrouteNotificationForMailメソッドを定義してください。When sending notifications via the mail channel, the notification system will automatically look for an email property on your notifiable entity. You may customize which email address is used to deliver the notification by defining a routeNotificationForMail method on the entity:
<?php

namespace App;

use Illuminate\Notifications\Notifiable;
use Illuminate\Foundation\Auth\User as Authenticatable;

class User extends Authenticatable
{
    use Notifiable;

    /**
     * メールチャンネルに対する通知をルートする
     *
     * @return string
     */
    public function routeNotificationForMail()
    {
        return $this->email_address;
    }
}
件名のカスタマイズCustomizing The Subject
デフォルトのメール件名は、通知のクラス名を"title case"にフォーマットしたものです。ですから、InvoicePaidという通知クラス名は、Invoice Paidというメールの件名になります。メッセージの件名を明確に指定したい場合は、メッセージを構築時にsubjectメソッドを呼び出してください。By default, the email's subject is the class name of the notification formatted to "title case". So, if your notification class is named InvoicePaid, the email's subject will be Invoice Paid. If you would like to specify an explicit subject for the message, you may call the subject method when building your message:
/**
 * 通知のメールプレゼンテーションを取得
 *
 * @param  mixed  $notifiable
 * @return \Illuminate\Notifications\Messages\MailMessage
 */
public function toMail($notifiable)
{
    return (new MailMessage)
                ->subject('Notification Subject')
                ->line('...');
}
テンプレートのカスタマイズCustomizing The Templates
通知パッケージのリソースを公開(開発者が変更できる場所にリソースを用意することを示すLaravel用語)することにより、メール通知で使用されるHTMLと平文テキストのテンプレートを変更することが可能です。次のコマンドを実行した後、メール通知のテンプレートはresources/views/vendor/notificationsディレクトリ下に作成されます。You can modify the HTML and plain-text template used by mail notifications by publishing the notification package's resources. After running this command, the mail notification templates will be located in the resources/views/vendor/notifications directory:
php artisan vendor:publish --tag=laravel-notifications
エラーメッセージError Messages
ある通知はユーザへエラーを知らせます。たとえば、課金の失敗です。メールメッセージがエラーに関するものであることを知らせるためには、メッセージ構築時にerrorメソッドを呼び出します。errorメソッドをメールメッセージで使用すると、アクション呼び出しボタンが青の代わりに赤で表示されます。Some notifications inform users of errors, such as a failed invoice payment. You may indicate that a mail message is regarding an error by calling the error method when building your message. When using the error method on a mail message, the call to action button will be red instead of blue:
/**
 * 通知のメールプレゼンテーションを取得
 *
 * @param  mixed  $notifiable
 * @return \Illuminate\Notifications\Message
 */
public function toMail($notifiable)
{
    return (new MailMessage)
                ->error()
                ->subject('Notification Subject')
                ->line('...');
}
データベース通知Database Notifications
事前要件Prerequisites
database通知チャンネルは、通知情報をデータベーステーブルへ保存します。このテーブルは通知タイプのような情報と同時に、通知を説明するカスタムJSONデータを含みます。The database notification channel stores the notification information in a database table. This table will contain information such as the notification type as well as custom JSON data that describes the notification.
アプリケーションのユーザインターフェイスで通知を表示するために、テーブルをクエリすることができます。しかし、その前に通知を保存するデータベーステーブルを作成する必要があります。実際のテーブルスキーマのマイグレーションを生成するために、notifications:tableを使用してください。You can query the table to display the notifications in your application's user interface. But, before you can do that, you will need to create a database table to hold your notifications. You may use the notifications:table command to generate a migration with the proper table schema:
php artisan notifications:table

php artisan migrate
データベース通知のフォーマットFormatting Database Notifications
通知でデータベーステーブルへの保存をサポートする場合、通知クラスにtoDatabaseかtoArrayメソッドを定義する必要があります。このメソッドは$notifiableエンティティを受け取り、プレーンなPHP配列を返す必要があります。返された配列はJSONへエンコードされ、notificationsテーブルのdataカラムに保存されます。toArrayメソッドの例を見てみましょう。If a notification supports being stored in a database table, you should define a toDatabase or toArray method on the notification class. This method will receive a $notifiable entity and should return a plain PHP array. The returned array will be encoded as JSON and stored in the data column of your notifications table. Let's take a look at an example toArray method:
/**
 * 通知の配列プレゼンテーションの取得
 *
 * @param  mixed  $notifiable
 * @return array
 */
public function toArray($notifiable)
{
    return [
        'invoice_id' => $this->invoice->id,
        'amount' => $this->invoice->amount,
    ];
}
toDatabase Vs. toArraytoDatabase Vs. toArray
toArrayメソッドは、JavaScriptクライアントへどのデータをブロードキャストするかを決めるために、broadcastチャンネルでも使用されます。databaseとbroadcastチャンネルで、別々の配列プレゼンテーションを持ちたい場合は、toArrayメソッドの代わりに、toDatabaseメソッドを定義してください。The toArray method is also used by the broadcast channel to determine which data to broadcast to your JavaScript client. If you would like to have two different array representations for the database and broadcast channels, you should define a toDatabase method instead of a toArray method.
通知へのアクセスAccessing The Notifications
通知をデータベースへ保存したら、通知エンティティから便利にアクセスできる方法が必要になります。LaravelのデフォルトApp\Userモデルに含まれている、Illuminate\Notifications\Notifiableトレイトは、notifications Eloquentリレーションを含んでおり、そのエンティティの通知を返します。通知を取得するために、他のEloquentリレーションと同様に、このメソッドにアクセスできます。デフォルトで、通知はcreated_atタイムスタンプでソートされます。Once notifications are stored in the database, you need a convenient way to access them from your notifiable entities. The Illuminate\Notifications\Notifiable trait, which is included on Laravel's default App\User model, includes a notifications Eloquent relationship that returns the notifications for the entity. To fetch notifications, you may access this method like any other Eloquent relationship. By default, notifications will be sorted by the created_at timestamp:
$user = App\User::find(1);

foreach ($user->notifications as $notification) {
    echo $notification->type;
}
「未読」の通知のみを取得したい場合は、unreadNotificationsリレーションシップを使います。この場合も、通知はcreated_atタイムスタンプでソートされます。If you want to retrieve only the "unread" notifications, you may use the unreadNotifications relationship. Again, these notifications will be sorted by the created_at timestamp:
$user = App\User::find(1);

foreach ($user->unreadNotifications as $notification) {
    echo $notification->type;
}
">Tip!! 通知にJavaScriptクライアントからアクセスするには、現在のユーザのような、通知可能なエンティティに対する通知を返す、通知コントローラをアプリケーションに定義する必要があります。その後、JavaScriptクライエントから、コントローラのURIへHTTPリクエストを作成します。{tip} To access your notifications from your JavaScript client, you should define a notification controller for your application which returns the notifications for a notifiable entity, such as the current user. You may then make an HTTP request to that controller's URI from your JavaScript client.
Readとしての通知作成Marking Notifications As Read
通常、ユーザが閲覧したときに、その通知を「既読」とマークするでしょう。Illuminate\Notifications\Notifiableトレイトは、通知のデータベースレコード上にある、read_atカラムを更新するmarkAsReadメソッドを提供しています。Typically, you will want to mark a notification as "read" when a user views it. The Illuminate\Notifications\Notifiable trait provides a markAsRead method, which updates the read_at column on the notification's database record:
$user = App\User::find(1);

foreach ($user->unreadNotifications as $notification) {
    $notification->markAsRead();
}
各通知をループで処理する代わりに、markAsReadメソッドを通知コレクションへ直接使用できます。However, instead of looping through each notification, you may use the markAsRead method directly on a collection of notifications:
$user->unreadNotifications->markAsRead();
データベースから取得せずに、全通知に既読をマークするため、複数更新クエリを使用することもできます。You may also use a mass-update query to mark all of the notifications as read without retrieving them from the database:
$user = App\User::find(1);

$user->unreadNotifications()->update(['read_at' => Carbon::now()]);
もちろん、テーブルエンティティから通知を削除するために、deleteを使うこともできます。Of course, you may delete the notifications to remove them from the table entirely:
$user->notifications()->delete();
ブロードキャスト通知Broadcast Notifications
事前要件Prerequisites
ブロードキャスト通知の前に、Laravelのイベントブロードキャストサービスを設定し、慣れておく必要があります。イベントブロードキャストは、JavaScriptクライアント側で、サーバサイドで発行されたLaravelイベントに対処する方法を提供しています。Before broadcasting notifications, you should configure and be familiar with Laravel's event broadcasting[/docs/{{version}}/broadcasting] services. Event broadcasting provides a way to react to server-side fired Laravel events from your JavaScript client.
ブロードキャスト通知のフォーマットFormatting Broadcast Notifications
broadcastチャンネルは、リアルタイムでJavaScriptクライアントが通知を補足できるようにする、Laravelのイベントブロードキャストサービスを用い、通知をブロードキャストします。通知でブロードキャストをサポートする場合、通知クラスでtoBroadcastかtoArrayメソッドを定義する必要があります。このメソッドは$notifiableエンティティを受け取り、プレーンなPHP配列を返す必要があります。返される配列はJSONへエンコードされ、JavaScriptクライアントへブロードキャストされます。toArrayメソッドの例を見てみましょう。The broadcast channel broadcasts notifications using Laravel's event broadcasting[/docs/{{version}}/broadcasting] services, allowing your JavaScript client to catch notifications in realtime. If a notification supports broadcasting, you should define a toBroadcast or toArray method on the notification class. This method will receive a $notifiable entity and should return a plain PHP array. The returned array will be encoded as JSON and broadcast to your JavaScript client. Let's take a look at an example toArray method:
/**
 * 通知の配列プレゼンテーションの取得
 *
 * @param  mixed  $notifiable
 * @return array
 */
public function toArray($notifiable)
{
    return [
        'invoice_id' => $this->invoice->id,
        'amount' => $this->invoice->amount,
    ];
}
">Tip!! 指定したデータに付け加え、ブロードキャスト通知は、通知のクラス名を含んだ
typeフィールドも付加します。{tip} In addition to the data you specify, broadcast notifications will also contain atypefield containing the class name of the notification.
toBroadcast Vs. toArraytoBroadcast Vs. toArray
toArrayメソッドは、データベーステーブルへ保存するデータを決めるために、databaseチャンネルによっても使用されます。databaseとbroadcastチャンネルで、それぞれ異なった配列プレゼンテーションを持ちたい場合は、toArrayメソッドの代わりにtoBroadcastメソッドを定義してください。The toArray method is also used by the database channel to determine which data to store in your database table. If you would like to have two different array representations for the database and broadcast channels, you should define a toBroadcast method instead of a toArray method.
通知のリッスンListening For Notifications
プライベートチャンネルにブロードキャストされる通知は、{notifiable}.{id}命名規則に従いフォーマットされます。ですから、IDが1のApp\Userインスタンスを通知で送る場合、App.User.1プライベートチャンネルへブロードキャストされます。Laravel Echoを使用していれば、notificationヘルパメソッドを使い、チャンネルへの通知を簡単にリッスンできます。Notifications will broadcast on a private channel formatted using a {notifiable}.{id} convention. So, if you are sending a notification to a App\User instance with an ID of 1, the notification will be broadcast on the App.User.1 private channel. When using Laravel Echo[/docs/{{version}}/broadcasting], you may easily listen for notifications on a channel using the notification helper method:
Echo.private('App.User.' + userId)
    .notification((notification) => {
        console.log(notification.type);
    });
SMS通知SMS Notifications
事前要件Prerequisites
LaravelのSMS通知送信は、Nexmoを使用します。Nexmoにより通知を送れるようにする前に、nexmo/client Composerパッケージをインストールし、config/services.php設定ファイルへ設定オプションをいくつか追加する必要があります。参考例として、以下の設定をコピーしてください。Sending SMS notifications in Laravel is powered by Nexmo[https://www.nexmo.com/]. Before you can send notifications via Nexmo, you need to install the nexmo/client Composer package and add a few configuration options to your config/services.php configuration file. You may copy the example configuration below to get started:
'nexmo' => [
    'key' => env('NEXMO_KEY'),
    'secret' => env('NEXMO_SECRET'),
    'sms_from' => '15556666666',
],
sms_fromオプションはSMSメッセージを送る電話番号です。アプリケーションの電話番号は、Nexmoコントロールパネルで作成してください。The sms_from option is the phone number that your SMS messages will be sent from. You should generate a phone number for your application in the Nexmo control panel.
SMS通知のフォーマットFormatting SMS Notifications
SMSとしての通知をサポートするには、通知クラスにtoNexmoメソッドを定義する必要があります。このメソッドは$notifiableエンティティを受け取り、Illuminate\Notifications\Messages\NexmoMessageインスタンスを返す必要があります。If a notification supports being sent as a SMS, you should define a toNexmo method on the notification class. This method will receive a $notifiable entity and should return a Illuminate\Notifications\Messages\NexmoMessage instance:
/**
 * 通知のNexmo/SMSプレゼンテーションを取得する
 *
 * @param  mixed  $notifiable
 * @return NexmoMessage
 */
public function toNexmo($notifiable)
{
    return (new NexmoMessage)
                ->content('Your SMS message content');
}
"from"電話番号のカスタマイズCustomizing The "From" Number
config/services.phpファイルで指定した電話番号とは異なる番号から、通知を送りたい場合は、NexmoMessageインスタンスのfromメソッドを使用します。If you would like to send some notifications from a phone number that is different from the phone number specified in your config/services.php file, you may use the from method on a NexmoMessage instance:
/**
 * 通知のNexmo/SMSプレゼンテーションを取得する
 *
 * @param  mixed  $notifiable
 * @return NexmoMessage
 */
public function toNexmo($notifiable)
{
    return (new NexmoMessage)
                ->content('Your SMS message content')
                ->from('15554443333');
}
SMS通知のルート指定Routing SMS Notifications
nexmoチャンネルで通知を送るとき、通知システムは自動的にphone_number属性を通知可能エンティティの中で探します。通知を配信する電話番号をカスタマイズしたい場合は、エンティティでrouteNotificationForNexmoメソッドを定義してください。When sending notifications via the nexmo channel, the notification system will automatically look for a phone_number attribute on the notifiable entity. If you would like to customize the phone number the notification is delivered to, define a routeNotificationForNexmo method on the entity:
<?php

namespace App;

use Illuminate\Notifications\Notifiable;
use Illuminate\Foundation\Auth\User as Authenticatable;

class User extends Authenticatable
{
    use Notifiable;

    /**
     * Nexmoチャンネルへの通知をルートする
     *
     * @return string
     */
    public function routeNotificationForNexmo()
    {
        return $this->phone;
    }
}
Slack通知Slack Notifications
事前要件Prerequisites
Slackを通じ通知を送る場合、Guzzle HTTPライブラリをComposerでインストールする必要があります。Before you can send notifications via Slack, you must install the Guzzle HTTP library via Composer:
composer require guzzlehttp/guzzle
さらに、Slackチームの"Incoming Webhook"インテグレーションを設定する必要もあります。このインテグレーションは、Slack通知のルートを行う時に使用するURLを提供します。You will also need to configure an "Incoming Webhook" integration for your Slack team. This integration will provide you with a URL you may use when routing Slack notifications[#routing-slack-notifications].
Slack通知のフォーマットFormatting Slack Notifications
通知がSlackメッセージとしての送信をサポートする場合、通知クラスにtoSlackメソッドを定義する必要があります。このメソッドは$notifiableエンティティを受け取り、Illuminate\Notifications\Messages\SlackMessageインスタンスを返す必要があります。Slackメッセージはテキストと同時に、追加テキストのフォーマットか、フィールドの配列を「添付」として含みます。基本的なtoSlackの例を見てください。If a notification supports being sent as a Slack message, you should define a toSlack method on the notification class. This method will receive a $notifiable entity and should return a Illuminate\Notifications\Messages\SlackMessage instance. Slack messages may contain text content as well as an "attachment" that formats additional text or an array of fields. Let's take a look at a basic toSlack example:
/**
 * 通知のSlackプレゼンテーションを取得
 *
 * @param  mixed  $notifiable
 * @return SlackMessage
 */
public function toSlack($notifiable)
{
    return (new SlackMessage)
                ->content('One of your invoices has been paid!');
}
この例では、Slackへ一行のテキストを送っており、以下のようなメッセージが生成されます。In this example we are just sending a single line of text to Slack, which will create a message that looks like the following:

Slack添付Slack Attachments
Slackメッセージに「添付」を追加することもできます。添付はシンプルなテキストメッセージよりも、リッチなフォーマットのオプションを提供します。以下の例では、アプリケーションで起きた例外についてのエラー通知で、例外についての詳細情報を表示するリンクを含めています。You may also add "attachments" to Slack messages. Attachments provide richer formatting options than simple text messages. In this example, we will send an error notification about an exception that occurred in an application, including a link to view more details about the exception:
/**
 * 通知のSlackプレゼンテーションを取得
 *
 * @param  mixed  $notifiable
 * @return SlackMessage
 */
public function toSlack($notifiable)
{
    $url = url('/exceptions/'.$this->exception->id);

    return (new SlackMessage)
                ->error()
                ->content('Whoops! Something went wrong.')
                ->attachment(function ($attachment) use ($url) {
                    $attachment->title('Exception: File Not Found', $url)
                               ->content('File [background.jpg] was not found.');
                });
}
上の例は、次のようなSlackメッセージを生成します。The example above will generate a Slack message that looks like the following:

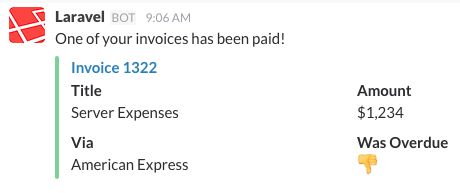
添付ではさらに、ユーザに対し表示すべきデータの配列を指定することもできます。指定したデータは簡単に読めるように、テーブルスタイルの形式で表示されます。Attachments also allow you to specify an array of data that should be presented to the user. The given data will be presented in a table-style format for easy reading:
/**
 * 通知のSlackプレゼンテーションを取得
 *
 * @param  mixed  $notifiable
 * @return SlackMessage
 */
public function toSlack($notifiable)
{
    $url = url('/invoices/'.$this->invoice->id);

    return (new SlackMessage)
                ->success()
                ->content('One of your invoices has been paid!')
                ->attachment(function ($attachment) use ($url) {
                    $attachment->title('Invoice 1322', $url)
                               ->fields([
                                    'Title' => 'Server Expenses',
                                    'Amount' => '$1,234',
                                    'Via' => 'American Express',
                                    'Was Overdue' => ':-1:',
                                ]);
                });
}
上の例は、以下のようなSlackメッセージを作成します。The example above will create a Slack message that looks like the following:
送信者と受信者のカスタマイズCustomizing The Sender & Recipient
fromとtoメソッドを使い、送信者と受信者のカスタマイズができます。fromメソッドはユーザ名と絵文字識別子を受け付け、toメソッドはチャンネルかユーザ名を受け取ります。You may use the from and to methods to customize the sender and recipient. The from method accepts a username and emoji identifier, while the to method accepts a channel or username:
/**
 * 通知のSlackプレゼンテーションを取得
 *
 * @param  mixed  $notifiable
 * @return SlackMessage
 */
public function toSlack($notifiable)
{
    return (new SlackMessage)
                ->from('Ghost', ':ghost:')
                ->to('#other')
                ->content('This will be sent to #other');
}
Slack通知のルート指定Routing Slack Notifications
実際の場所へSlack通知をルートするには、通知可能エンティティのrouteNotificationForSlackメソッドを定義します。これは通知が配送されるべきWebhook URLを返す必要があります。Webhook URLは、Slackチームの"Incoming Webhook"サービスを追加することにより、作成されます。To route Slack notifications to the proper location, define a routeNotificationForSlack method on your notifiable entity. This should return the webhook URL to which the notification should be delivered. Webhook URLs may be generated by adding an "Incoming Webhook" service to your Slack team:
<?php

namespace App;

use Illuminate\Notifications\Notifiable;
use Illuminate\Foundation\Auth\User as Authenticatable;

class User extends Authenticatable
{
    use Notifiable;

    /**
     * Slackチャンネルに対する通知をルートする
     *
     * @return string
     */
    public function routeNotificationForSlack()
    {
        return $this->slack_webhook_url;
    }
}
通知イベントNotification Events
通知が送信されると、Illuminate\Notifications\Events\NotificationSentイベントが、通知システムにより発行されます。これには「通知可能」エンティティと通知インスンタンス自身が含まれます。このイベントのリスナは、EventServiceProviderで登録します。When a notification is sent, the Illuminate\Notifications\Events\NotificationSent event is fired by the notification system. This contains the "notifiable" entity and the notification instance itself. You may register listeners for this event in your EventServiceProvider:
/**
 * The event listener mappings for the application.
 *
 * @var array
 */
protected $listen = [
    'Illuminate\Notifications\Events\NotificationSent' => [
        'App\Listeners\LogNotification',
    ],
];
">Tip!!
EventServiceProviderでリスナを登録した後に、event:generateArtisanコマンドを使うと、リスナークラスが素早く生成できます。{tip} After registering listeners in yourEventServiceProvider, use theevent:generateArtisan command to quickly generate listener classes.
イベントリスナーの中で、通知受取人や通知自身について調べるために、そのイベントのnotifiable、notification、channelプロパティにアクセスできます。Within an event listener, you may access the notifiable, notification, and channel properties on the event to learn more about the notification recipient or the notification itself:
/**
 * Handle the event.
 *
 * @param  NotificationSent  $event
 * @return void
 */
public function handle(NotificationSent $event)
{
    // $event->channel
    // $event->notifiable
    // $event->notification
}
カスタムチャンネルCustom Channels
Laravelはいくつかの通知チャンネルを用意していますが、他のチャンネルを使用し通知を配信するために、独自のドライバーを書くこともあるでしょう。Laravelでは、これも簡単です。手始めに、sendメソッドを含むクラスを定義しましょう。このメソッドは$notifiableと $notificationの、2引数を受け取ります。Laravel ships with a handful of notification channels, but you may want to write your own drivers to deliver notifications via other channels. Laravel makes it simple. To get started, define a class that contains a send method. The method should receive two arguments: a $notifiable and a $notification:
<?php

namespace App\Channels;

use Illuminate\Notifications\Notification;

class VoiceChannel
{
    /**
     * 指定された通知の送信
     *
     * @param  mixed  $notifiable
     * @param  \Illuminate\Notifications\Notification  $notification
     * @return void
     */
    public function send($notifiable, Notification $notification)
    {
        $message = $notification->toVoice($notifiable);

        // 通知を$notifiableインスタンスへ送信する…
    }
}
通知チャンネルクラスが定義できたら、通知のviaメソッドから、クラス名をただ返すだけです。Once your notification channel class has been defined, you may simply return the class name from the via method of any of your notifications:
<?php

namespace App\Notifications;

use Illuminate\Bus\Queueable;
use App\Channels\VoiceChannel;
use App\Channels\Messages\VoiceMessage;
use Illuminate\Notifications\Notification;
use Illuminate\Contracts\Queue\ShouldQueue;

class InvoicePaid extends Notification
{
    use Queueable;

    /**
     * 通知チャンネルの取得
     *
     * @param  mixed  $notifiable
     * @return array|string
     */
    public function via($notifiable)
    {
        return [VoiceChannel::class];
    }

    /**
     * 通知の音声プレゼンテーションを取得
     *
     * @param  mixed  $notifiable
     * @return VoiceMessage
     */
    public function toVoice($notifiable)
    {
        // ...
    }
}